
Manage Your Order / Professional Configurator
The professional configurator is divided into 3 parts:
- Left side - this section contains settings for:
- collections
- configurations
- colors
- mullions
- construction properties
- double-glazed units
- additional items
- Right side - this section contains settings for:
- order name
- editing the validity period of the offer
- deleting the order
- changing the website user
- changing statuses
- adding/editing tags
- editing/adding calculation options
- editing production timeframes
- pricing - discounts, taxes, services, currencies
- payment invoices
- changing/editing the client
- changing/editing additional order information
- creating/synchronizing manufacturer/client orders
- changing/editing the manager
- message exchange with the client
- generating/configuring/sending PDF quotations
- link to the online quotation
- Central part - this section contains settings for:
- adding new constructions
- editing construction names
- deleting a construction
- adding/editing openings and mullions for the construction
- editing construction dimensions
- description and editing of price and quantity of the construction
Change collection
To change the collection, click the blue pencil ![]() on the right side of the Collection block, next to the collection name. After that, a collection selection modal window will open, where:
on the right side of the Collection block, next to the collection name. After that, a collection selection modal window will open, where:
- Search by name - a field for searching a collection by its name
- Collection type - collections can be divided into 2 types:
- My collections - if you are a manufacturer or have your own active collections, they will be displayed in this section
- Partner's collections - if you are a dealer and a manufacturer has provided you with their collections, they will be displayed in this section
- Collection card - the collection card consists of:
- Image
- Collection name
- Price (if the system cannot calculate the price for this construction, the label Price on request will be displayed)
- Collection characteristics information - to view it, click the icon
 , after which a modal window with the description will appear
 - Number of profile chambers
- Material
- Glazing
Please note! When adding new constructions to an order, by default the collection of the first construction is used
Construction properties
To edit, click the blue pencil ![]() on the right side of the block, after which a modal window with the following parameters will appear:
on the right side of the block, after which a modal window with the following parameters will appear:
- U-value heat transfer coefficient (according to DIN)
- U-value heat transfer coefficient (for the USA) — this coefficient is intended for the American market (imperial measurement system), its unit of measurement is: Btu/hr*ft2*F.
- R-value thermal resistance coefficient
- SHGC — the solar heat gain coefficient of the construction, accepts values from 0 to 1. Indicates the amount of solar radiation passing through the construction into the room
- Weight (in kilograms) — accepts a numeric value up to hundredths (100.99)
Please note! The R and U coefficients are inversely proportional, and when one value changes, the other is recalculated. U (for the USA) is recalculated relative to the U value
Construction colors
In the Construction Colors block, information about the following colors is displayed:
- Exterior color
- Inside color
- Color of the base
- Gasket or sealant color
To edit the colors, click the blue pencil ![]() in the top-right corner of the block, after which a modal window with the following settings will open:
in the top-right corner of the block, after which a modal window with the following settings will open:
- Bilateral — allows configuring the profile color for both the interior and exterior sides (in this mode, the base and seal color settings are unavailable; these colors are taken from the collection’s default parameters, подробнее ➤ here)
- External — allows configuring the profile color for the exterior side (in this mode, the base and seal color settings are unavailable; these colors are taken from the collection’s default parameters, подробнее ➤ here); in this case, the interior color will use the default value
- Internal — allows configuring the profile color for the interior side (in this mode, the base and seal color settings are unavailable; these colors are taken from the collection’s default parameters, подробнее ➤ here); in this case, the exterior color will use the default value
- Settings — allows selecting separate profile colors for the exterior and interior sides, as well as individual colors for the base and the seal.
To change a color, click the element name, after which the color selection modal window will open (more details about collection color settings ➤ here), where:
- Selected — displays the image of the current color (hovering over it will show the color name)
- Filter by application technology — filters colors by application technology. By default, the filter shows all colors.
- Search by name — searches for colors by name
- Color album name (more details about color settings ➤ here) — to view available colors, click the album name, after which the list will expand.
To select a color, click on the desired color, after which a blue checkmark will appear on the selected color, then click the Select button. The modal window will close, and the element color will change to the selected one.
To apply the selected color(s) to the order, click the Select button.
Transom bars and mullions
The Transom bars and mullions block displays the following information:
- Mullion name
- Mullion length (depending on the measurement system settings — in meters or feet)
To edit, click the blue pencil ![]() in the top-right corner of the block, after which a modal window will open containing:
in the top-right corner of the block, after which a modal window will open containing:
- An image of the construction with the mullion location highlighted. If there are multiple mullions in the construction, click the card below to view the required one.
- Mullion card, which contains:
- Image
- Name
- Information button
 — clicking it opens a modal window with an enlarged image and description of the mullion
 - Price per meter (or per foot if the measurement system uses inches)
- Change button — clicking it opens a modal window with available mullions for selection. The modal window contains the following information:
- Current mullion card
- List of manufacturers — clicking on a manufacturer displays the list of available mullions
- Mullion cards.
A mullion card consists of:- Image
- Name
- Information button — clicking it opens a modal window with an enlarged image and description of the mullion
- Manufacturer country (if such information is available for the mullion)
- Main material (if such information is available for the mullion)
- Color
To change the mullion, click the required card and press the Select button
- Change all button — if the construction contains more than one mullion, all mullions can be replaced at once by clicking this button and selecting the required one from the list in the modal window. The modal window has the same functionality as when changing a single mullion, except for the current mullion image.
- Return to order button — closes the modal window leaving the mullions unchanged. The modal window can also be closed using the X close icon in the top-right corner of the window.
Glazing
The Glazing block displays information about the current insulated glass units and contains:
- Insulated glass unit name
- Height × Width in millimeters (if the imperial measurement system is selected — in inches)
- Area of the insulated glass unit in square meters (if the imperial measurement system is selected — in square feet)
To edit insulated glass units, click the blue pencil ![]() to the right of the name, after which a modal window will open containing:
to the right of the name, after which a modal window will open containing:
- An image of the construction with the insulated glass unit location highlighted. If there are multiple insulated glass units in the construction, click the card below to view the required one.
- Insulated glass unit card, which contains:
- Image
- Name
- Information button — clicking it opens a modal window with an enlarged image and description
- Price per meter (or per foot if the measurement system uses inches)
- Change button — clicking it opens a modal window with available insulated glass units for selection. The modal window contains the following information:
- Current insulated glass unit card
- Filters with the following parameters:
- Category
- Gas filling
- Ug
- Warm edge spacer
- Sound-insulating glazing
- Solar control glazing
- Safety glazing
- Decorative glass
- Sorting
- Insulated glass unit cards. An insulated glass unit card consists of:
- Image and insulated glass unit thickness displayed on it (in millimeters or inches depending on the measurement system settings)
- Name
- Information button — clicking it opens a modal window with an enlarged image and description
- Insulated glass unit type (number of panes)
- Insulated glass unit thickness (in millimeters or inches depending on the measurement system settings)
- Spacer type
To change the insulated glass unit, click the required card and press the Select button
- Change all button — if the construction contains more than one insulated glass unit, all insulated glass units can be replaced at once by clicking this button and selecting the required one from the list in the modal window.
To add glazing bars, click the Add button in the top-right corner of the block, after which a modal window will open containing:
- Search by name
- Category filter
- Table with available elements, consisting of:
- Selection field
- Element name
- Subcategory name
- Price per meter (or per foot if the measurement system uses inches)
- Quantity field. The quantity can be entered manually by typing the required number into the field, or by using the + and - buttons.
- Information button
 — clicking it opens a modal window with an image and description
Please note! Multiple positions of this element can be selected by checking the required selection fields.
Please note! When the selection field is checked, the element quantity is automatically set to 1.
To add the selected elements to the order, click the Select button
Hardware
Hardware is available only in constructions with opening functionality.
The block displays the following information:
- Hardware subcategory
- Name
- Dimensions
- Blue pencil
 - for editing the element
 - Quantity of elements
To edit an element, click the blue pencil ![]() to the right of the element name, after which a modal window will open containing:
to the right of the element name, after which a modal window will open containing:
- Construction image.
- Element card, which contains:
- Image
- Name
- Information button — clicking it opens a modal window with an enlarged image and description
- Price per piece
- Change button — clicking it opens a modal window with available elements from the subcategory for selection. The modal window contains the following information:
- Current element card
- Subcategory of elements from the current category
- List of manufacturers — clicking on a manufacturer displays the available elements.
- Element cards. An element card consists of:
- Image and element color
- Name
- Information button — clicking it opens a modal window with an enlarged image and description
- Main material
- Country of manufacturing
- Color
To change the element, click the required element card and press the Select button
- Change all button — if the construction contains more than one element, all elements can be replaced at once by clicking this button and selecting the required one from the list in the modal window.
To add an element, click the Add button, after which a modal window with a list of available elements will open. The table in the modal window contains the following data:
- Title — search by name
- Subcategory — dropdown list for selecting a subcategory
- Selection checkbox
- Element name
- Element subcategory
- Price per piece
- Amount — allows selecting the required quantity of the element
- Information button
 — clicking it opens a modal window with an image and description
To select multiple elements, mark them using the checkboxes
Please note! When an element is selected by checking the checkbox, the quantity is automatically set to 1
Mosquito nets
Mosquito nets are available only in constructions with opening functionality.
Please note! If no mosquito net is selected in the configuration (more details ➤ here), the block will be empty when the construction is created.
The block displays the following information:
- Subcategory
- Name
- Dimensions — width × height in millimeters (if the imperial measurement system is selected — in inches)
- Blue pencil — for editing the element
- Quantity of elements
To edit an element, click the blue pencil ![]() to the right of the name, after which a modal window will open containing:
to the right of the name, after which a modal window will open containing:
- Construction image
- Subcategory (Roller, Framed, Pleated, etc.)
- Name
- Area in square meters (if the imperial measurement system is selected — in square feet)
- Total — total amount
- Sets — quantity of elements. In this field, the quantity can be increased or decreased.
- Description
- Enlarged images of the element
- Control buttons:
- Delete — removes the element from the order and closes the modal window
- Save — saves the changes made and closes the modal window
To add mosquito nets, click the Add button, after which a modal window with a list of available elements will open. The table in the modal window contains the following data:
- Name — search by name
- Subcategory — dropdown list for selecting a subcategory
- Element name
- Element subcategory
- Price per square meter (if the imperial measurement system is selected — per square foot)
- Amount — allows selecting the required quantity of the element
- Information button — clicking it opens a modal window with an image and description
Please note! When an element is selected by checking the checkbox, the quantity is automatically set to 1.
Please note! Only one type of mosquito net can be selected for a single construction.
Accessories, size
Accessories, size — this is a block where accessories with custom dimensions are added.
Please note! If size accessories are not selected in the configuration (more details ➤ here), the block will be empty when the construction is created.
To add an accessory, click the Add button, after which a modal window will open containing a table with the following data:
- Name — search by name
- Subcategory — dropdown list for selecting a subcategory
- Selection checkbox
- Element name
- Element subcategory
- Price per square meter (if the imperial measurement system is selected — per square foot)
- Amount — allows selecting the required quantity of the element
- Size — field where the element size can be specified. If the field is left empty, the size will automatically be set to the construction width when added.
- Information button — clicking it opens a modal window with an image and description
To select multiple elements, mark them using the checkboxes
Please note! When an element is selected by checking the checkbox, the quantity is automatically set to 1
Please note! When selecting a Additional profile or Stand profile (for windowsills), this element will be added to the top part of the construction image and will affect the overall dimensions of the entire construction by the size of the element (for example, if the element has a width of 100 millimeters, this value will be added to the construction height). This modified image will be displayed in the order (professional configurator), online quotation, and PDF quotation.
To edit a size accessory, click the blue pencil ![]() to the right of the name, after which a modal window will open containing:
to the right of the name, after which a modal window will open containing:
- Construction image (for elements located inside the construction, the image will not be displayed)
- Subcategory
- Element name
- Length in meters (if the imperial measurement system is selected — in feet)
- Total — amount for the element
- Length (mm) — field for entering/changing the element length
- Sets — quantity field for the element in the order
- Description
- Element image
- Control buttons:
- Delete — removes the element from the order and closes the current modal window
- Save — saves the changes and closes the current modal window
To edit an Additional profile or Stand profile (for windowsills), a special modal window is available containing:
- Construction image with numbered position indicators
- Subcategory
- Element name
- Length in meters (if the imperial measurement system is selected — in feet)
- Total — amount for the element
- Position — field for selecting the element position in the construction. When the position changes, the element location will be highlighted on the construction image.
- Length — field for entering the element length.
- Sets — quantity field for the element in the order
- Element image
- Control buttons:
- Delete — removes the element from the order and closes the current modal window
- Save — saves the changes and closes the current modal window
When an element is added, the following information will be displayed in the block:
- Subcategory
- Name
- Dimensions — width × height in millimeters (if the imperial measurement system is selected — in inches)
- Blue pencil — for editing the element
- Quantity of elements
- Pos. — element position in the construction (available only for Extension profile and Base profile (for window sill) elements)
- Length in meters
Accessories, pieces
Accessories, pieces — this is a block where accessories are added by quantity.
Please note! If piece accessories are not selected in the configuration (more details ➤ here), the block will be empty when the construction is created.
To add an accessory, click the Add button, after which a modal window will open containing a table with the following data:
- Name — search by name
- Subcategory — dropdown list for selecting a subcategory
- Selection checkbox
- Element name
- Element subcategory
- Price per piece
- Quantity — allows selecting the required quantity of the element
- Information button — clicking it opens a modal window with an image and description
To select multiple elements, mark them using the checkboxes
Please note! When an element is selected by checking the checkbox, the quantity is automatically set to 1
To edit a piece accessory, click the blue pencil ![]() to the right of the name, after which a modal window will open containing:
to the right of the name, after which a modal window will open containing:
- Subcategory
- Element name
- Quantity in pieces
- Total — amount for the element
- Sets — quantity field for the element in the order
- Description
- Element image
- Control buttons:
- Delete — removes the element from the order and closes the current modal window
- Save — saves the changes and closes the current modal window
When an element is added, the following information will be displayed in the block:
- Subcategory
- Name
- Dimensions — width × height in millimeters (if the imperial measurement system is selected — in inches). This parameter is taken from the current construction dimensions.
- Blue pencil — for editing the element
- Quantity of elements
Roller shutters and Shutters
Please note! If roller shutters and shutters are not selected in the configuration (more details ➤ here), the block will be empty when the construction is created.
To add an element, click the Add button, after which a modal window will open containing a table with the following data:
- Name — search by name
- Subcategory — dropdown list for selecting a subcategory
- Selection checkbox
- Element name
- Element subcategory
- Price per square meter (if the imperial measurement system is selected — per square foot)
- Quantity — allows selecting the required quantity of the element
- Information button — clicking it opens a modal window with an image and description
To select multiple elements, mark them using the checkboxes
Please note! When an element is selected by checking the checkbox, the quantity is automatically set to 1
To edit elements, click the blue pencil ![]() to the right of the name, after which a modal window will open containing:
to the right of the name, after which a modal window will open containing:
- Construction image
- Subcategory
- Element name
- Area in square meters (if the imperial measurement system is selected — in square feet)
- Total — amount for the element
- Sets — quantity field for the element in the order
- Description
- Element image
- Control buttons:
- Delete — removes the element from the order and closes the current modal window
- Save — saves the changes and closes the current modal window
When an element is added, the following information will be displayed in the block:
- Subcategory
- Name
- Dimensions — width × height in millimeters (if the imperial measurement system is selected — in inches). This parameter is taken from the current construction dimensions.
- Blue pencil — for editing the element
- Quantity of elements
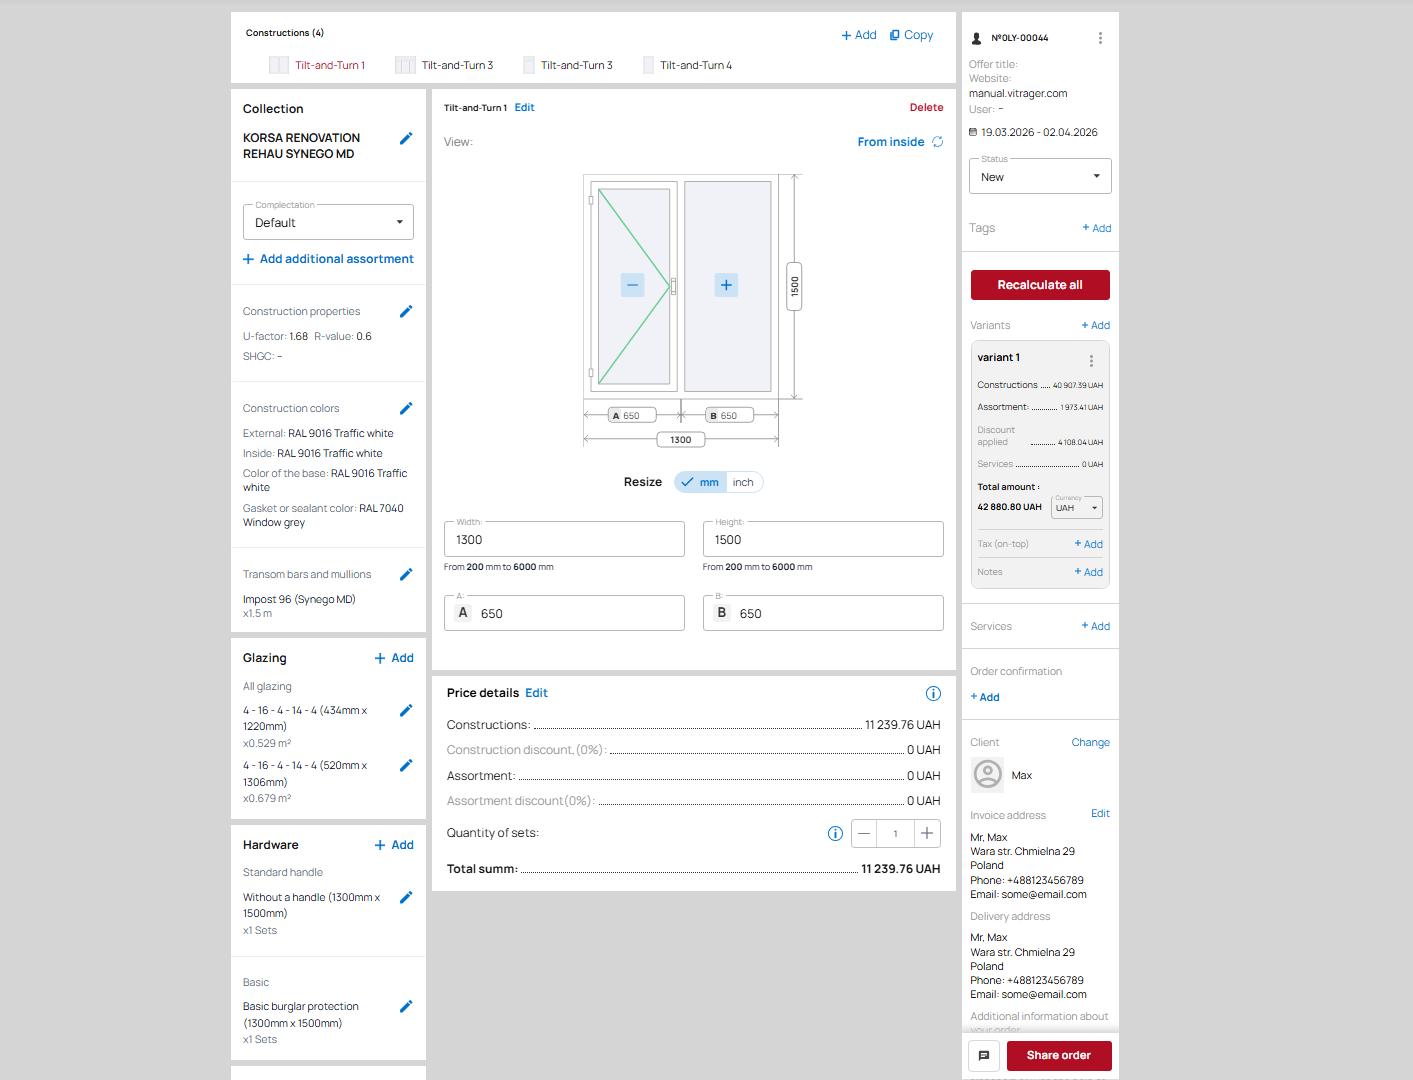
Construction Settings
The Construction Settings block contains:
- Editing the construction name — clicking the Edit button opens a modal window containing:
- Construction name — field for entering/changing the construction name. This field is required.
- Note — allows adding information/a note to the construction. This note will be displayed in the online quotation and PDF quotation next to the construction. The note has a limit of 200 characters.
- Delete construction button — clicking it opens a modal window to confirm or cancel the construction deletion.
- construction type — multiblock / monoblock. This parameter is displayed only for the entrance doors category.
- Opening button — allows changing the opening direction (left / right). This parameter is available only for door constructions.
- View switch button for the construction image:
- From inside
- From outside
- Construction image with height and width dimensions for each block
Please note! To add a mullion or opening (for window constructions), click in the required location on the image and select the desired parameter in the modal window
 - Change size button — allows changing the measurement system (millimeters / inches).
- Construction dimensions editing block
Please note! Minimum and maximum size values are displayed below the width and height fields. If the entered dimensions exceed these limits, an error message will appear, and the price for the current construction will change to 0.
Please note! When clicking a dimension next to the construction image, the field for editing the current dimension becomes active.
Please note! When changing dimensions, the construction image will update according to the new dimensions.
Price details
The Price Details block displays the construction pricing, allows configuring discounts, and adjusting the quantity of constructions.
It contains the following sections:
- Edit button — allows editing the price and discounts. Clicking it opens a modal window containing:
- Total amount — the total cost of constructions with all options and additional assortment, including discounts.
- Number of sets for this construction.
- Base construction price — the cost of the construction with all options before discounts.
- Construction price for customer — the cost of the construction with all options including discounts. The price in this field can be changed manually.
Please note! When changes are made to the construction, the manual price will be reset to the regular price.
Please note! When a manual price is added, an icon will appear in the top-right corner of the Price Details block
- Discount for customer (%) — percentage discount applied to the construction with all options. The discount percentage can be changed manually in the field.
- Discount for customer — absolute discount value applied to the construction with all options. The discount amount can be changed manually in the field.
- Base assortment price — the cost of additional assortment before discounts.
- Assortment for customer — the cost of additional assortment including discounts.
- Discount for customer (%) — percentage discount applied to the additional assortment. The discount percentage can be changed manually in the field.
- Discount for customer — absolute discount value applied to the additional assortment. The discount amount can be changed manually in the field.
- Control buttons:
- Reset manual price — returns the price to the default value and closes the modal window.
- Save price — saves the price changes and closes the modal window.
 (in the top-right corner of the block) — pricing information. Clicking it opens a modal window containing:
- Construction name
- Construction price — price excluding assortment cost.
- Supplier's base price — the price provided by the supplier before discounts.
- My discount — discount percentage provided by the supplier.
- My markup — markup percentage configured in pricing settings (more details ➤ here).
- Price before manual input (with discounts) — displays the construction cost before manual editing. This row appears only after manual price editing.
- Manual input — displays the date, time, employee's first and last name (who performed the manual price editing), and the construction cost.
- Discount for customer — customer discount percentage (more details ➤ here).
- Accessories price — total amount for accessories.
- Supplier's base price — the price provided by the supplier before discounts.
- Price before manual input (with discounts) — displays the construction cost before manual editing. This row appears only after manual price editing.
- Manual input — displays the date, time, employee's first and last name (who performed the manual price editing), and the construction cost.
- Discount for customer — customer discount percentage (more details ➤ here).
- Total amount — the final amount for the construction including discounts/markups.
- Price table containing:
- Constructions — amount for the construction before discounts.
- Construction discount — discount percentage and amount for the construction.
- Assortment — amount for additional assortment before discounts.
- Assortment discount — discount percentage and amount for the additional assortment.
- Quantity of sets — counter for the number of construction sets with buttons to increase and decrease the quantity.
- Total summ — the final amount for the construction including discounts and additional assortment.
Order Information
The Order Information block contains the following data:
- Order type icon — customer (
 ) or production (
 ) — helps the user identify the order type.
 - Order number.
- Additional management menu
 — clicking opens a context menu containing:
- Edit order title — opens a modal window where you can enter/change/delete the order name. The name can be any value.
- Edit offer validity — opens a calendar modal window where you can select the quotation validity period.
Offer validity — defines the period during which online payment for the order will be available through the online quotation. - Change website — opens a modal window for changing the website to which the order will be linked. If you have multiple websites on the Vitrager platform, you can link the order to any of them, so the online quotation and PDF quotation will open on the selected website.
Please note! When changing the website, the website user is removed. - Change user — opens a modal window with a list of website users (more details ➤ here). The modal window contains:
- Search by name/email
- User card containing:
- First and last name
- Phone number
- City
- Email address
Please note! To remove a website user, click on their card (the selection highlight will disappear), then click the Save button.
- Status history — opens a modal window with a list of status changes containing:
- Employee's first and last name
- Initial status
 changed to a new status
 - Date and time of the status change
Please note! If there were multiple different status changes, each change will appear as a separate row.
Please note! The status change rows are displayed from bottom (earliest) to top (latest).
- Delete order — opens a confirmation modal window for deleting the order.
Please note! After deleting an order, it is impossible to restore it.
- Offer title — displays the current order name.
- Website — displays the company website to which the order is linked.
- User — displays the website user linked to the order. If there is no user, a dash ( - ) will be displayed.
- Offer validity.
- Status — displays the order status. To change the order status, click the current status, after which a list of available statuses will appear. More details about statuses:
-
From each status, the order can be moved one status forward or backward. From the New and In Progress statuses, the order can also be moved to the Archive status.
-
The New, In Progress, and Archive statuses are not synchronized, meaning Manufacturer/Dealer and Dealer/Customer orders may have different status values. All other statuses are synchronized — meaning when the status changes in one order, it is automatically changed to the same status in the other order.
-
Creating an order for the manufacturer from a customer order is possible only from the first three statuses (New, In Progress, Approved).
-
Creating an order for the customer from a manufacturer order is possible in all statuses except Archive.
-
When creating a manufacturer order from a customer order: if the status was New or In Progress, the production order will have the New status; if the status was Approved, the production order will also have the Approved status.
-
When creating a customer order from a manufacturer order, the status in the new order will be the same as in the manufacturer order.
-
The statuses Accepted, In Production, Manufactured, and Shipped can only be set by the Manufacturer. If there is a Dealer/Customer order, its status will also change (synchronize). If there is no Manufacturer/Dealer order, the dealer still has the ability to move the Dealer/Customer order through the production statuses Accepted, In Production, Manufactured, and Shipped.
-
The Completed status is an executor status. Meaning if the order goes through a partner, only the dealer can move the order to this status (orders are synchronized). If it is a direct sale (Manufacturer/Customer), then only the Manufacturer can do this.
-
When changing the status from In Progress to Approved, if the order contains more than one calculation option, the following message will be displayed: "To approve the order, it must contain only one calculation option", and to change the status, only one option must remain while the others must be deleted.
-
If the current order status is Approved, Accepted, In Production, Manufactured, Shipped, Completed, or Archive — the ability to edit the order is blocked, except for:
- changing statuses
- adding/removing tags
- changing payment statuses
Order deletion works only in three statuses:
- New order
- In Progress
- Archive
In all other statuses, the following message will be displayed: “Order deletion is not possible at the current status.”
Please note! When changing the status, if there is no production order, the label No production order will appear above the status.
-
- Tags — displays the current order tags. If no tags are selected, the Add button will be displayed; if tags exist, the Edit button will be displayed. Clicking it opens a tag management modal window containing:
- List of available tags (if any)
- Add/edit labels button — opens a modal window where you can:
- edit the name and color of the tag
- delete a tag by clicking the button
 on the right side of the tag name
 - add a new tag by clicking the Add new label button
Please note! Multiple tags can be selected for an order by checking them and clicking the Save button.
Variants constructions
Variants constructions are used in an order to calculate the same order with different collections, accessories, and services.
The Variants block consists of the following elements:
- Recalculate all button - recalculates all constructions and all construction variants in the order.
Please note! If the order contains manual prices - a confirmation message will appear asking whether to recalculate them:
- Yes - removes manual prices and recalculates them to standard prices
- No - keeps manual prices unchanged, only standard prices will be recalculated
Add button - adds a new calculation variant. The content is an exact copy of the current variant.- Variant card contains:
Please note! If there are multiple variants, all inactive variants will be displayed in collapsed format, showing only the variant name and total amount. To activate a variant, click on it.
- Variant name. The name is automatically assigned in the format variant [variant sequence number]. The word “variant” is displayed in the interface language. The variant name can be changed.
- Additional control menu
 which contains:
- Additional discount - opens a modal window containing:
- Order price - total amount including the additional discount
- Changing the price % - field for entering an additional discount. The discount is entered as a percentage value
- Price - order amount without discount
- The term of manufacture - opens a modal window where you can set the number of production days for the order. It contains the following parameters:
- Manually specify - allows entering the number of days manually. If 0 is entered - production and delivery time will not be displayed in the online and PDF quotation.
- Use calculation - uses the production time specified in the collection settings (more details ➤ here)
- Price details - opens a modal window with detailed pricing for each construction in the order, containing:
- All construction price - total order amount excluding the additional discount
- Discount applied - discount amount
- Additional discount (if added) - percentage of the additional discount
- Total - total order amount including the additional discount
- Price details for each construction contain the following information:
- Construction name
- Total construction cost - amount including discounts/markups excluding additional assortment
- Supplier's base price - the price provided by the supplier without discount
- My discount - supplier discount percentage
- My markup - markup percentage configured in pricing settings (more details ➤ here)
- Price before manual input (with discounts) - displays the construction price before manual editing. This row appears only after manual price editing.
- Manual input - displays the date, time, employee surname and first name (who manually edited the price), and the construction price.
- Discount for customer - customer discount percentage (more details ➤ here).
- Assortment for [Construction name] - displayed if additional assortment has been added.
- Assortment cost - additional assortment amount including discounts/markups
- Supplier's base price - the price provided by the supplier without discount
- Price before manual input (with discounts) - displays the construction price before manual editing. This row appears only after manual price editing.
- Manual input - displays the date, time, employee surname and first name (who manually edited the price), and the construction price.
- Discount for customer - customer discount percentage (more details ➤ here)
- Total amount - final amount for the construction and additional assortment including discounts/markups.
- Edit title- opens a modal window for editing the variant name
Please note! The variant name cannot be empty - Copy - creates a copy of the calculation variant. Works similarly to the Add button
- Delete - deletes the current calculation variant
- Additional discount - opens a modal window containing:
- Constructions - total cost of all constructions excluding additional assortment and additional discount
- Assortment - total cost of all additional assortment excluding additional discount
- Discount applied - total applied discount amount for the entire order
- Additional discount - percentage of the additional discount. If no additional discount has been applied, this parameter will be absent.
- Services - total amount for added services. If no services have been added, the amount will be 0
- Total amount - total order amount. If tax is added on top, Total amount (net) will be displayed - the order amount excluding tax.
- Currency - allows selecting from the list of available company currencies. More details about company currency settings ➤ here
- Tax - to add tax to the order, click the Add button, after which a modal window with available taxes will open. More details about adding taxes ➤ here
Please note! Tax is not added to the order automatically and must be selected manually
If tax is added, the following data will be displayed:- Delete button - removes the tax from the order. To change the tax, you must first remove the old one and then add a new one
- Tax name as configured in the company
- Tax percentage
- Tax amount
- Total to be paid - if an additional tax is added to the order, the order amount including tax will be displayed
- Notes - allows adding notes to the variant. This note will be displayed in the online and PDF quotation. To create a note, click the Add button, after which a modal window will open containing:
- Add button allows adding a note block
- Note block consists of:
- Add image - allows attaching an image uploaded from your device to the note. Supported image formats: jpg, png, bmp
- Notes - field for entering information. This field is mandatory.
- Delete note block button

To save the note, click the Save changes button. To cancel changes, click the Cancel button or the cross icon in the upper-right corner of the window.
- Services - displays the list of selected services. If no services have been added, the Add button will appear. Clicking it opens a modal window for selecting services (more details about the list of services ➤ here), which contains:
- Selection checkbox
- Service name
- Price - if the price is calculated automatically, the amount will be displayed; if the price is missing, an empty field with a red border
 will be shown
To select/deselect a service, click the selection checkbox or the service name.
After adding services, the block will display the list of services and their prices.
To edit services, click the blue pencil , after which the service selection modal window will open.