
Basic website settings
For the site to work properly, you need to make settings on the following pages.
My company
On the My company page, you need to configure the sections:
- Basic information - in this section, you need to set up the Company currency, Measurement system, and Company language. After all the actions, click the Save button
- Legal entities - in this section you need to create a Legal entity by filling in all the fields. After creating it, you need to add Payment Methods. To do this, in the Payment methods block, click the Add button and select the desired method from the list. Then select the currency and fill in the ID and token fields. These fields may differ for different methods.
Please note! For the Stripe method, it is possible to create an account directly from the settings page that will be linked to the Vitrager portal, which simplifies the connection procedure.
Company goods (For dealers)
Collections provided by the manufacturer - you can customize for yourself, you can completely change the collection by changing texts, descriptions, media, select elements and accessories that will be available on the site, you can divide the collection into categories - basic, optimal and premium to form different price categories.
Please note. It is possible to synchronize descriptions and media files from the manufacturer, but your descriptions will be deleted. To do this, go to the Clients/Partners section and in the Suppliers tab, select the required supplier and click the Synchronize button
To customize collections, you need to:
- Go to the desired design category
- Go to the Partner collection tab
- Select the desired manufacturer by clicking on it
- Select the collection you want to customize
Please note! The collections selection page can contain both active collections and collections that the selector has excluded. You can see them, but they are not available for use. Collections that are available for use are marked with the Active label
- On the collection page, you can edit the following blocks:
- Online sales(settings of the configuration and accessories that will be available on the site for this collection)
- Collection parameters for basic/optimal/premium configuration (configuration settings and accessories that are available for selection on the collection selection page on the website (next page after the configurator))
- Professional configurator collection settings (configuration of equipment and accessories that will be available for selection in the professional configurator)
- Media files/documents (it is possible to upload photos/pictures of drawings, certificates, product views, as well as add links to videos)
- Description for the client (it is possible to edit the description for the collection, as well as add translations for other languages of this description)
All other blocks are available for viewing, but you cannot edit them.
Company goods (For the manufacturer)
Creating colors
Before creating and customizing collections, you need to create colors and additional assortments.
To create colors, go to the Color Settings section.
- Next, you need to add a color album - click the Add Album button.
- In the modal window that appears, you need to enter the name of the album (the name can be arbitrary).
- Go to the created album
- Click the Add color button
- In the modal window that appears, enter the name of the color (the name can be arbitrary)
- Next, select the Application technology from the list
- Next, customize the appearance of the color. In the Preview image section, you can upload a picture with a color (arrow icon) or enter a color code in RGB format (pencil icon). For the Image for enlarged view block, you can upload only a picture.
Please note! Formats for uploading images - jpeg, bmp, png
After you save a color, it becomes automatically available for selection in collections.
Additional assortment
The next step is to add additional assortment.
Additional assortment is an assortment that is used for the creation of constructions (such as glazing, handle, impost), as well as that is additional to the construction or collection and may not affect the construction (such as blinds, roller blinds, mounting materials, packaging).
- To do this, go to the Additional assortment section
- Next, select a category (for example, Double-glazed windows)
- Next, select a subcategory
- Once on the page of the subcategory of the additional assortment, click the Add button.
- In the modal window that opens, you need to fill in all the fields
- After filling in, click the Save button.
- We get to the page of the additional assortment (in this case, the page of the two-chamber folding package)
- The next step is to add a price list, for this purpose, in the pricing block, click the Edit button.
- On the price editing page, there are three options for setting the price:
- Price per unit
- Price per square meter
- Price per length (meaning perimeter)
Please note that you can enter the price for one item or for all of them. But it is recommended to fill in all the parameters for an accurate calculation.
Please note that you do not need to enter anything in the information price field. This field will be filled in automatically after saving the price that you do not need to enter anything in the information price field. This field will be filled in automatically after saving the price
- After entering the price, click the Save button.
- Next, for the product to become active, you need to enable it, to do this, click on the switch
A list of the required assortment for the collections:
- For window collections:
- Double glazing
- Handles
- Bridges
- Burglary protection
- For door collections:
- Insulating glass units
- Handles
- Imosts
- Locks
- Thresholds
- Burglary protection
- Hinges
- Horizontal / Vertical connectors
Creating collections
In the Company Goods section, you need to create collections for the type of construction (for example, Entrance doors).
To do this, go to the Entrance doors page and click the Add Collection button.
There are a number of mandatory fields that must be filled in to create a collection:
- Name (will be displayed on the site and in orders)
- Type of construction (filled in by default)
- Material (select the desired one from the list)
- Manufacturer (enter the name)
- Warranty (specify the number of years by number)
- Profile brand (Select from the list)
- Price category (Basic, Optimal or Premium)
- Name of the basic profile (enter the name)
- Brand of hardware manufacturer (select from the list)
- Hardware model (enter the name)
- Minimum depth of the frame profile (enter a number)
- Sealing levels (select from the list)
After filling out the form, click the Save button. After saving, you will be taken to the collection page.
Next, you need to configure the Basic parameters of the collection.
To do this, go to the Basic Collection Settings section. On this page, you can configure the default collection configuration. The following settings are required:
- Profile color
- Base color
- Seal color
- Double-glazed window
- Impost
- Handle
You also need to specify the production time of the basic configuration
For the collection to work, you need to upload prices.
To do this, go to the Prices section. The page displays the types of templates that can be used to upload prices. Prices are uploaded in XML or CSV format. More information about downloading prices can be found here
If you successfully upload the price list with prices, you will see the filled prices in the blocks with templates. To confirm the upload, click the Apply button. Also, to cancel the upload, click the Cancel button.
After applying the price, you will be taken to the collection page, then you need to enable the collection.
To do this, turn the switch to active mode
Pricing
To generate prices, you need to configure pricing.
- To do this, go to the Pricing page.
- Next, go to the Special discounts/markups page
- Next, go to the Regional tab and click the Add discount/margin button.
- In the modal window that appears, fill in the fields:
- Name of the markup discount (the name can be arbitrary)
- User region (you need to specify the country in which sales will be made)
- Currency of the customer order
- Prepayment and delivery time (the text can be arbitrary)
- Next, you need to go to the middle of the created discount/margin and add collections and accessories
- Go to the “Discount/margin relative to the base price” block
- In the Collections block, click the Add rule to categories button
- In the modal window that opens:
- Enter the name of the rule (the text can be any)
- Select the type of rule (discount or markup)
- Enter the percentage (numeric value)
- Next, click the Edit button and mark the types of constructions that the rule will apply to.
- After that, click the Select button and then Save
- Next, create a rule for accessories (the same steps as for collections)
Regional discounts/markups - are used for pricing for specified countries and regions. They are used both for professional orders (by the manager in the professional configurator) and for the formation of prices on the website depending on the country or region of the user
My webpage
In the My webpage block, you can create and administer websites. This page also displays new reviews and questions about the site.
Please note!
The system allows you to create several separate websites.
When you create a company, a website is automatically created on the Vitrager.com subdomain (for tariffs with websites).
There is an option in this section:
- customize the appearance of the site
- customize the display of goods and services
- administer product pages and product listing pages
- customize the SEO parameters of pages
- create directories, pages, blocks
- create language versions of the site
- set up payment methods
configure the parameters of the client configurator - configure energy efficiency classes
- customize messenger buttons
- Google Tag Manager
- customize the Terms, Conditions, Privacy Policy and Cookie Policy
Add website
When you create a company, a website is automatically created on the Vitrager.com subdomain (Mycompany.vitrager.com). But it is also possible to host a website on your own domain. In order to use your own domain name, you need to do the following steps:
- For your domain, register an A-record to our server 116.202.6.56 (please note that it can take about 24 hours for providers to update dns names)
- Add a new website using the Add website button and fill in the details:
- Domain name (in the format mywebsite.com)
- Favicon and Logo for the site (if there is no site logo, then the company logo will be used as the logo)
- The main language of the site
- Mail for receiving requests from the site (mail can be any)
Region (required for site indexing by bots) - Type of configurator (site mode)
- Return email (mail that will be displayed in the “basement” of the site)
- Phone number
In order to select the main website (after creation), you need to click on the three dots next to the website and select Set as main site in the menu
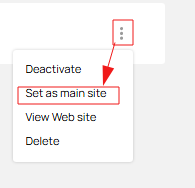
Please note!
To select a website as the main one, it must be activated (enabled)
Online sale settings
Next, you need to set up the online sales section, namely:
- Legal entity and payment methods (if the site operates in the online sales mode)
- Available collections
- Parameters of the client configurator
- Energy efficiency indicators and energy saving classes
- Product generation and product page parameters
- General information about the terms and conditions of delivery and receipt of the order
Legal entity and payment methods (For online sales)
If your website is to work in the Online Sales mode, then you need to set up a legal entity and payment methods.
To do this, in the “Online sales settings” block:
- Click on Legal entity and payment methods
- A modal window will open in which you need to select your legal entity (which was labeled in the My company section)
- After that, a list of available payment methods will appear, select the desired one.
Please note!
For some payment methods, a selection of payment systems is available. All payment systems are selected by default. To disable them, uncheck the box next to the payment system
Please note!
In order to be able to select payment methods, the Law Firm must be enabled on the “My company” page
List of collections available for sale
Next, you need to configure the collections that will be displayed on the site
- Click on the List of collections available for sale
- Select the desired collections in the modal window
Please note!
Collections are divided into categories: windows, doors, etc. To select a collection, you need to expand the category
- After selecting the desired categories, click the Save button
Please note!
If no collections are selected from a category, this category will be absent in the client configurator.
Client configurator settings
Next, configure the Client Configurator settings.
The client configurator is a constructor for selecting the desired design on the website. You can customize the default settings, namely:
- Opening by default - inward or outward
- Default design - monoblock or multiblock
After the desired structure is selected in the configurator on the site, you will go to the page for selecting collections and in order to determine the sorting of collections, there are settings for this. You can select the following items:
- In ascending order of price
- In descending order of price
- In ascending order of energy saving
- In descending order of energy saving
After making all the settings, click the Save button.
Energy efficiency and energy saving classes
Next, set up the Energy efficiency and energy saving classes:
- Open the Energy efficiency and energy saving classes modal window
- Choose the required coefficient, there are 3 types
- Rw
- Uw
- U (for the US region)
- For the selected type, enter the name that will be displayed on the site
You can also customize the energy efficiency rating. To do this:
- Click the Add button
- Enter the name, the maximum value (from the lowest or zero if there is no lower value to this value) and enter a description.
- Next, select the color that will correspond to this class by clicking on the pencil (the color is entered in RGB format)
- After all the actions, click the Save button
Product generation and product page parameters
Next, you need to set up product pages.
- Go to the section Product generation and product page parameters
- Next, select the parameters you need:
- “Enable displaying the assortment in the form of links in the basket and online control panel” (so that you can view detailed information about the assortment)
- “Visit product pages after e-commerce configurator” (go to the product page after selecting a collection in the configurator, if disabled, you will go to the page for changing product options)
- “Generate product pages” (each time you select a collection in the configurator, a product will be created on the site with the appropriate parameters. Products can be generated independently and with the help of site visitors to have a large selection of popular products, and disable visits to these pages after the configurator to increase conversions)
- “Allow viewing other collections from the product page”
You can also create information blocks on the product page (below the Buy button). To do this:
- Click on the Add block button
- In the modal window that opens, enter the name of the block
- Next, select the location of the block and click Save
- Next, you need to add content for this block:
- Add a picture (it can be placed to the left of the text (40x40px) or under the text (300x40px))
- Customize the display of the block (can be displayed always or when services are active. The list of services can be customized)
- Add a description (text to be displayed)
- Button name (if you want to place a feedback form in the block. If the field is empty, there will be no button)
Please note that when editing an information block, you do not need to save anything, the changes are saved automatically.
Customize the unique look of your site
Next, you can customize the appearance of the site depending on your design.
To do this, go to the Customize the unique look of your site block and click the Edit button. To edit the parameters, you need to expand the block.
- Fonts. You can customize the font for headings and body text. You can choose the fonts you need from the list.
- Styles for headings. In this block, you can customize the styles for H2, H3, and H4 headings. You can customize the bottom underline and text color for each type of heading.
- Website header colors. Allows you to customize the top block of the site (header/header), namely:
- Preferences background and text color - the top block in the header of the site, where data about your preferences and ratings (if configured) are displayed.
- Menu block background and text color - the look of the entire header.
- Expanded menu background and text color - used if you have several levels of menu items and when expanded, the menu items may look different from the main menu.
- Website colors. Customize site colors, such as:
- Site background color and text colors - sets the background of the entire site (except for color blocks), the color of all text on the site.
- Background of color blocks - when setting up blocks on pages, it is possible to make it with a colored background, in this parameter you can set the background and text color
- Background of information blocks - the background color of information elements (all “i” and “price on request” dies)
- Buttons. This option controls the radius, color, and text color of buttons. There are two types of buttons: primary and secondary.
- Messenger button. In this setting, you can customize the messenger icons with some colors or use the original colors
- Displaying phone numbers. In this block, you can enable/disable hidden numbers - part of the phone number in the header of the site can be hidden behind the “Details” button, if you do not need it, uncheck the box
- Animation. It is possible to use animation for the site (for example, in the client configurator, the structures will appear one by one with a slight delay)
Please note!
All the changes that have been made can be seen in the block Customize the uniqueness of your site's appearance, this is a preview for the views on the site.
My content (in different languages)
And finally, you need to create a language version of the site.
To do this:
- Go to the My content (in different languages) block
- Click the Add language button
- Select the required language from the list of available languages
- Click the Select button
- Next, you will automatically be taken to the settings page for the selected language version
- Now you need to activate
- To do this, click the Active translation switch
- Now your site is active and working.
To go to the main page of the site, you can:
- On the current page, go to the Home tab and click the View button in the upper right corner
- Or go back to the previous page and click the View button at the bottom of the page