
- Settings for the site to work
- My company
- Company goods (For dealers)
- Company goods (For the manufacturer)
- Pricing
- My webpage
- Add a website
- Online sale settings
- Legal entity and payment methods (For online sales)
- List of collections available for sale
- Client configurator settings
- Energy efficiency and energy saving classes
- Product generation and product page parameters
- Customize the unique look of your site
- My content (in different languages)
Settings for the site to work
For the site to work properly, you need to make settings on the following pages.
My company
Company goods (For dealers)
Collections provided by the manufacturer - you can customize for yourself, you can completely change the collection by changing texts, descriptions, media, select elements and accessories that will be available on the site, you can divide the collection into categories - basic, optimal and premium to form different price categories.
Please note.
It is possible to synchronize descriptions and media files from the manufacturer, but your descriptions will be deleted. To do this, go to the Clients/Partners section and in the Suppliers tab, select the required supplier and click the Synchronize button
To customize collections, you need to:
- Go to the desired design category
- Go to the Partner collection tab
- Select the desired manufacturer by clicking on it
- Select the collection you want to customize
Please note!
The collections selection page can contain both active collections and collections that the selector has excluded. You can see them, but they are not available for use. Collections that are available for use are marked with the Active label
- On the collection page, you can edit the following blocks:
- Online sales(settings of the configuration and accessories that will be available on the site for this collection)
- Collection parameters for basic/optimal/premium configuration (configuration settings and accessories that are available for selection on the collection selection page on the website (next page after the configurator))
- Professional configurator collection settings (configuration of equipment and accessories that will be available for selection in the professional configurator)
- Media files/documents (it is possible to upload photos/pictures of drawings, certificates, product views, as well as add links to videos)
- Description for the client (it is possible to edit the description for the collection, as well as add translations for other languages of this description)
All other blocks are available for viewing, but you cannot edit them.
Company goods (For the manufacturer)
Creating colors
Before creating and customizing collections, you need to create colors and additional assortments.
To create colors, go to the Color Settings section.
- Next, you need to add a color album - click the Add Album button.
- In the modal window that appears, you need to enter the name of the album (the name can be arbitrary).
- Go to the created album
- Click the Add color button
- In the modal window that appears, enter the name of the color (the name can be arbitrary)
- Next, select the Application technology from the list
- Next, customize the appearance of the color. In the Preview image section, you can upload a picture with a color (arrow icon) or enter a color code in RGB format (pencil icon). For the Image for enlarged view block, you can upload only a picture.
Please note! Formats for uploading images - jpeg, bmp, png
After you save a color, it becomes automatically available for selection in collections.
Additional assortment
The next step is to add additional assortment.
Additional assortment is an assortment that is used for the creation of constructions (such as glazing, handle, impost), as well as that is additional to the construction or collection and may not affect the construction (such as blinds, roller blinds, mounting materials, packaging).
- To do this, go to the Additional assortment section
- Next, select a category (for example, Double-glazed windows)
- Next, select a subcategory
- Once on the page of the subcategory of the additional assortment, click the Add button.
- In the modal window that opens, you need to fill in all the fields
- After filling in, click the Save button.
- We get to the page of the additional assortment (in this case, the page of the two-chamber folding package)
- The next step is to add a price list, for this purpose, in the pricing block, click the Edit button.
- On the price editing page, there are three options for setting the price:
- Price per unit
- Price per square meter
- Price per length (meaning perimeter)
Please note that you can enter the price for one item or for all of them. But it is recommended to fill in all the parameters for an accurate calculation.
Please note that you do not need to enter anything in the information price field. This field will be filled in automatically after saving the price that you do not need to enter anything in the information price field. This field will be filled in automatically after saving the price
- After entering the price, click the Save button.
- Next, for the product to become active, you need to enable it, to do this, click on the switch
A list of the required assortment for the collections:
- For window collections:
- Double glazing
- Handles
- Bridges
- Burglary protection
- For door collections:
- Insulating glass units
- Handles
- Imosts
- Locks
- Thresholds
- Burglary protection
- Hinges
- Horizontal / Vertical connectors
Creating collections
In the Company Goods section, you need to create collections for the type of construction (for example, Entrance doors).
To do this, go to the Entrance doors page and click the Add Collection button.
There are a number of mandatory fields that must be filled in to create a collection:
- Name (will be displayed on the site and in orders)
- Type of construction (filled in by default)
- Material (select the desired one from the list)
- Manufacturer (enter the name)
- Warranty (specify the number of years by number)
- Profile brand (Select from the list)
- Price category (Basic, Optimal or Premium)
- Name of the basic profile (enter the name)
- Brand of hardware manufacturer (select from the list)
- Hardware model (enter the name)
- Minimum depth of the frame profile (enter a number)
- Sealing levels (select from the list)
After filling out the form, click the Save button. After saving, you will be taken to the collection page.
Next, you need to configure the Basic parameters of the collection.
To do this, go to the Basic Collection Settings section. On this page, you can configure the default collection configuration. The following settings are required:
- Profile color
- Base color
- Seal color
- Double-glazed window
- Impost
- Handle
You also need to specify the production time of the basic configuration
For the collection to work, you need to upload prices.
To do this, go to the Prices section. The page displays the types of templates that can be used to upload prices. Prices are uploaded in XML or CSV format. More information about downloading prices can be found here
If you successfully upload the price list with prices, you will see the filled prices in the blocks with templates. To confirm the upload, click the Apply button. Also, to cancel the upload, click the Cancel button.
After applying the price, you will be taken to the collection page, then you need to enable the collection.
To do this, turn the switch to active mode
Pricing
My webpage
Add a website
When you create a company, a website is automatically created on the Vitrager.com subdomain (Mycompany.vitrager.com). But it is also possible to host a website on your own domain. In order to use your own domain name, you need to do the following steps:
- For your domain, register an A-record to our server 116.202.6.56 (please note that it can take about 24 hours for providers to update dns names)
- Add a new website using the Add website button and fill in the details:
- Domain name (in the format mywebsite.com)
- Favicon and Logo for the site (if there is no site logo, then the company logo will be used as the logo)
- The main language of the site
- Mail for receiving requests from the site (mail can be any)
Region (required for site indexing by bots) - Type of configurator (site mode)
- Return email (mail that will be displayed in the “basement” of the site)
- Phone number
In order to select the main website (after creation), you need to click on the three dots next to the website and select Set as main site in the menu
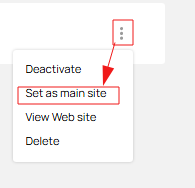
Please note!
To select a website as the main one, it must be activated (enabled)