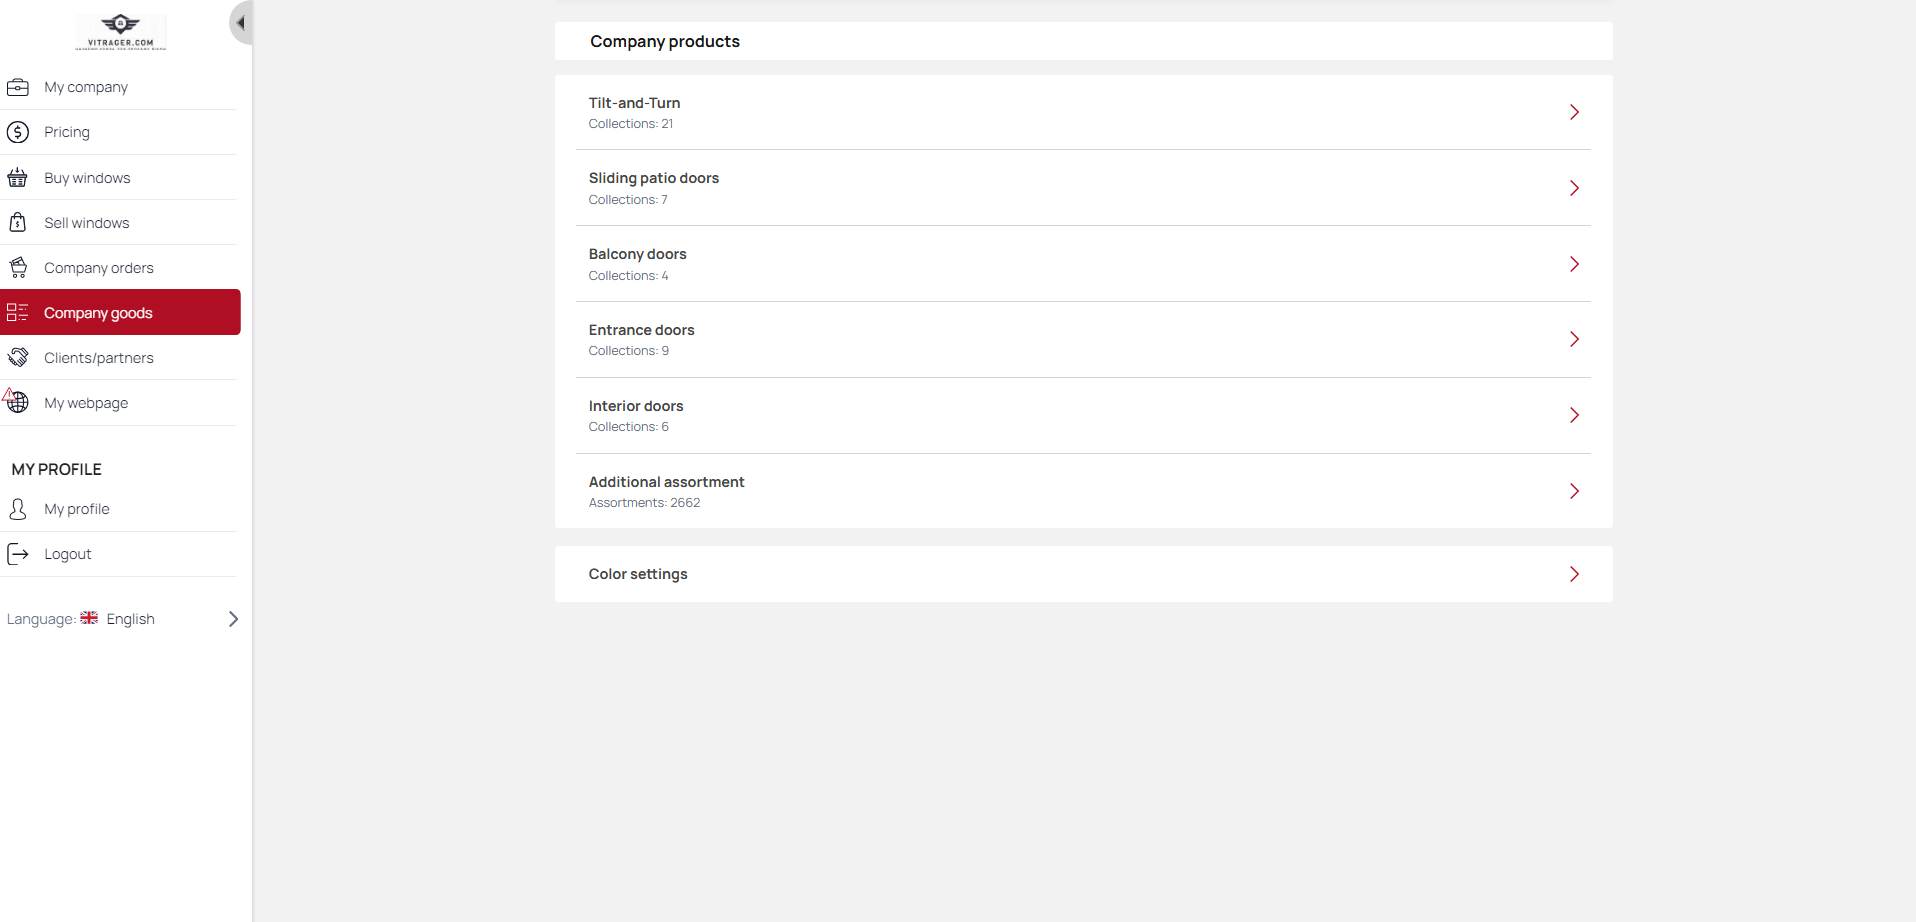
Company goods
The Company goods section allows you to work with product collections—windows and doors made from different profiles.
Distributors can edit information about product collections, the terms of sale for which they have received from their suppliers in the Vitrager system.
By creating its own collection, the company becomes a supplier in the system and can sell them independently and provide dealer terms to other companies.
Creating collection
By creating its own collections, the company becomes a supplier in the system.
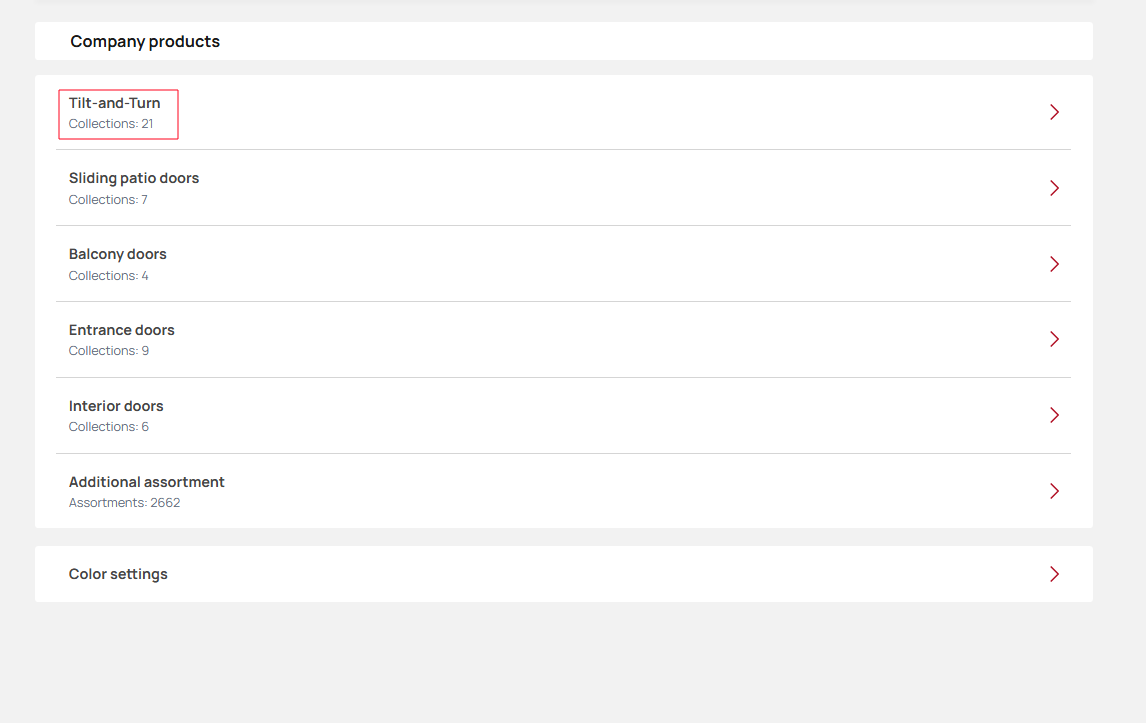
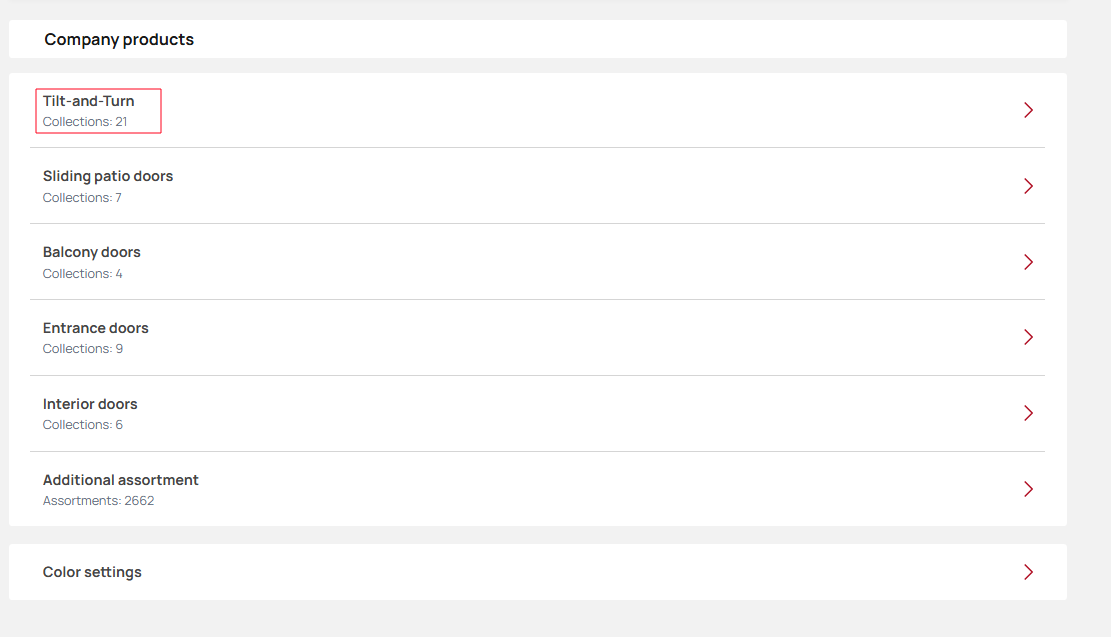
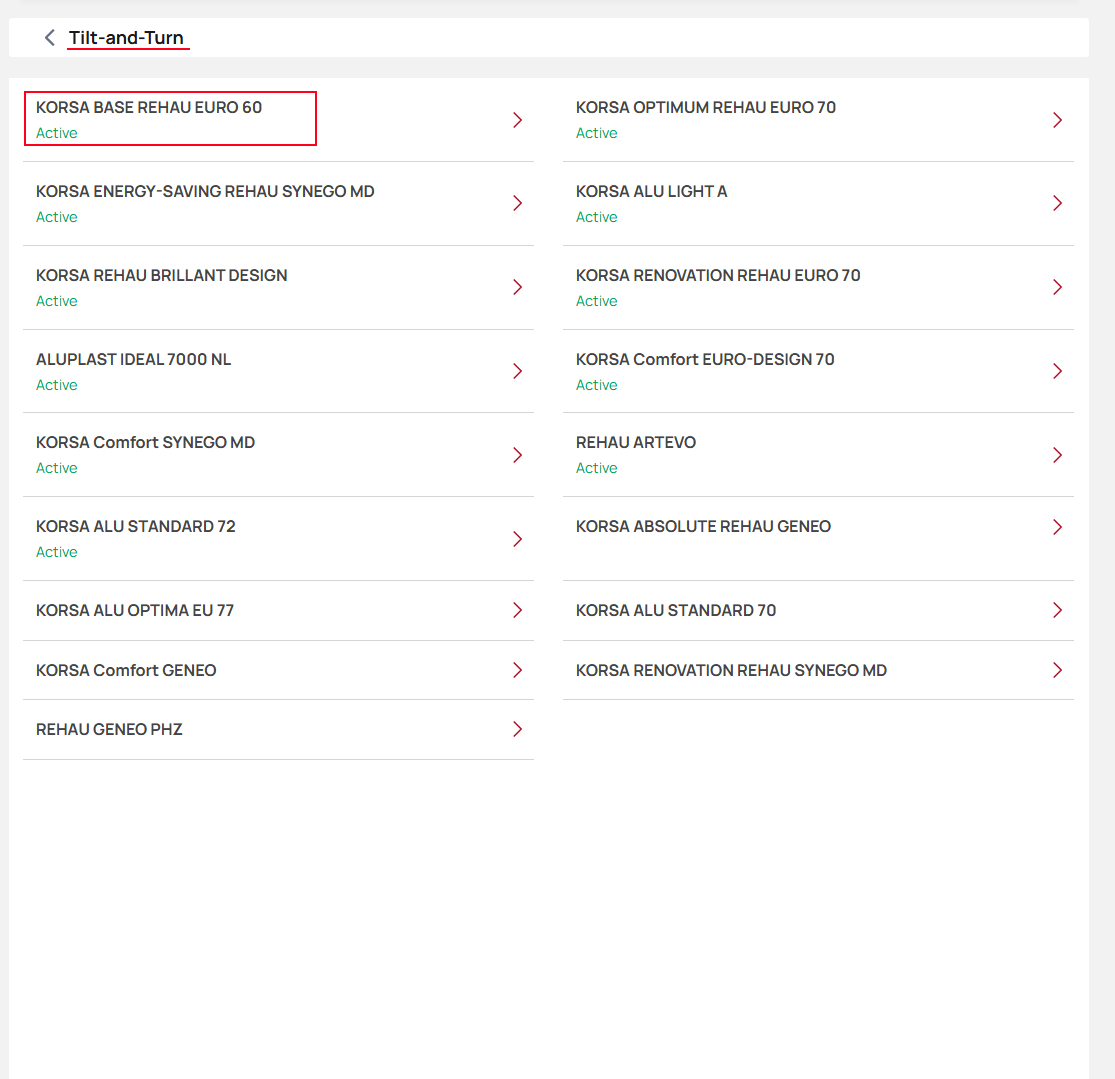
Select the product type and click on it.
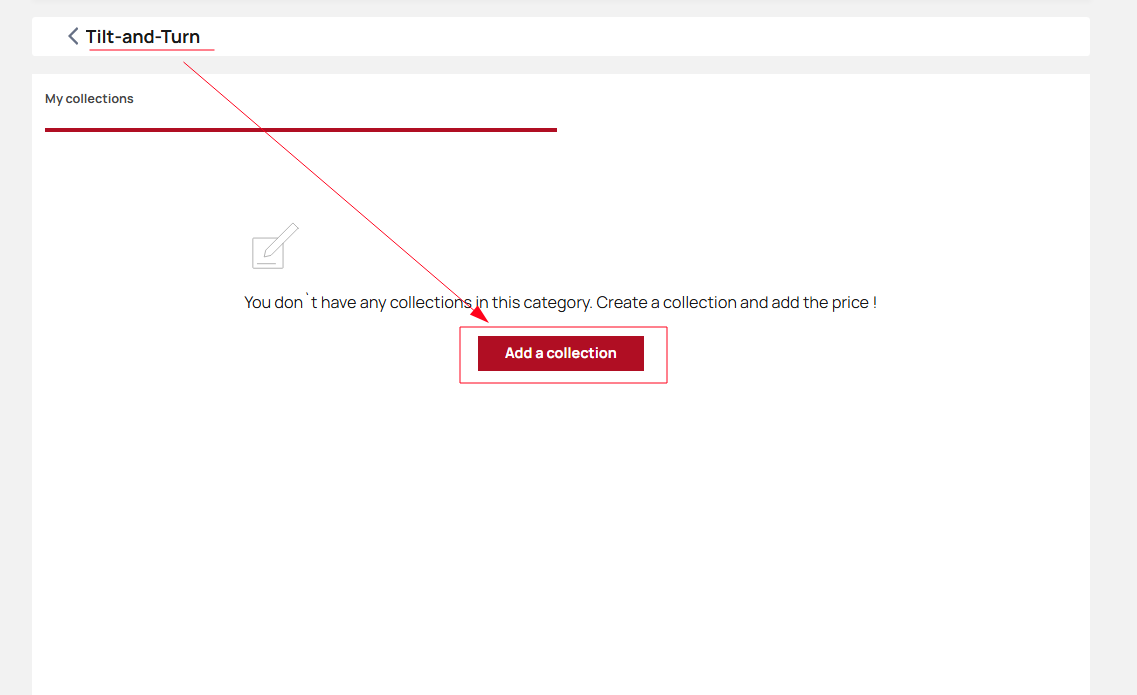
To create a collection, click the Add Collection button.
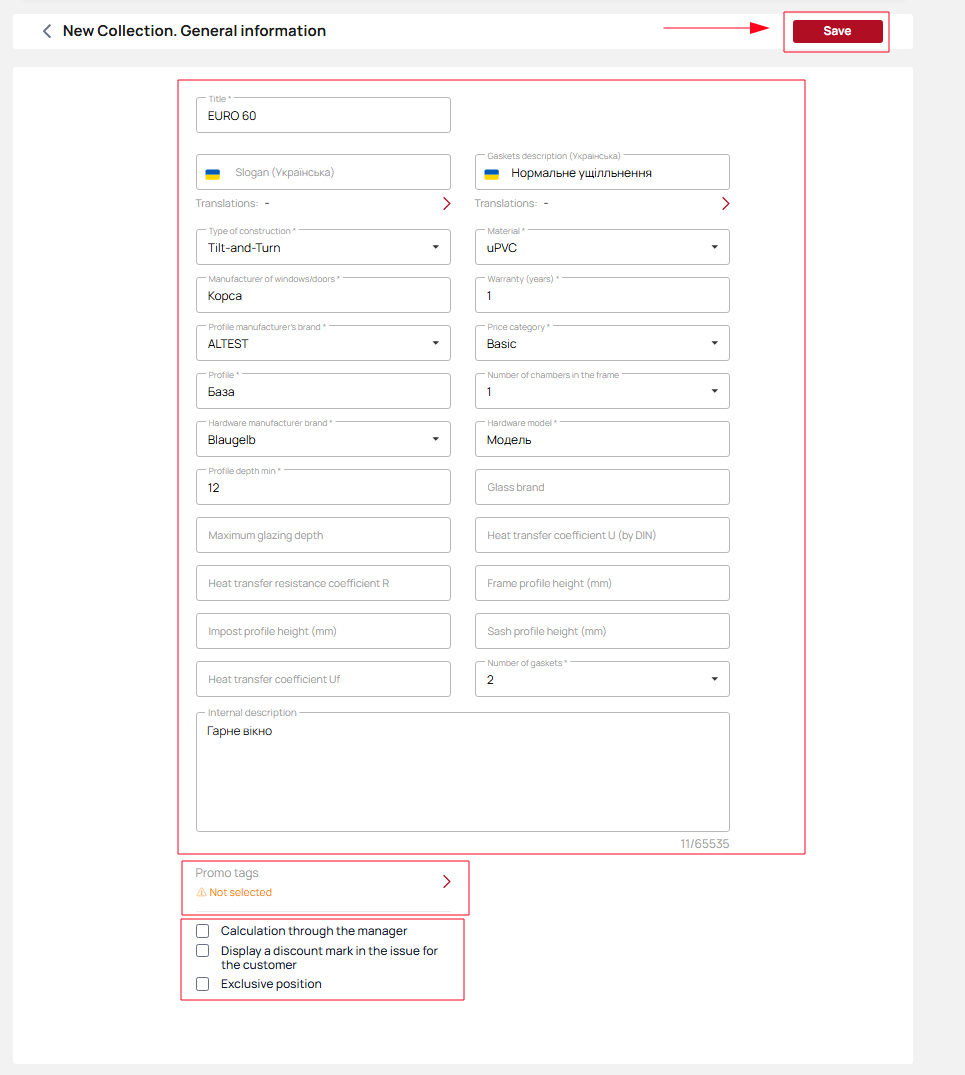
You will see a page with general information about the collection. Enter all the data about the collection (not all fields are required). After filling in all the data, click the Save button.
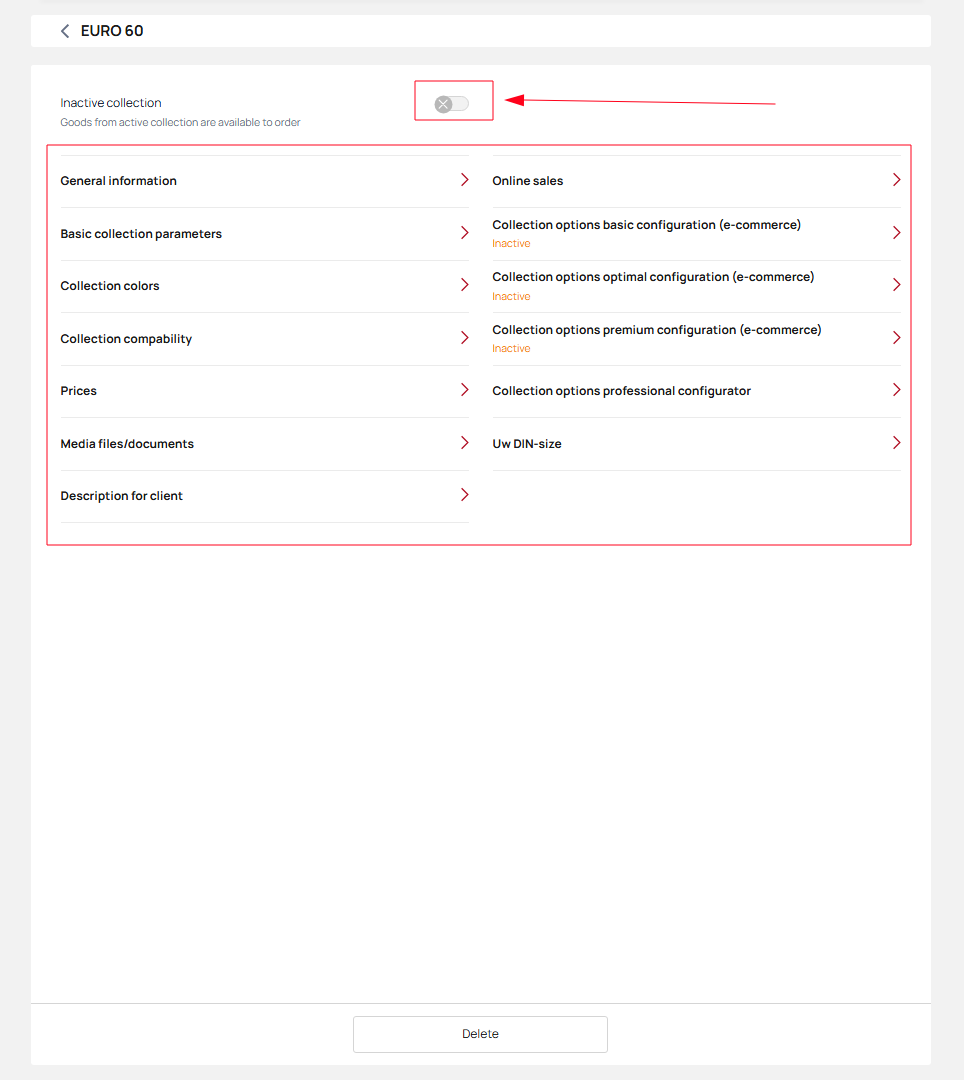
Click on each information block to view and edit specific information about the collection you need. After all settings are complete, you need to activate the collection.
If the price list is not uploaded to the newly created collection, it is impossible to activate the collection.
Collection settings
Select the product type and click on it.
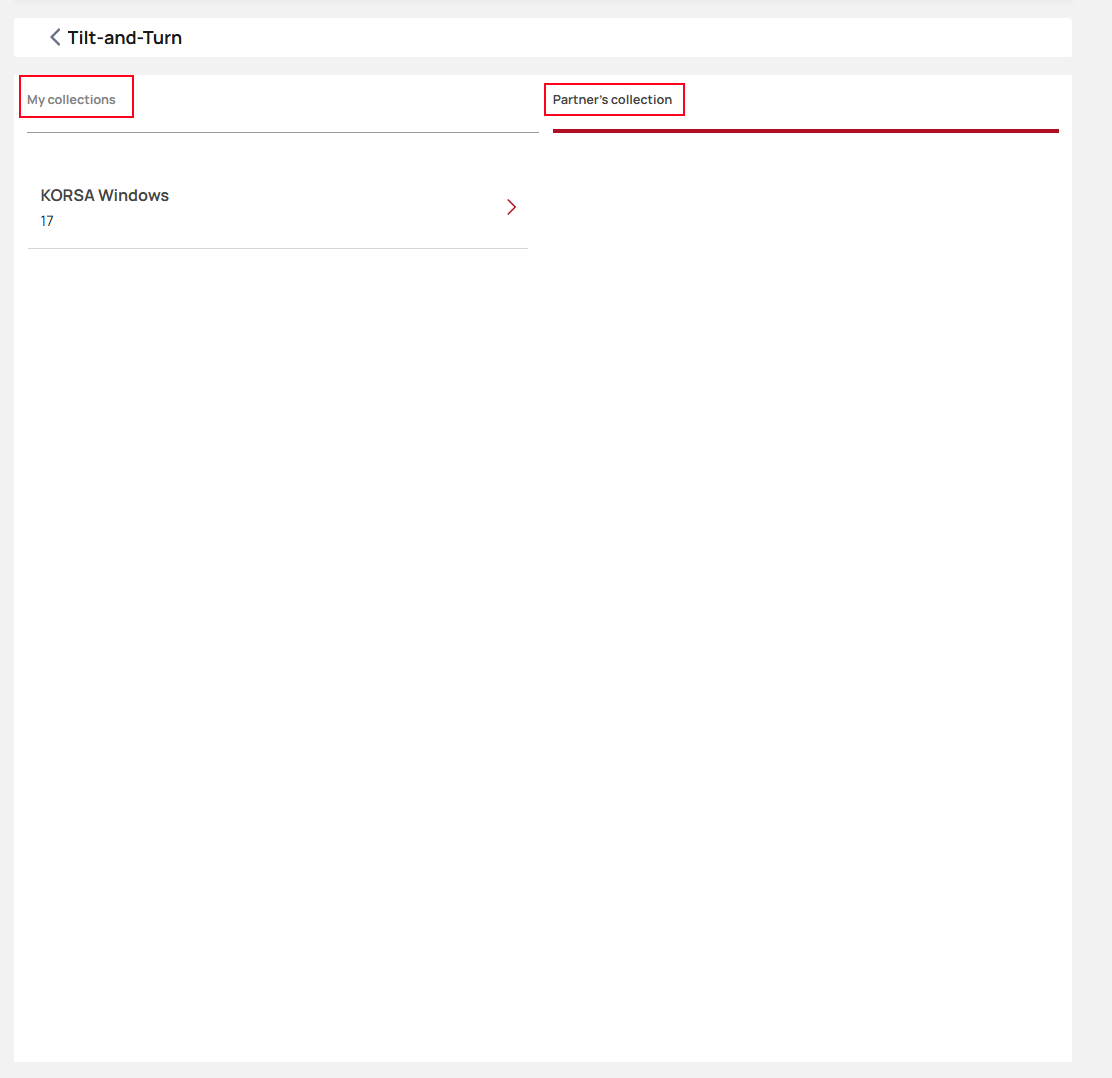
On this page, you can view your own and partner collections.
By creating their own collections, dealers become suppliers.
Dealers can view and edit collections, with special conditions provided by partners.
Click on a specific collection to view or edit the information.
Click on each information block to view and edit specific information about the collection you need.

General information
Click “General Information” to view the basic required data, and click “Edit” to start the setup.
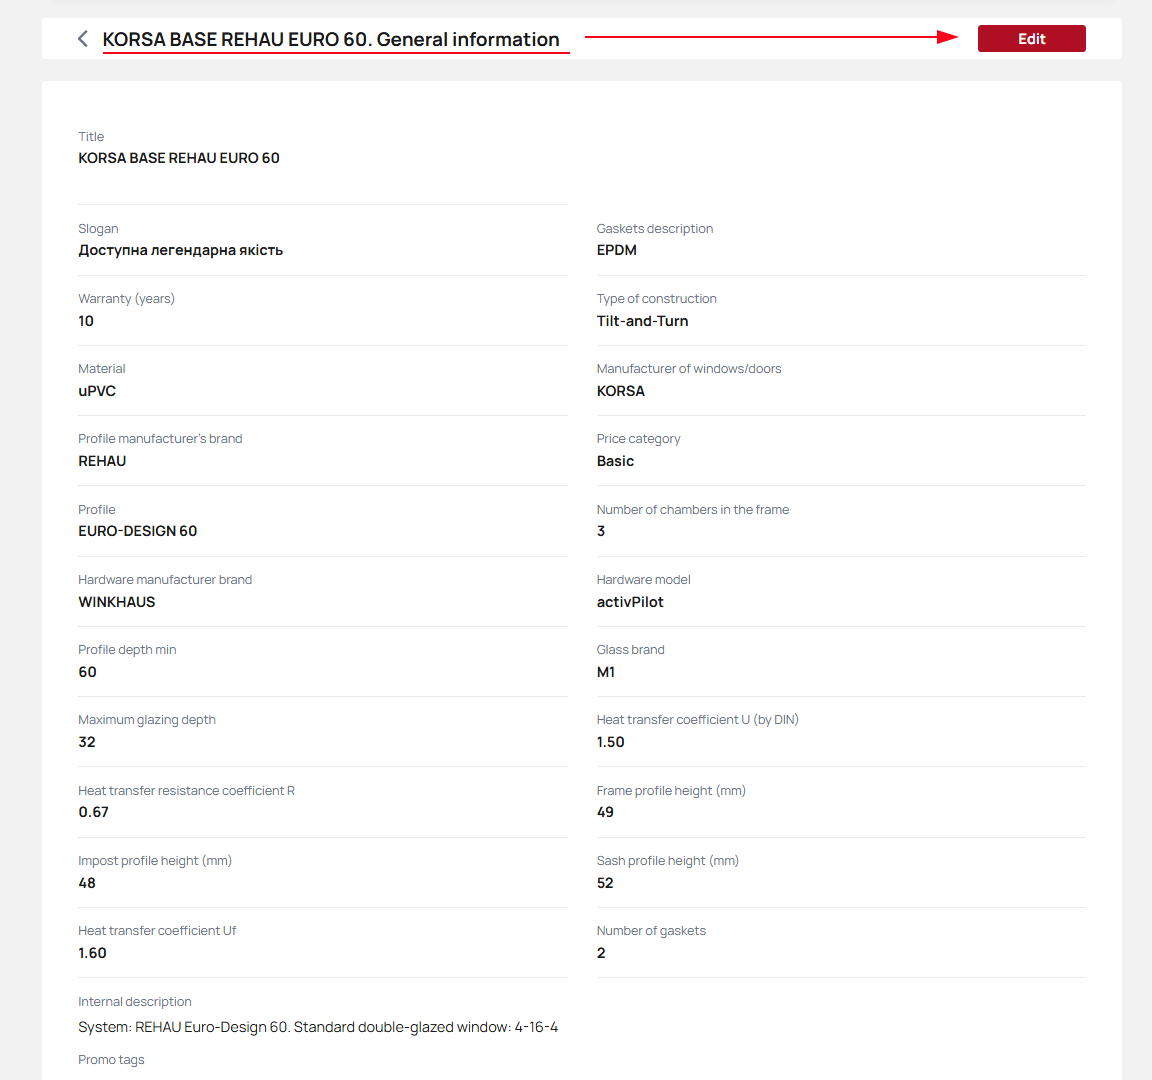
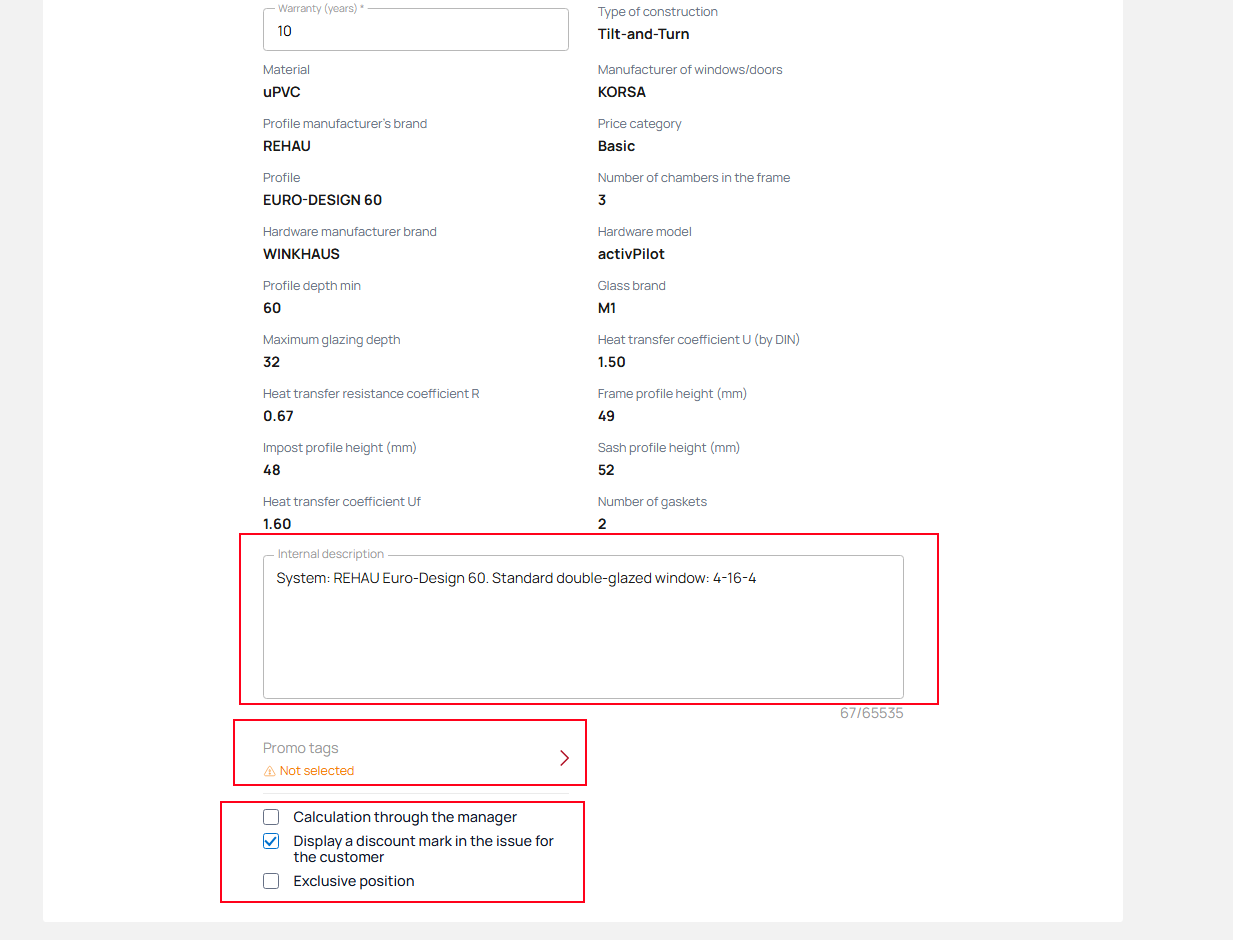
At this stage, you can edit the title, tagline, warranty years, add promo tags, and internal description. Scroll down the page.

Select additional settings for this collection. Scroll up and click the “Save” button.
Basic collection parameters
Click Basic collection parameters. Here you can view all the necessary information about the colors of the collection, the colors of seals or sealants, handles, imposts, glazing, burglary protection, and manufacturing time.
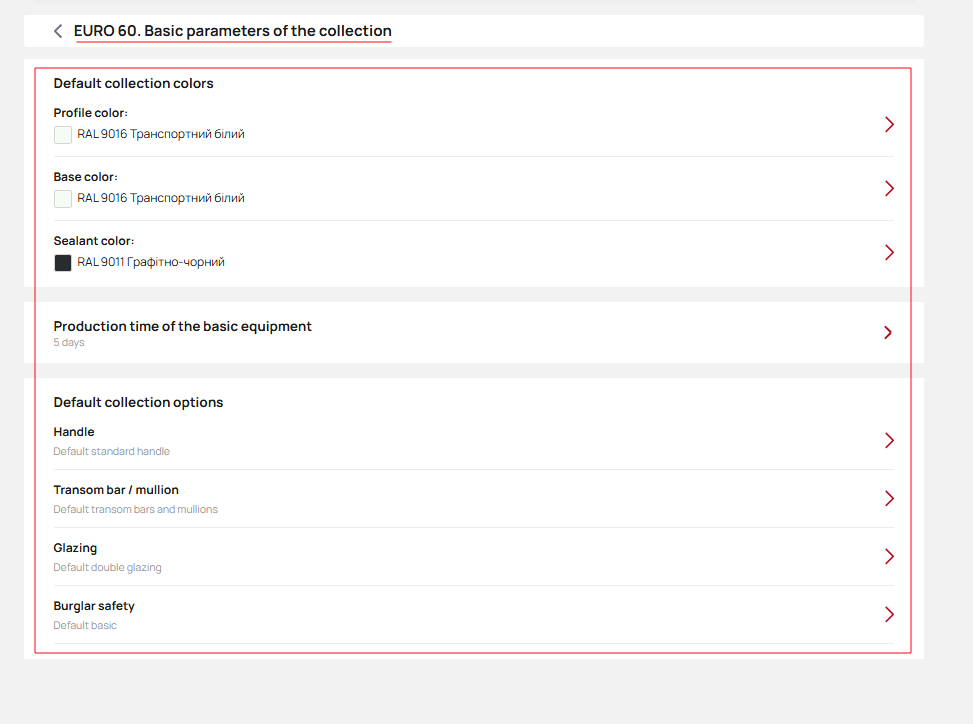
At this time, you cannot change any data except for the production date of the basic configuration. All changes to these parameters are made by the supplier.
Collection options
Set up basic, optimal, and premium configuration options and collection parameters for the professional configurator.
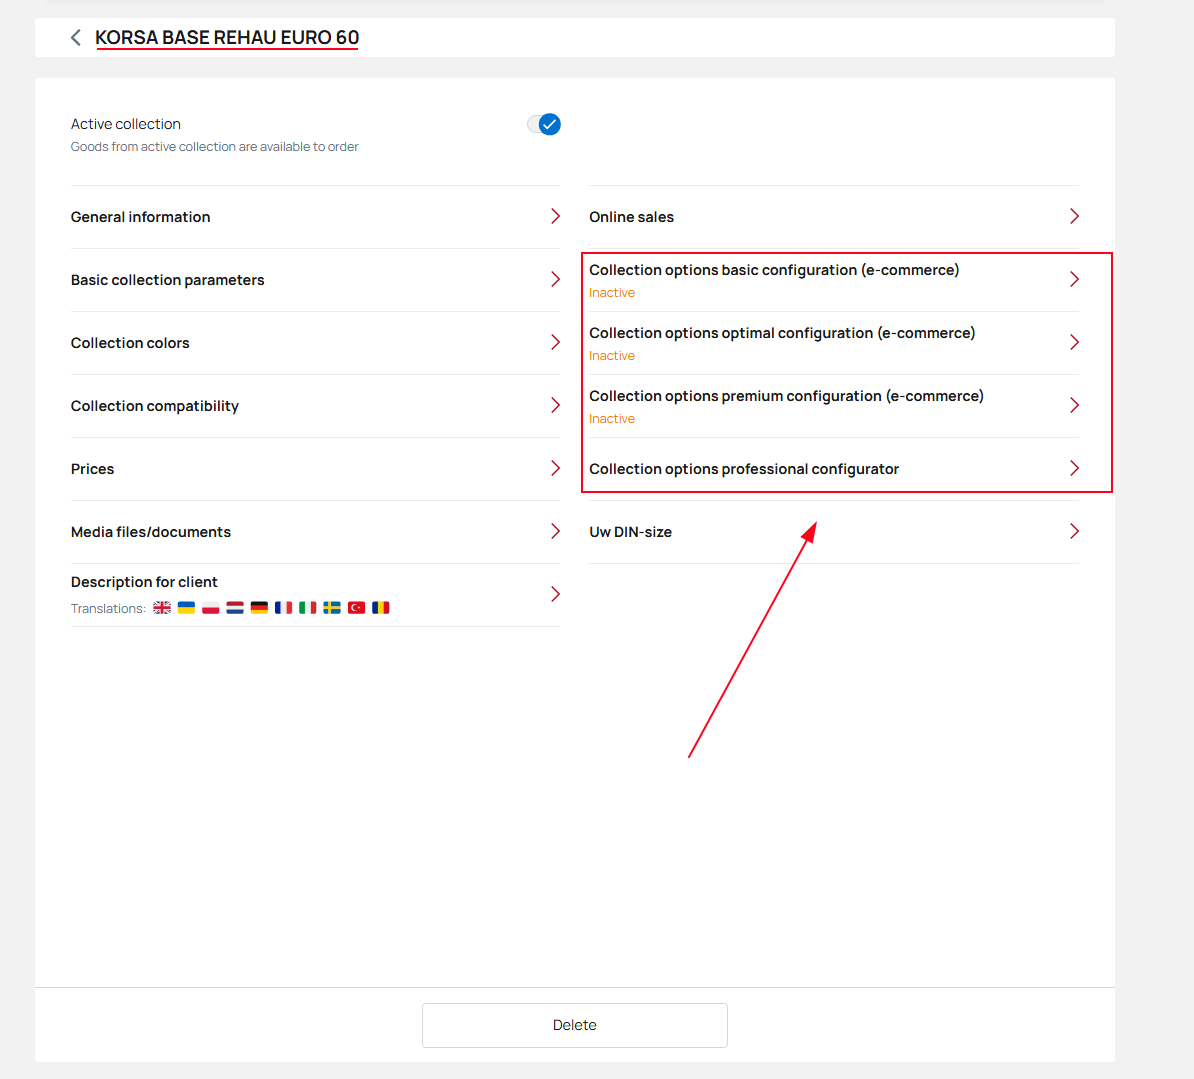
Configure all configuration options available to customers.
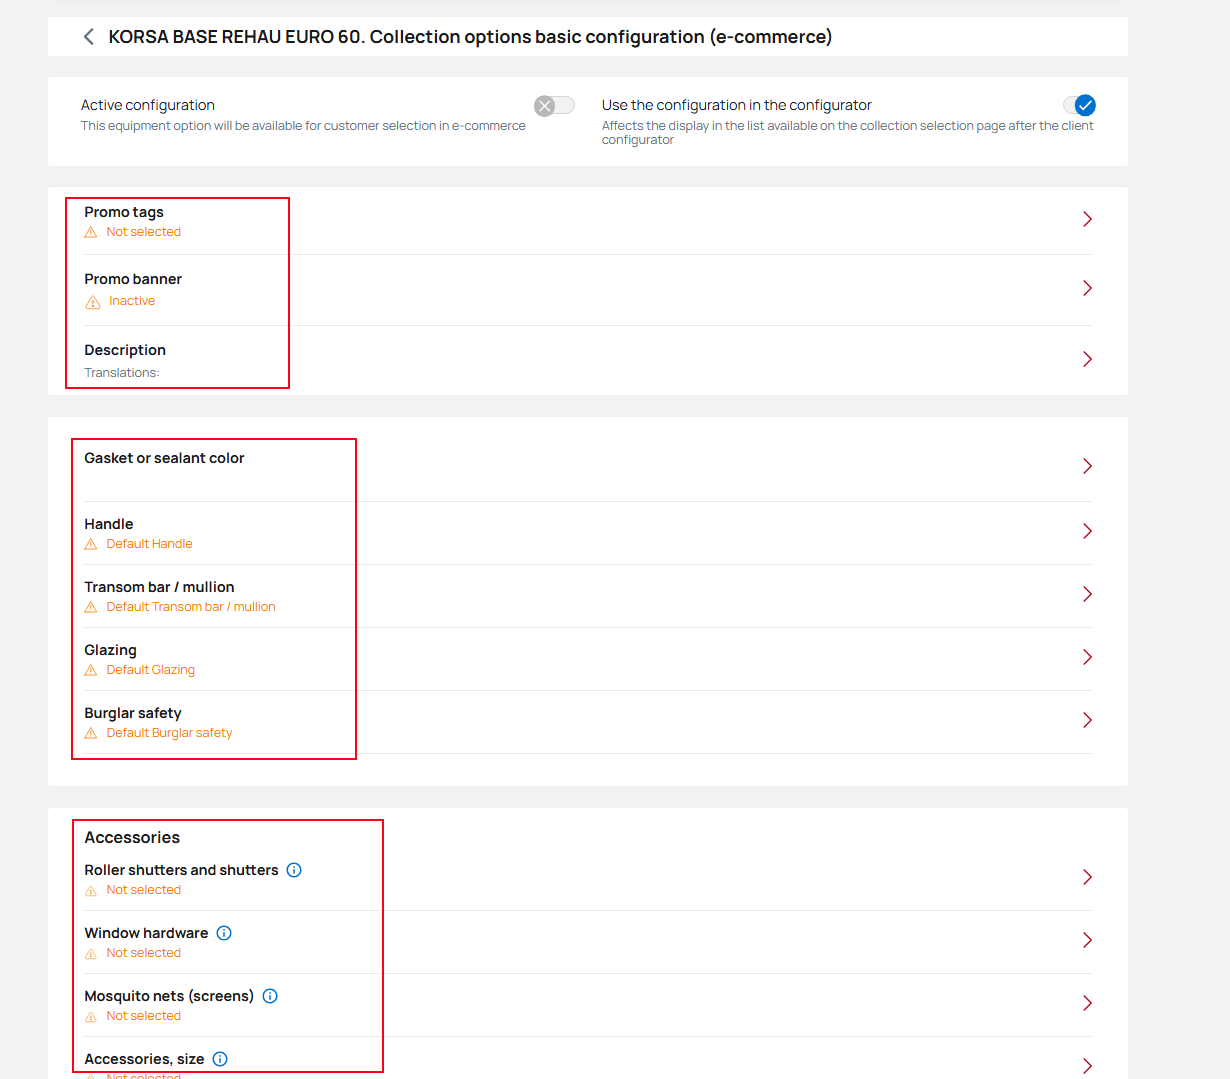
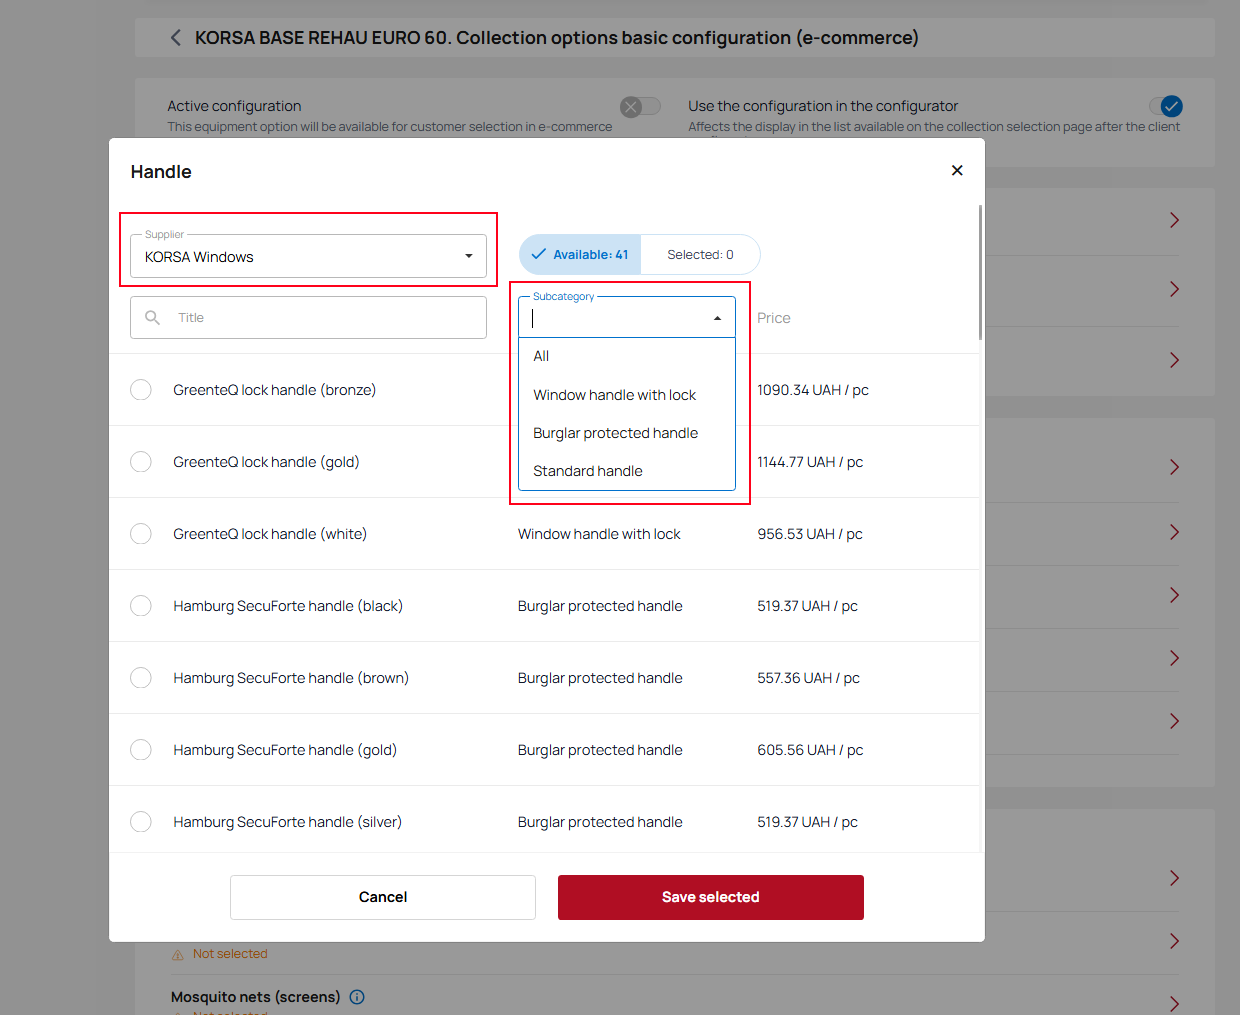
Select a pen from your collection or from the suppliers' collection, use the search function, and get all the necessary information by clicking on the information icon.
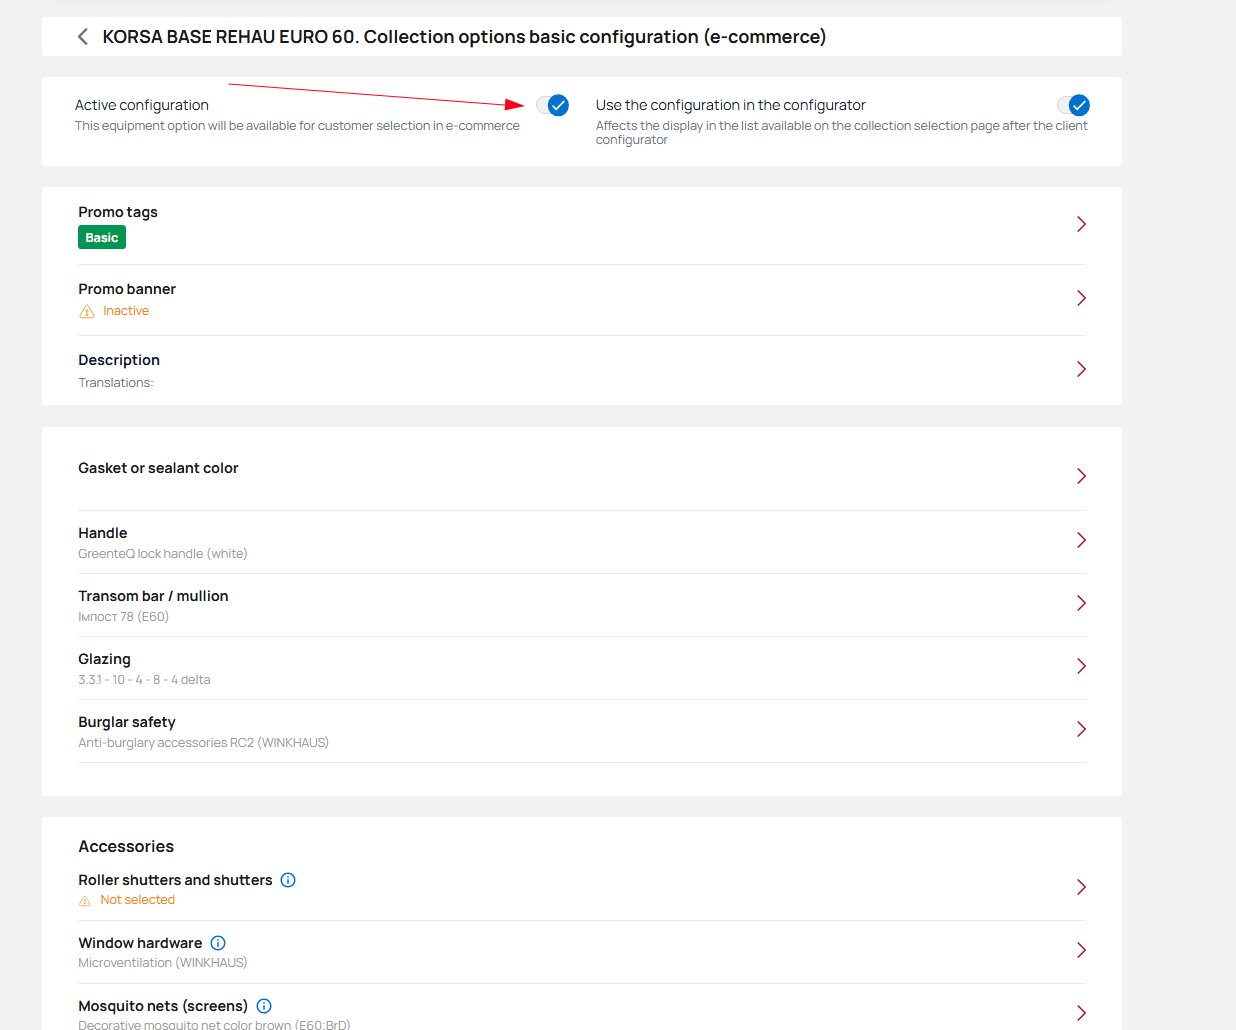
Configure the remaining configuration parameters.
Now that you have added the necessary configuration parameters, you can activate this specific configuration by clicking the switch.
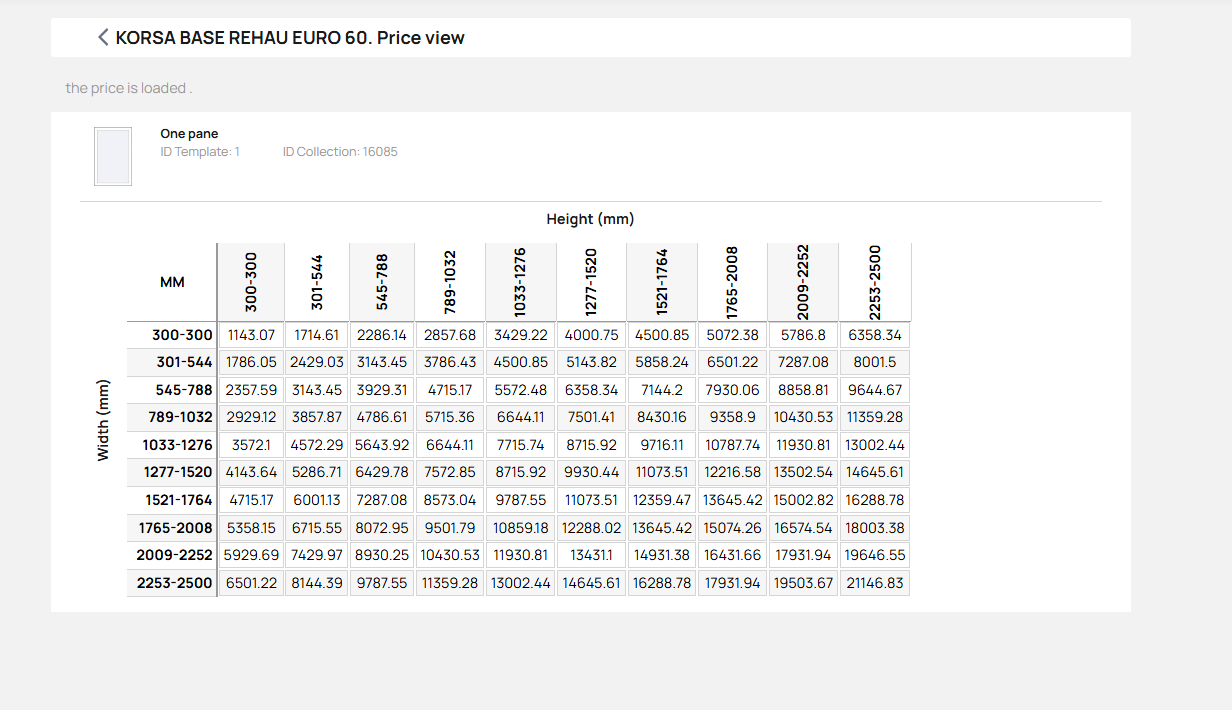
Prices
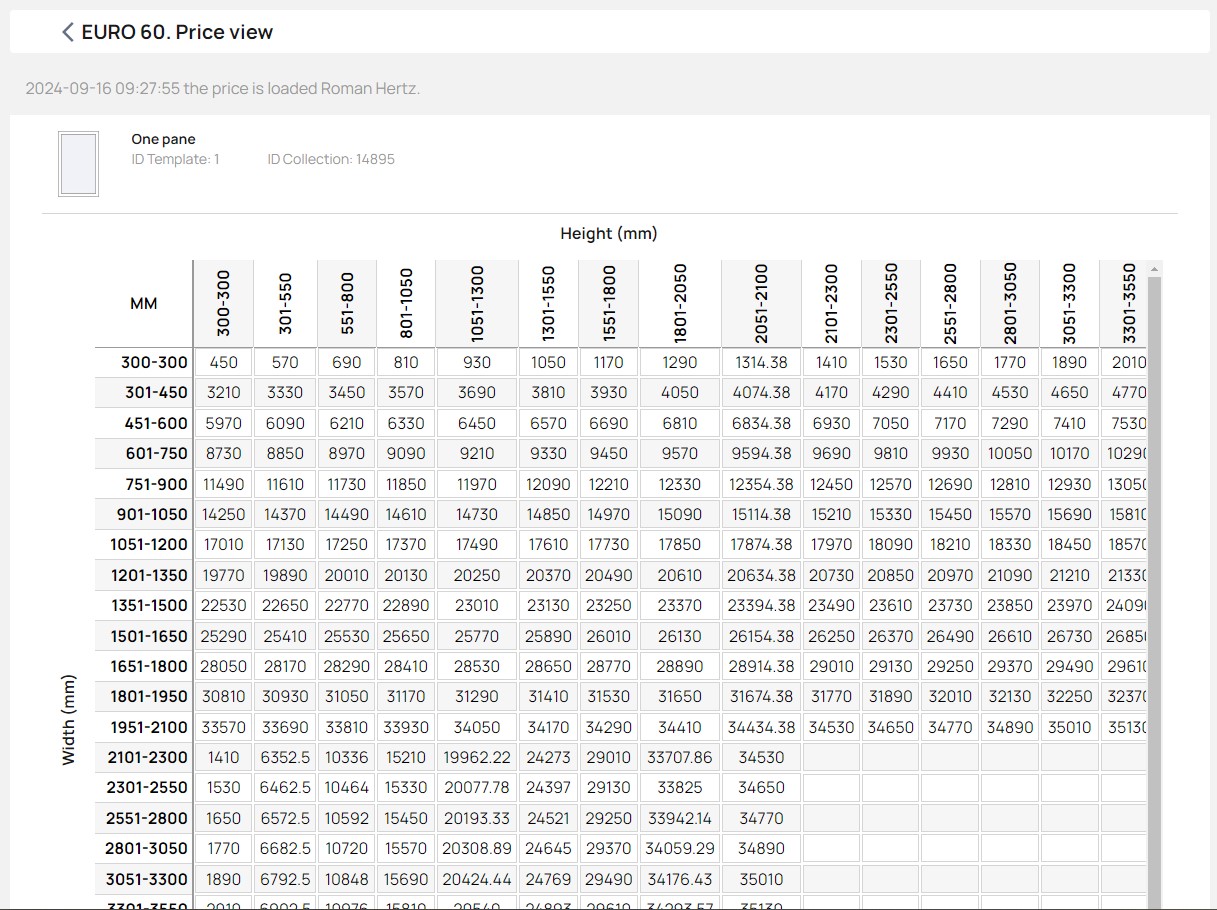
Click “Price” to view the prices for the various templates uploaded by your supplier.

Select a specific template to view prices.
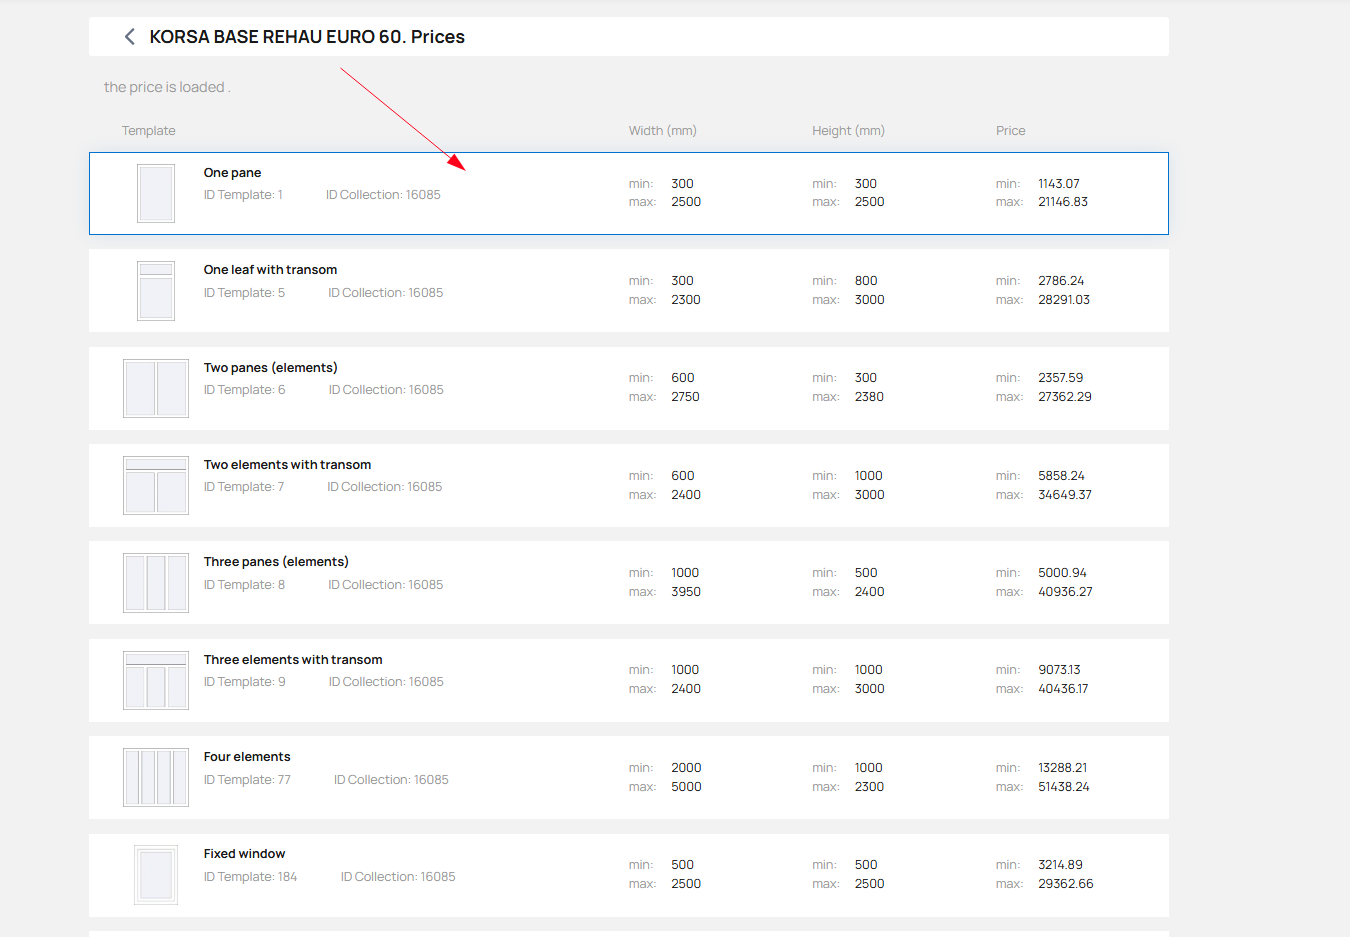
Check the prices for different sizes.
Please note that if your size is outside the price range, the system will not be able to calculate your order in the configurator.
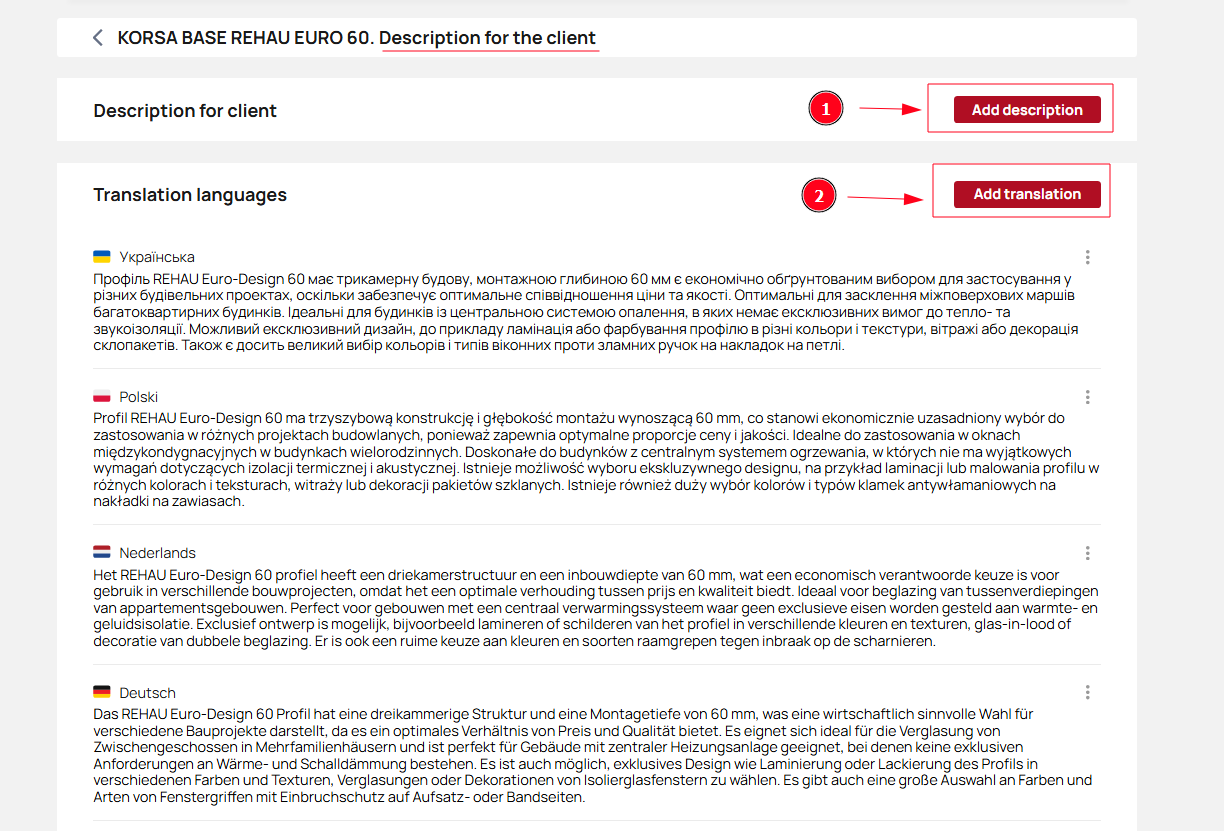
Description for client
Add a description of the specific collection. Click Description for client.
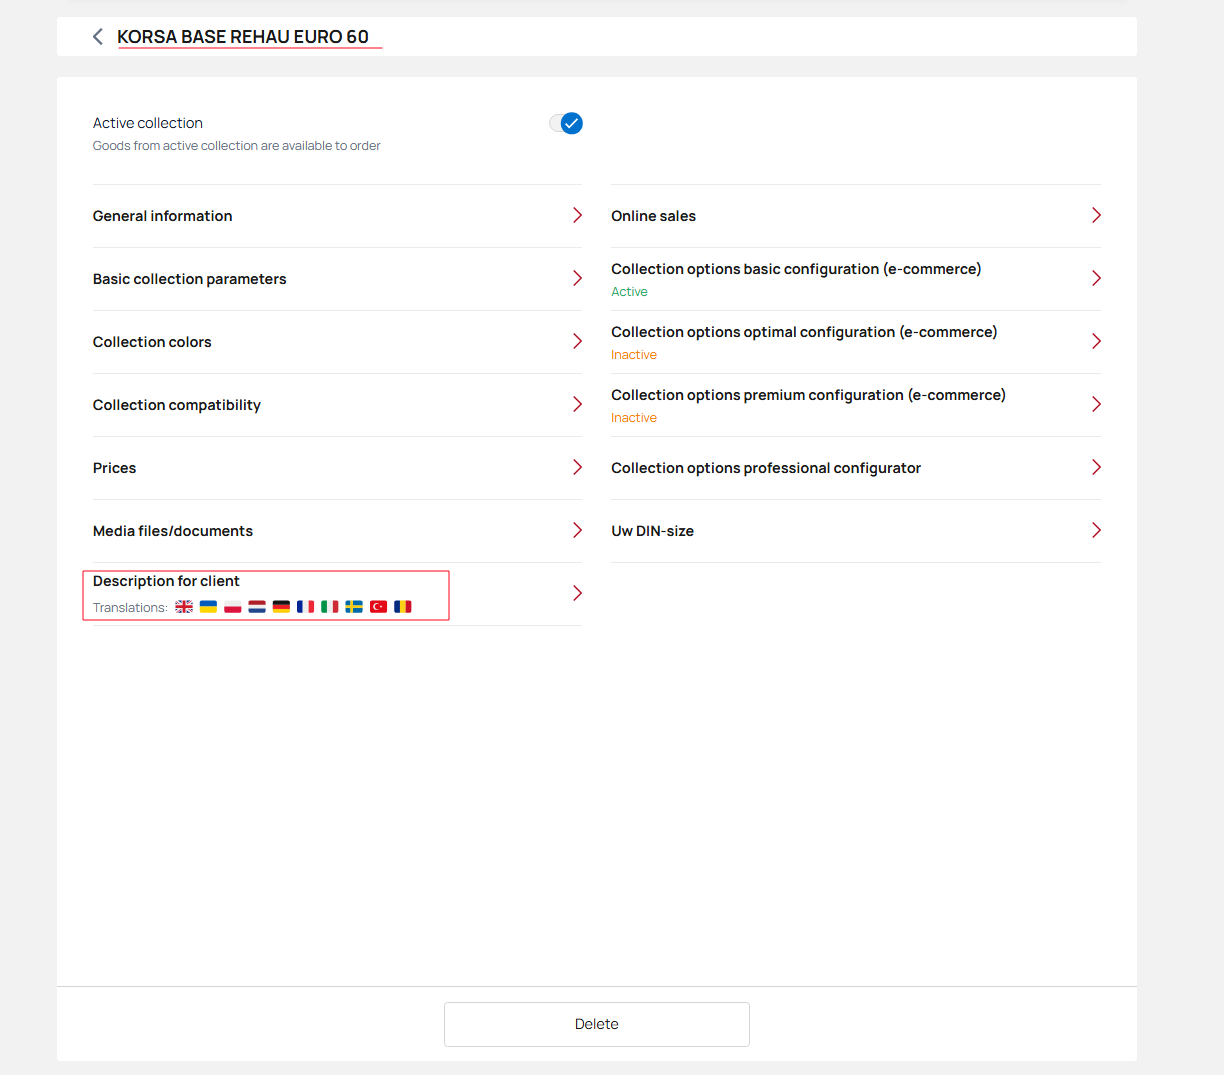
Add a description in the main language and translations into other languages.
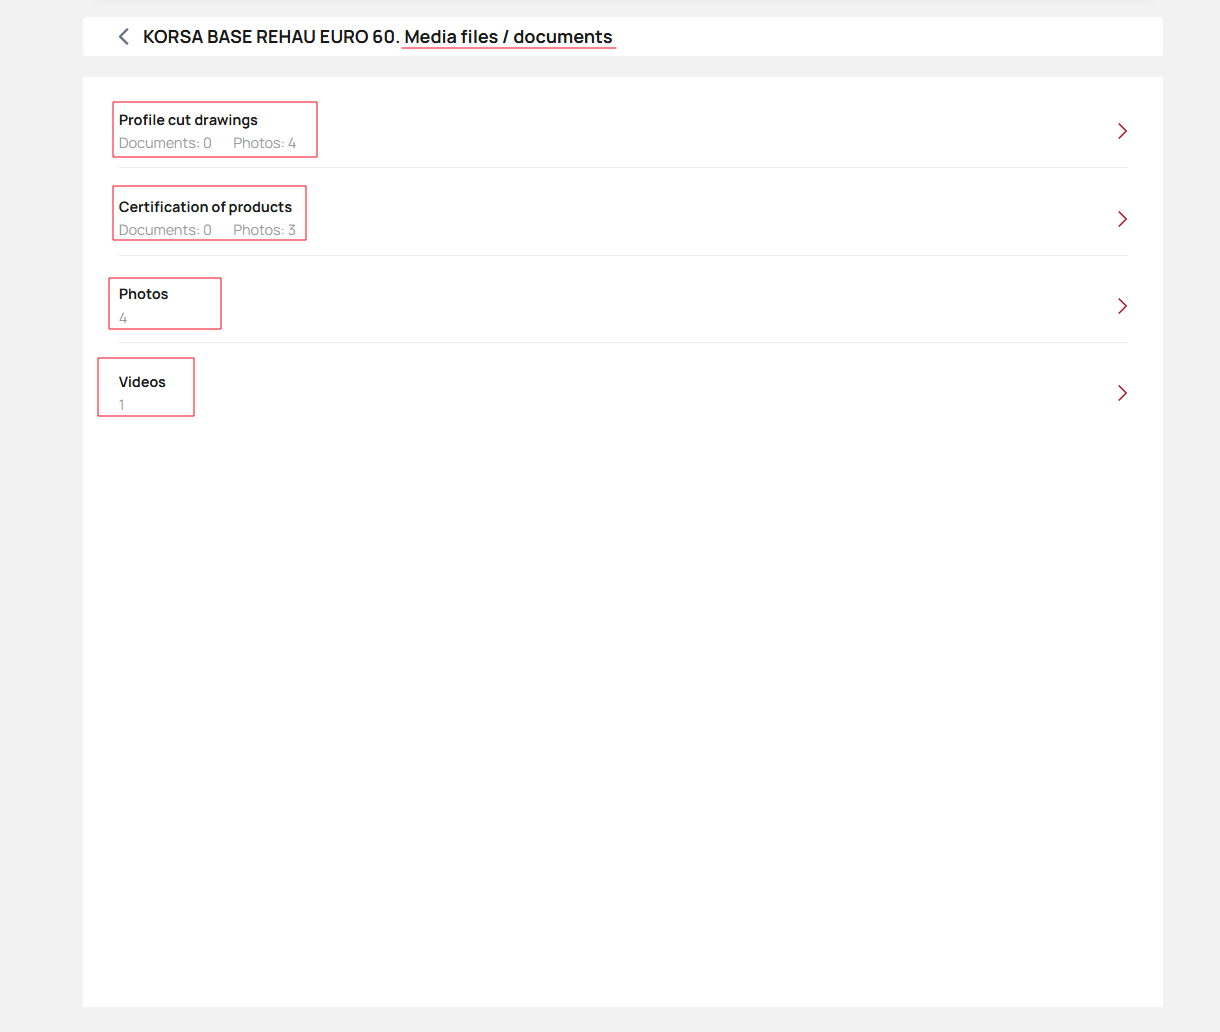
Media files / documents
Add media files/documents from a specific collection to provide customers with additional visual effects and create an attractive image.
Click “Media files/documents."

There are four types of files available for download: Profile Cut Drawings, Product Certification, Photos, and Gallery of Works. Each type is displayed in different blocks on the product pages.
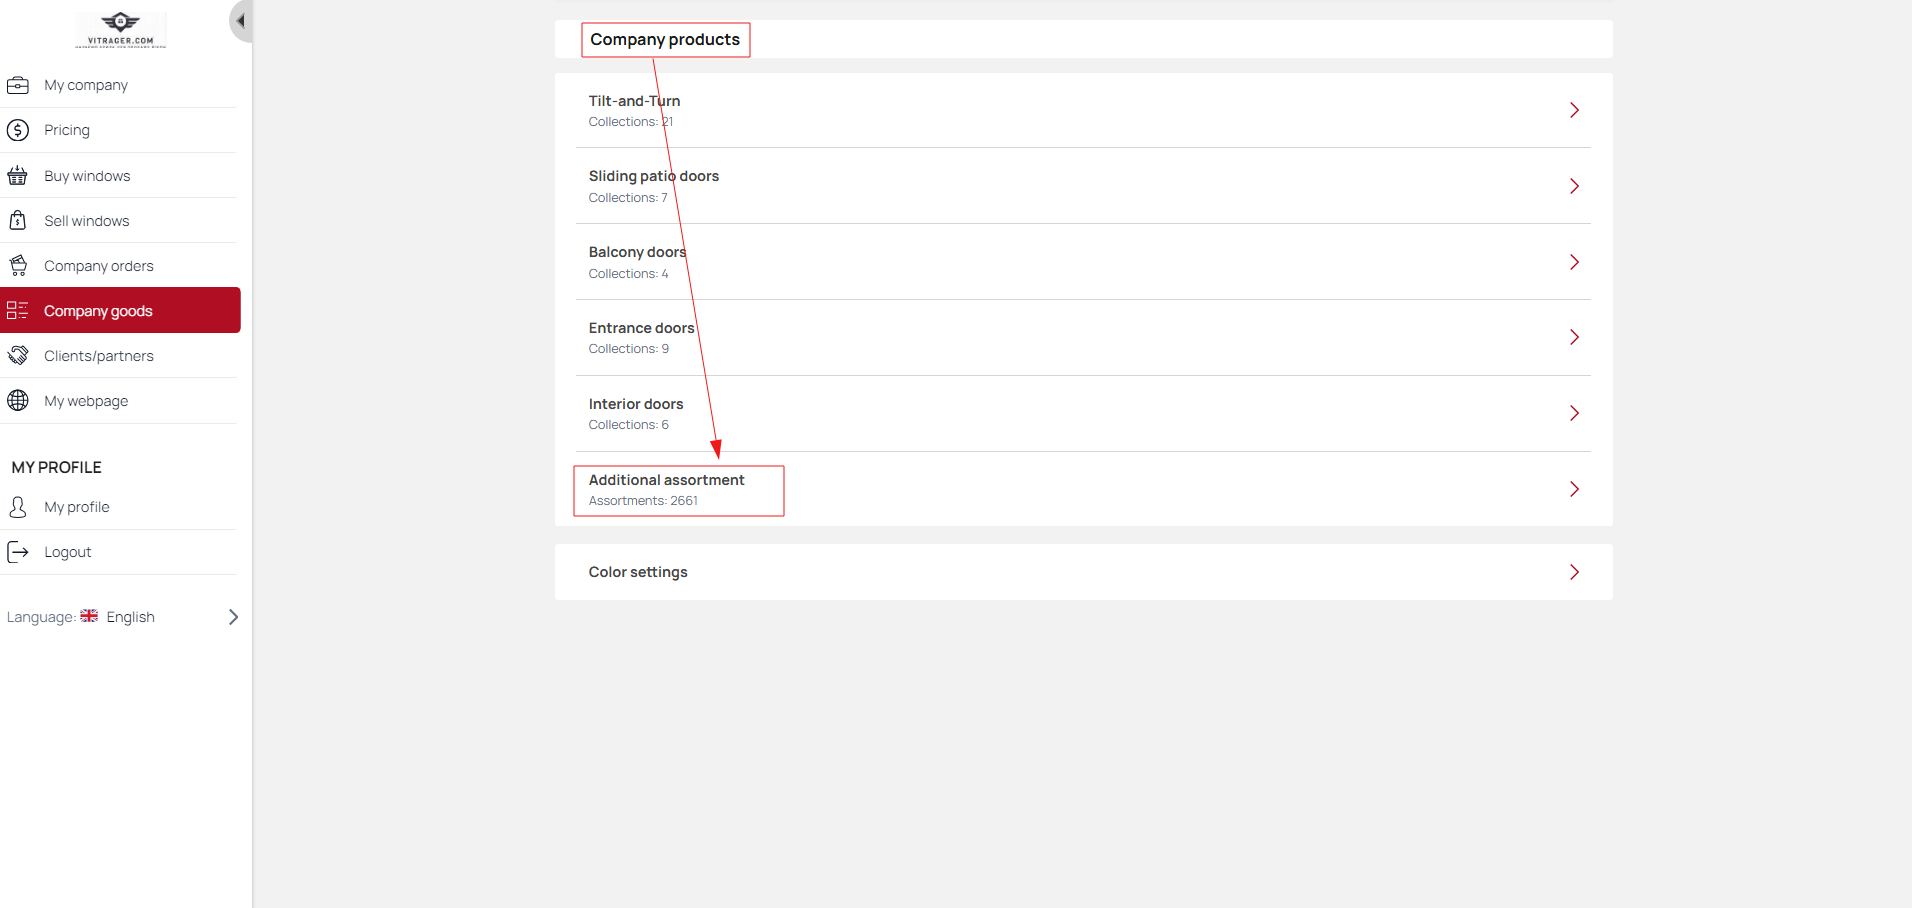
Additional assortment
Additional assortment is an assortment used to create structures (such as double-glazed windows, handles, imposts), as well as an assortment that is additional to the structure or collection and may not affect the structure (such as blinds, roller blinds, mounting materials, packaging).
The Additional Assortment section includes the following sections:
|
|
|
|
To create an additional assortment, you need:
- Go to Additional assortment section
- Select a category (for example, Glazing)
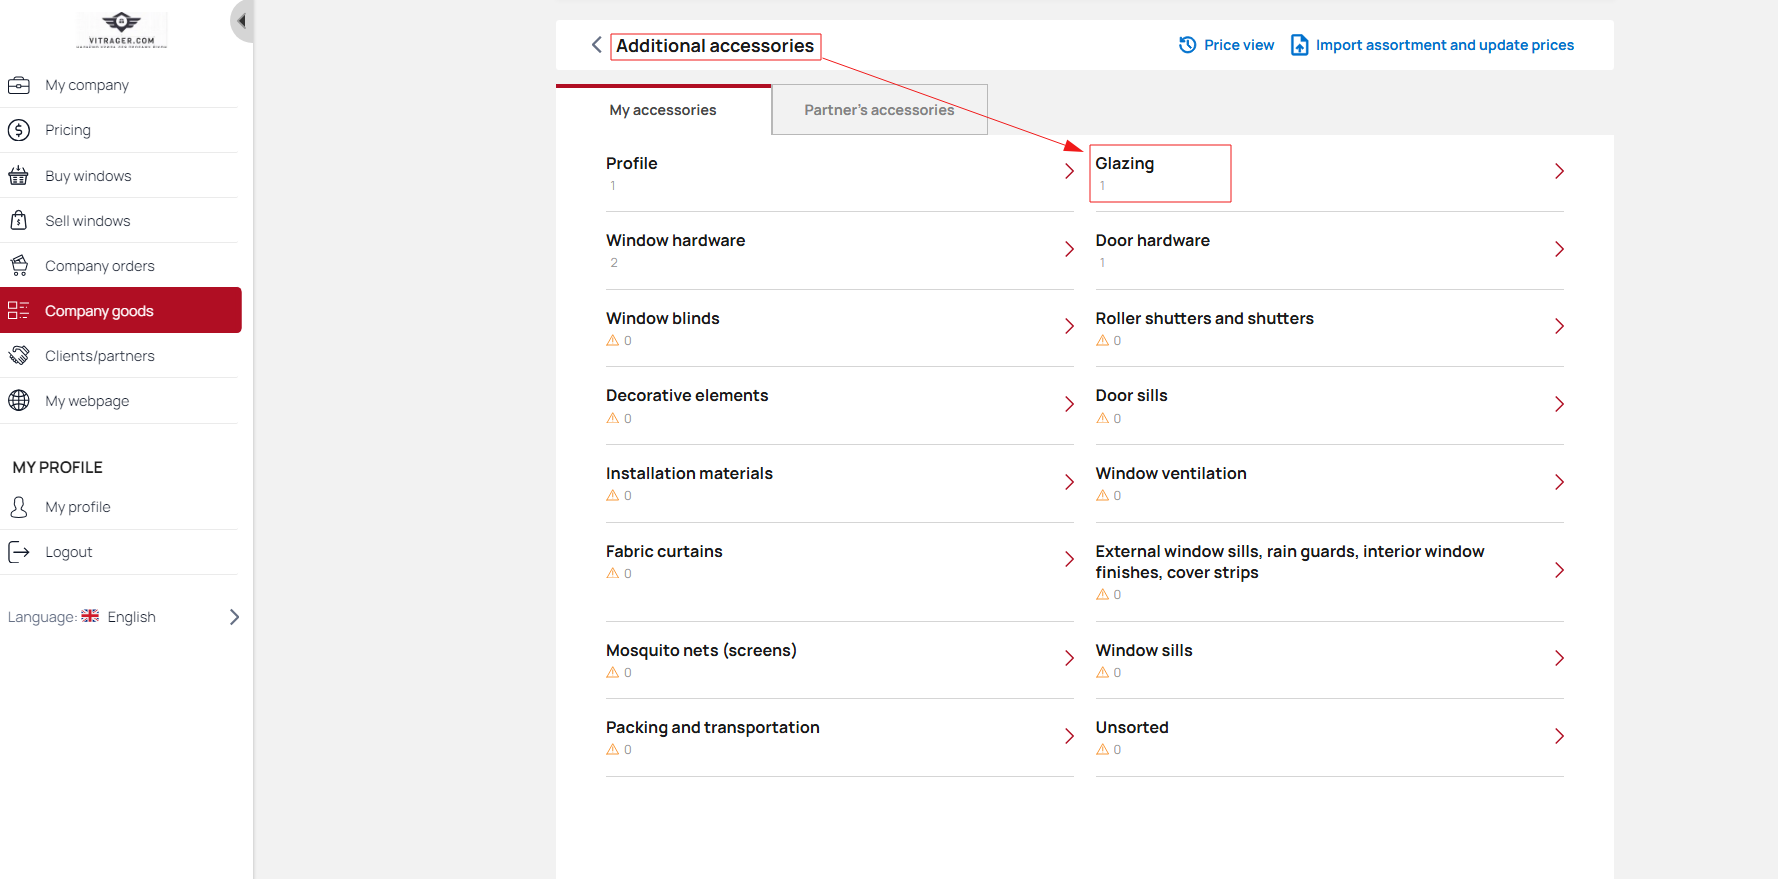
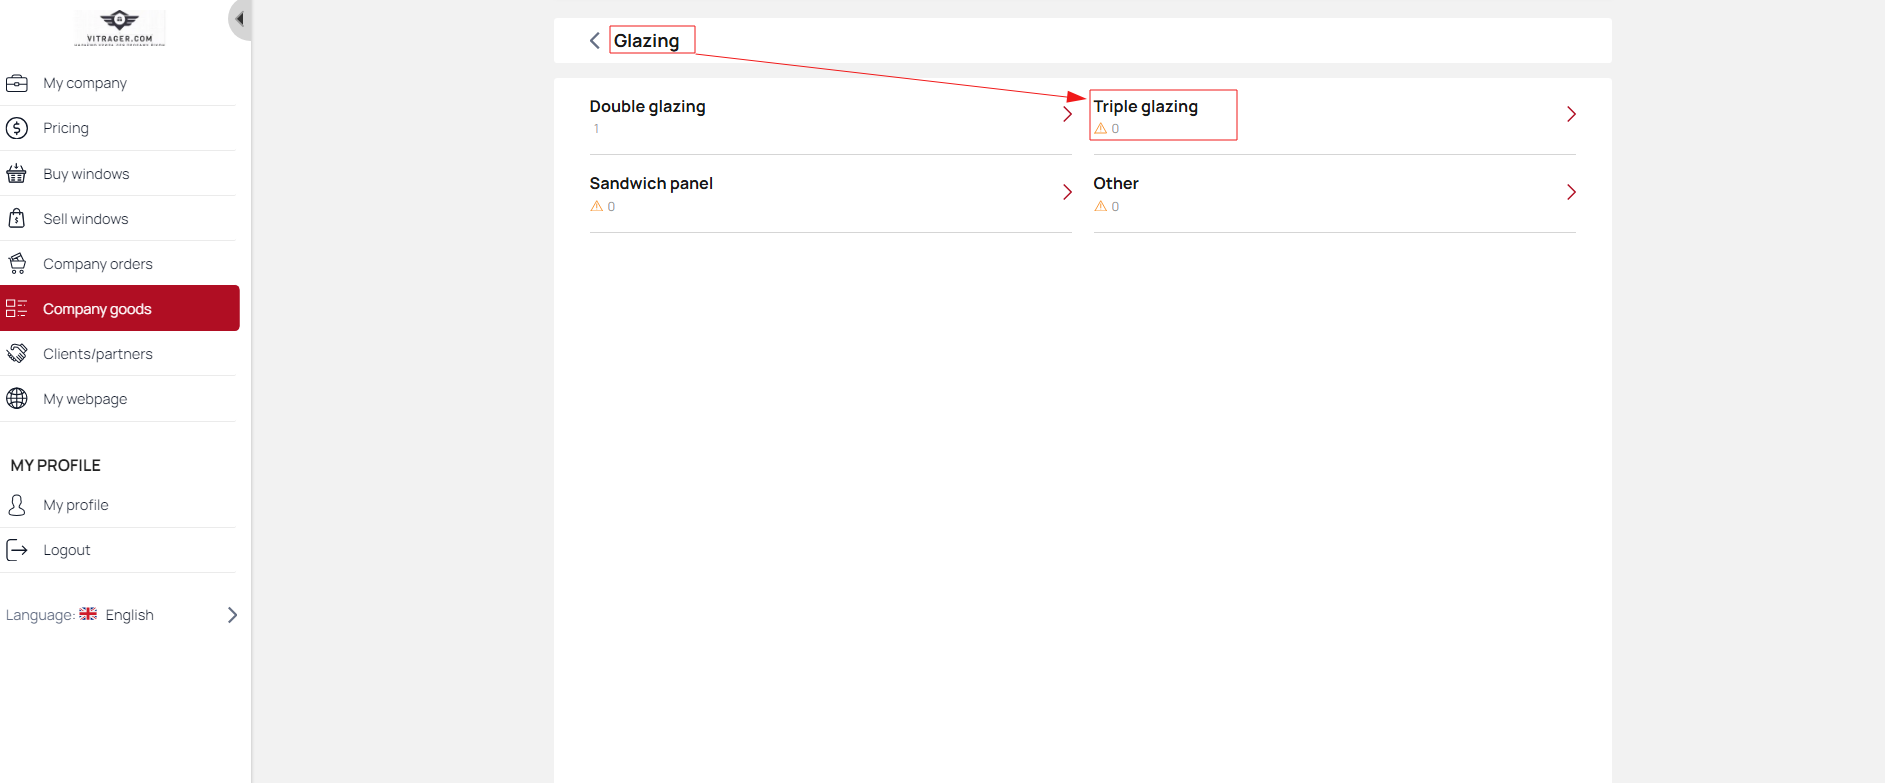
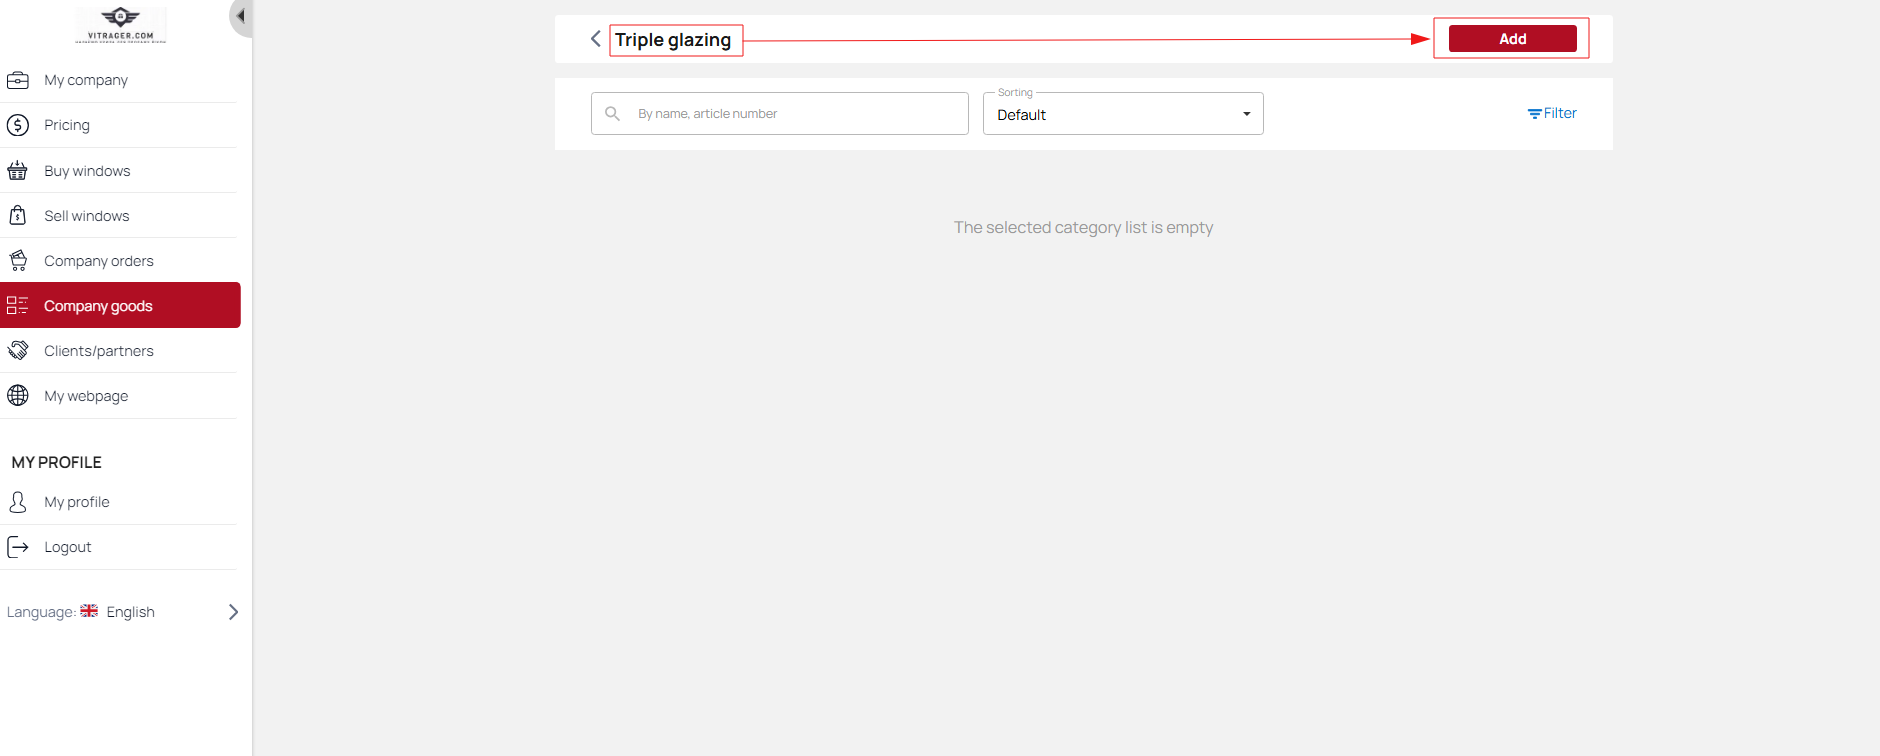
- Select subcategory
- Once you are on the subcategory page of the additional assortment, click the Add button.
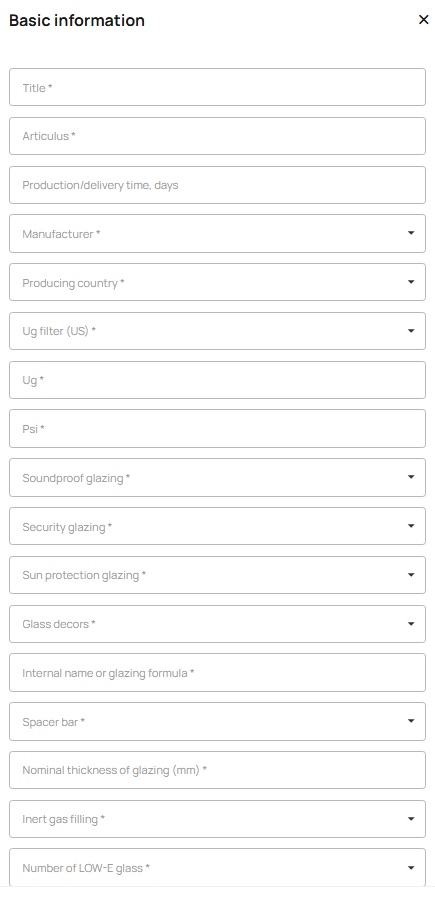
- In the modal window for creating an assortment, you need to fill in the fields:
Required fields
- Name - enter data
- Article number - enter data
- Selector - select from the list
- Country of manufacture - select from the list
- Ug filter - select from the list
- Ug - enter numerical data
- Psi - enter numerical data
- Soundproof glazing - select from the list
- Safety glazing - select from the list
- Sun protection glazing - select from the list
- Decorative glass - select from the list
- Internal name or shape of the glass unit - select from the list
- Spacer frame - select from the list
- Nominal thickness of the glass unit - enter numerical data in millimeters
- Inert gas filling - select from the list
- Number of Low-E glass panes - select from the list
- Functional purpose - select from the list
- Special glass and decor - select from the list
Optional fields
- Production/delivery time - specify numerical data in days
- Min. width - enter numerical value in millimeters
- Min. height - enter numerical value in millimeters
- Max. width - enter numerical value in millimeters
- Max. height - enter numerical value in millimeters
- Switch Exclusive position - check the box to enable
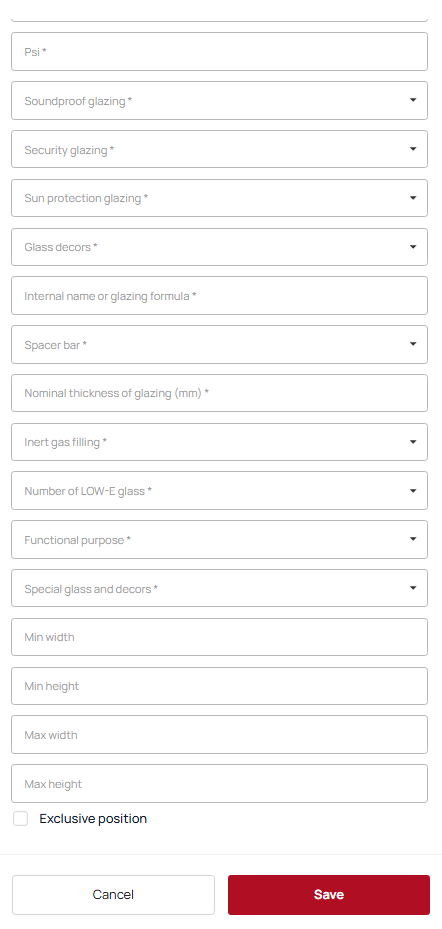
- After filling in the form, click the Save button.
- You will be redirected to the additional assortment page (in this case, to the double-chamber glass package page).
- The next step is to add the price. To do this, click the Edit button in the pricing block.
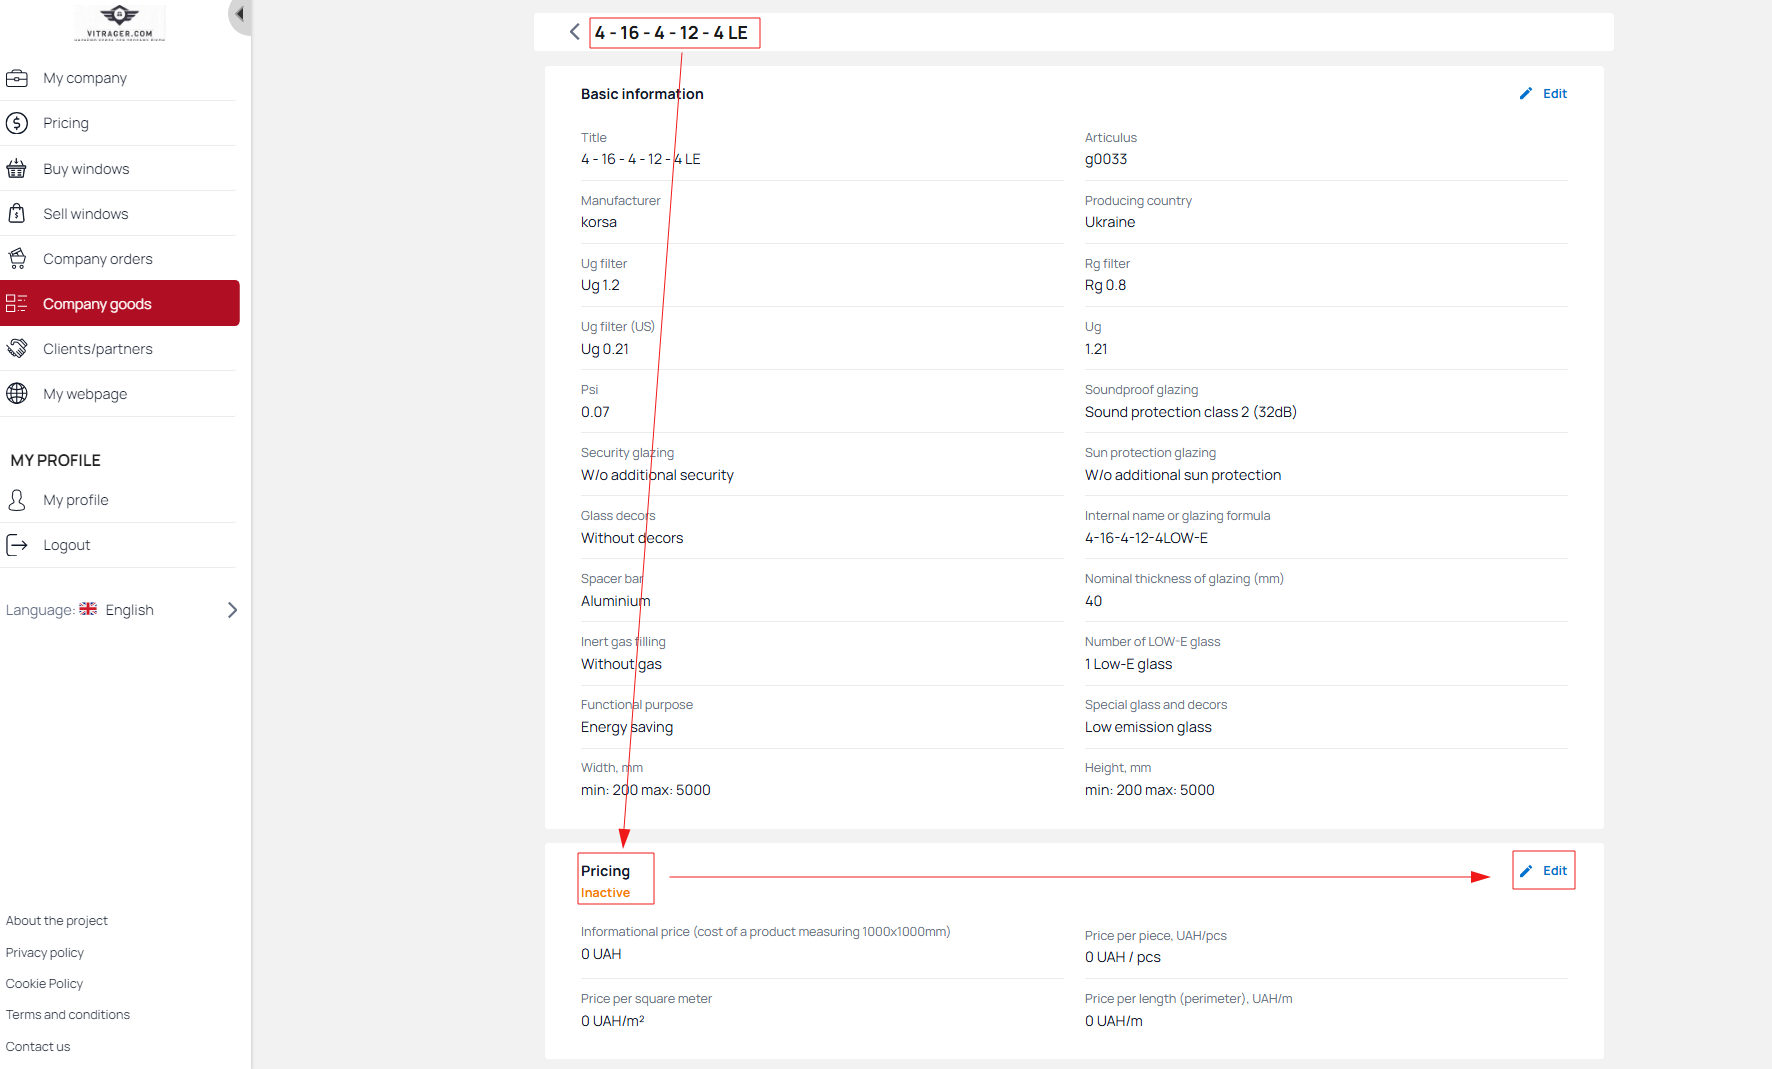
- On the price editing page, there are three options for setting the price:
- Price per unit of goods
- Price per square meter
- Price per length (meaning per perimeter)
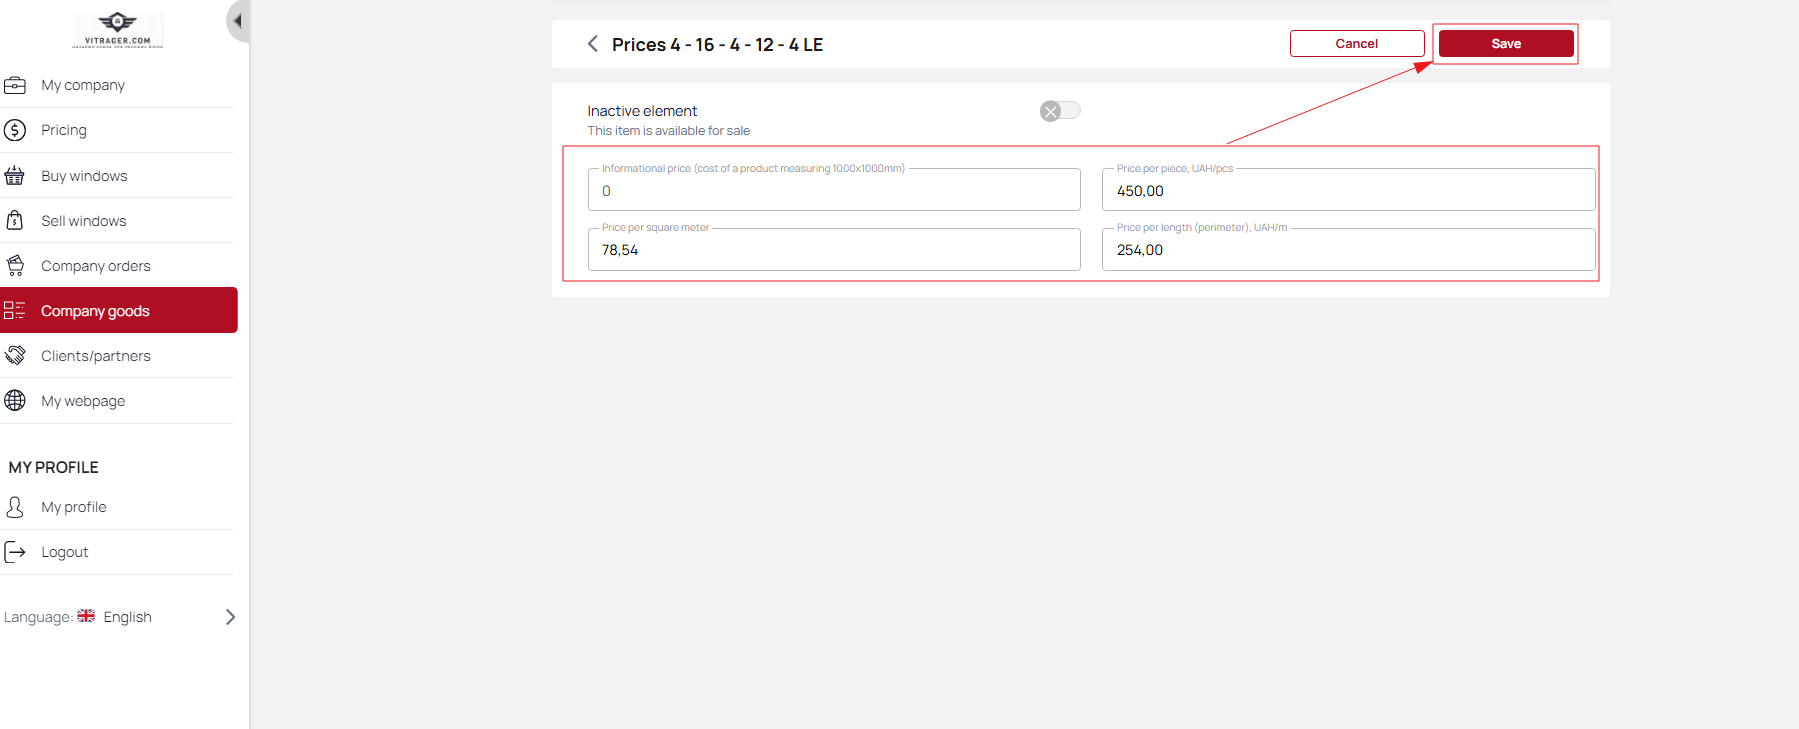
Please note that you can enter the price for one item or for all items. However, it is recommended to fill in all parameters for accurate calculation.
Please note that you do not need to enter anything in the information price field. This field will be filled in automatically after saving the price.
- After entering the price, click the Save button.
- Next, to activate the product, you need to enable it by clicking the switch.

- To configure the description and translations, go to the Customer Information section and click the Edit button.
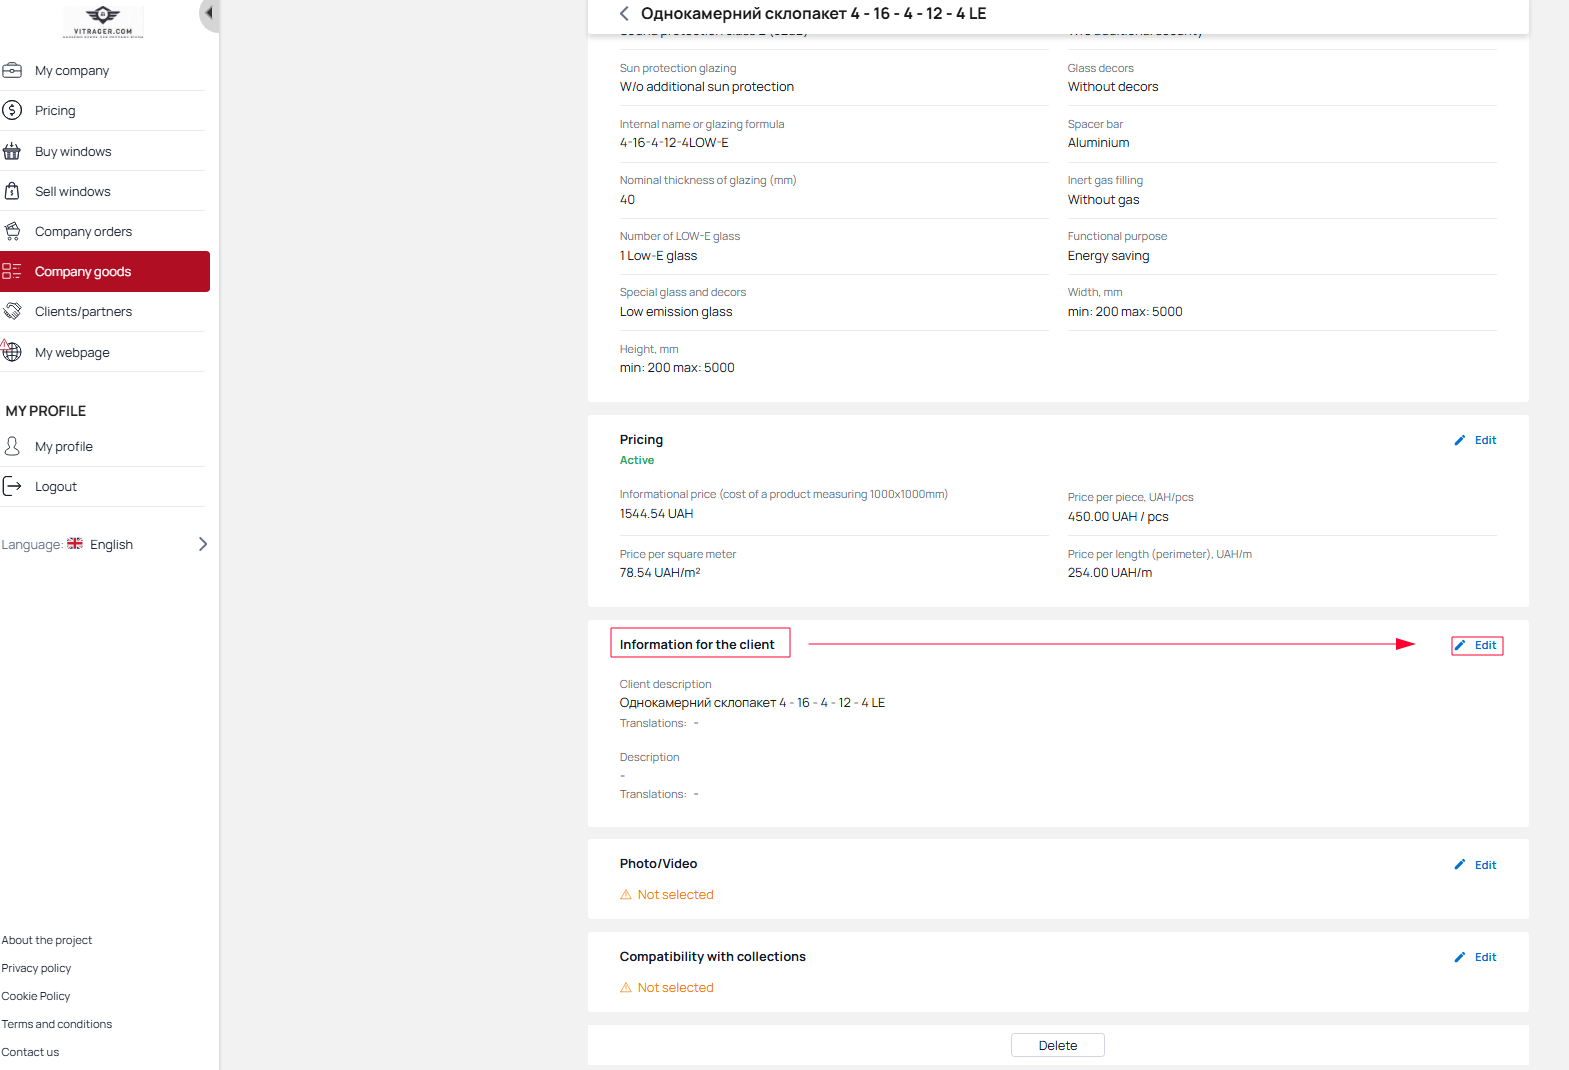
The Customer Information page contains:- A block for editing the name and adding translations into other languages. To edit the name, click the Edit button. To add a translation, click Translations for foreign language users. If you need to edit an added translation, click the flag icon.
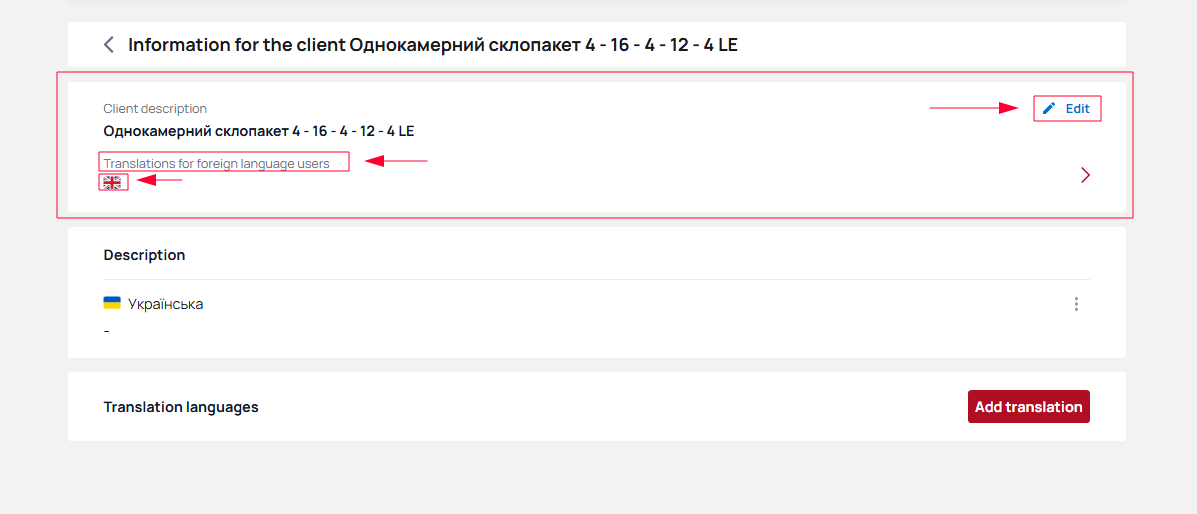
- Description block - to add/edit a description, click on the three dots and select Edit.
- Description translation block - to add translations for the description, click the Add translation button, select the translation language from the list in the modal window, and add the text.
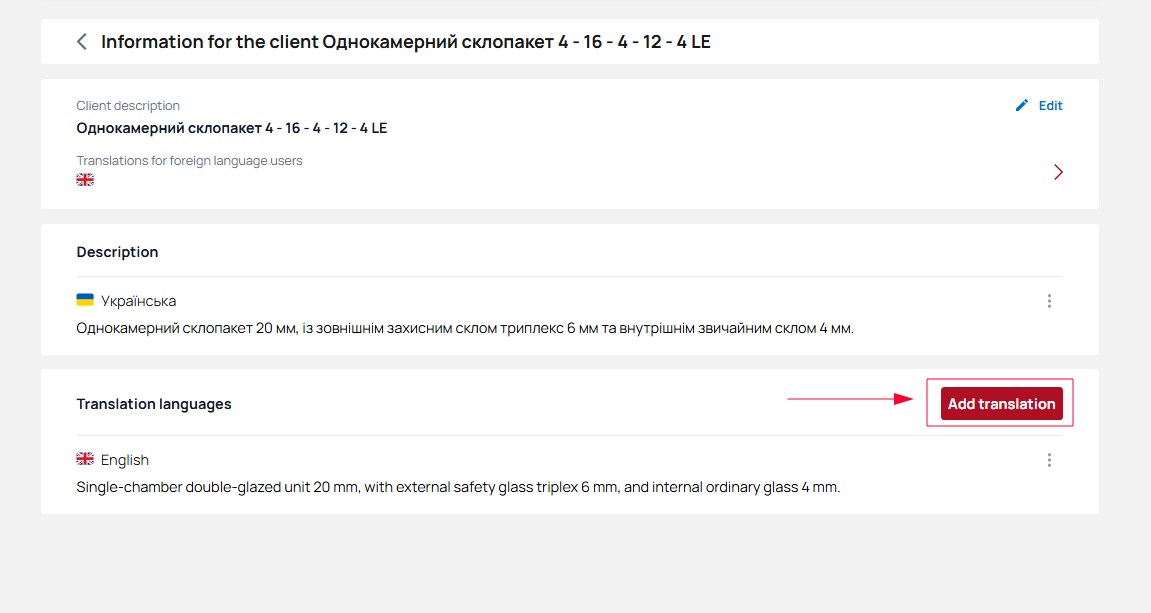
- A block for editing the name and adding translations into other languages. To edit the name, click the Edit button. To add a translation, click Translations for foreign language users. If you need to edit an added translation, click the flag icon.
- To add/edit photos and videos, go to the Photos/Videos section and click the Edit button.
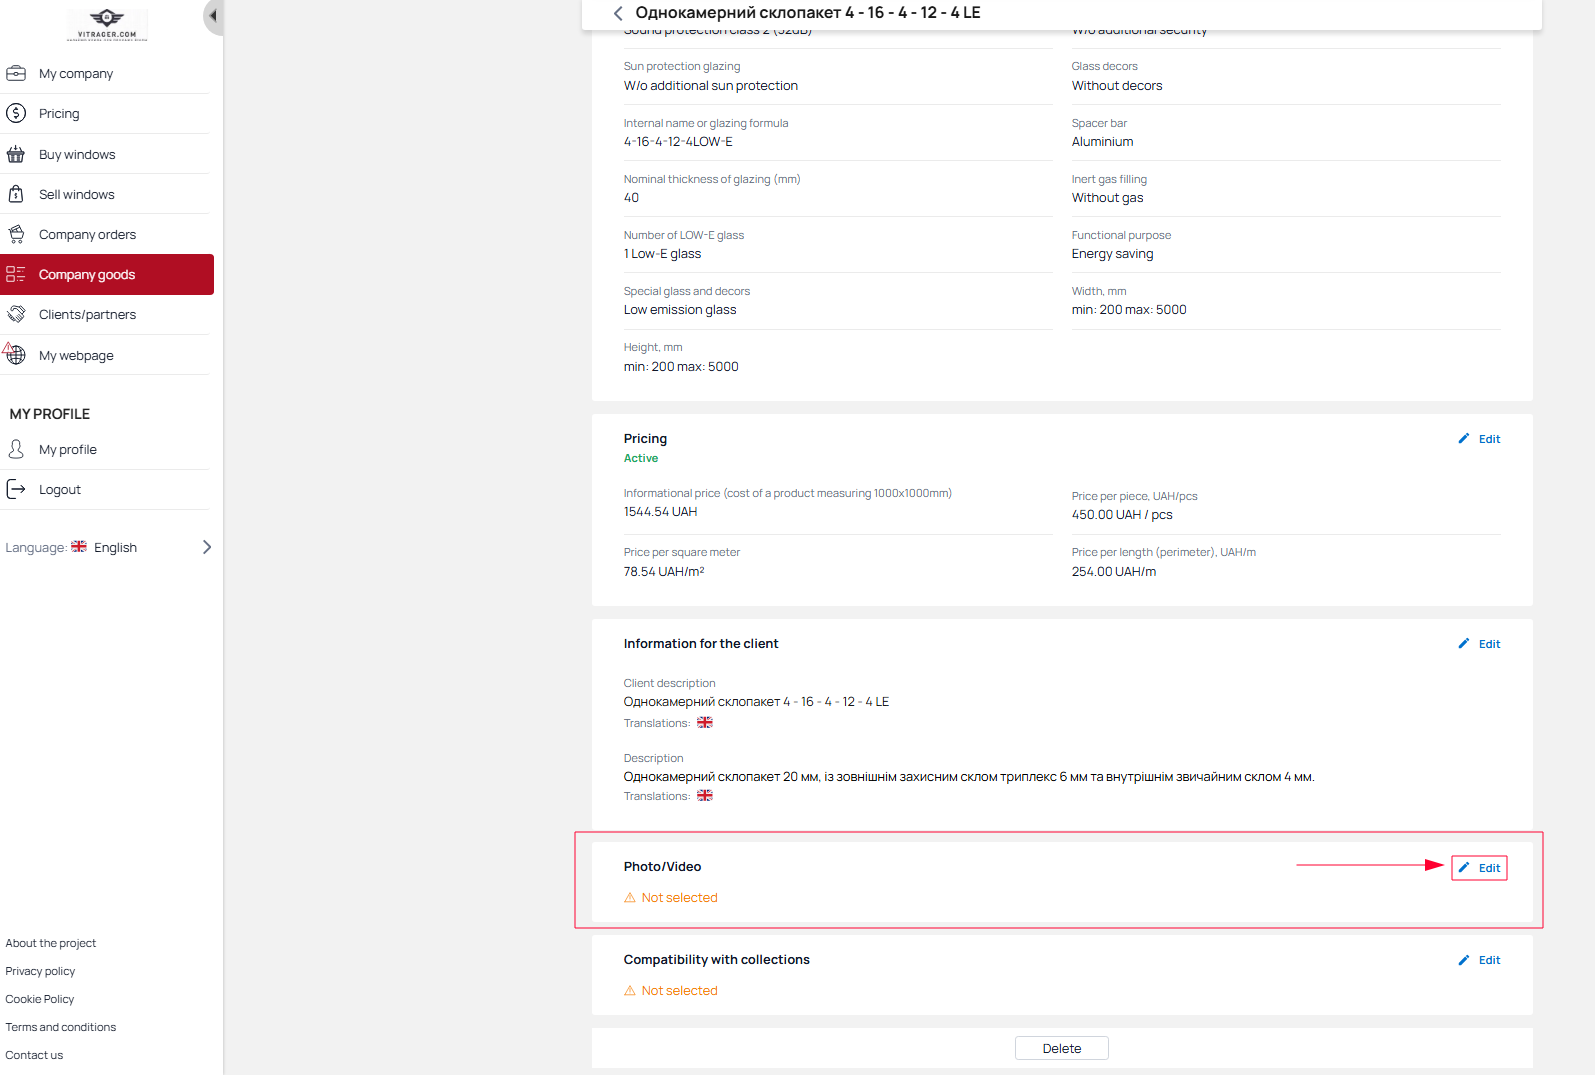
To add a photo, click the Add photo button and upload the desired photo by selecting it on your device. After uploading the photo, you can configure the title, alt, description, and translations of the description. After adding, click the Save button.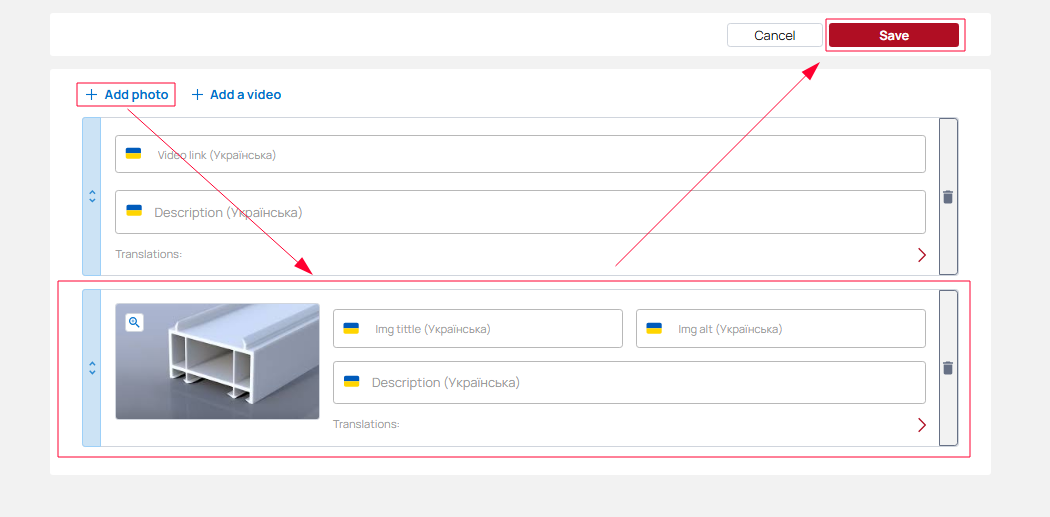
To add a video, click the Add Video button. In the block that appears, add a link to the video (the link must begin with https://). You can also add a description and translations for the video. After adding, click the Save button.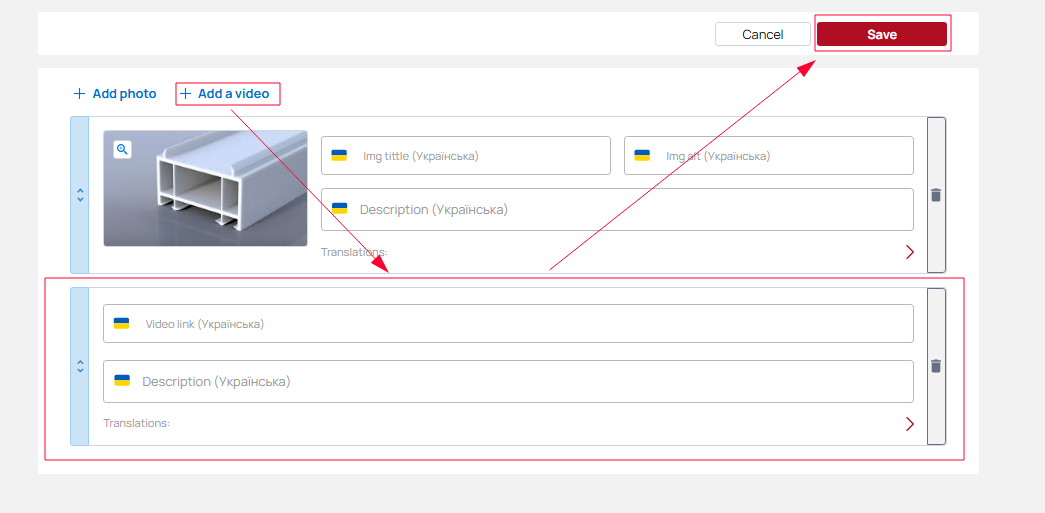
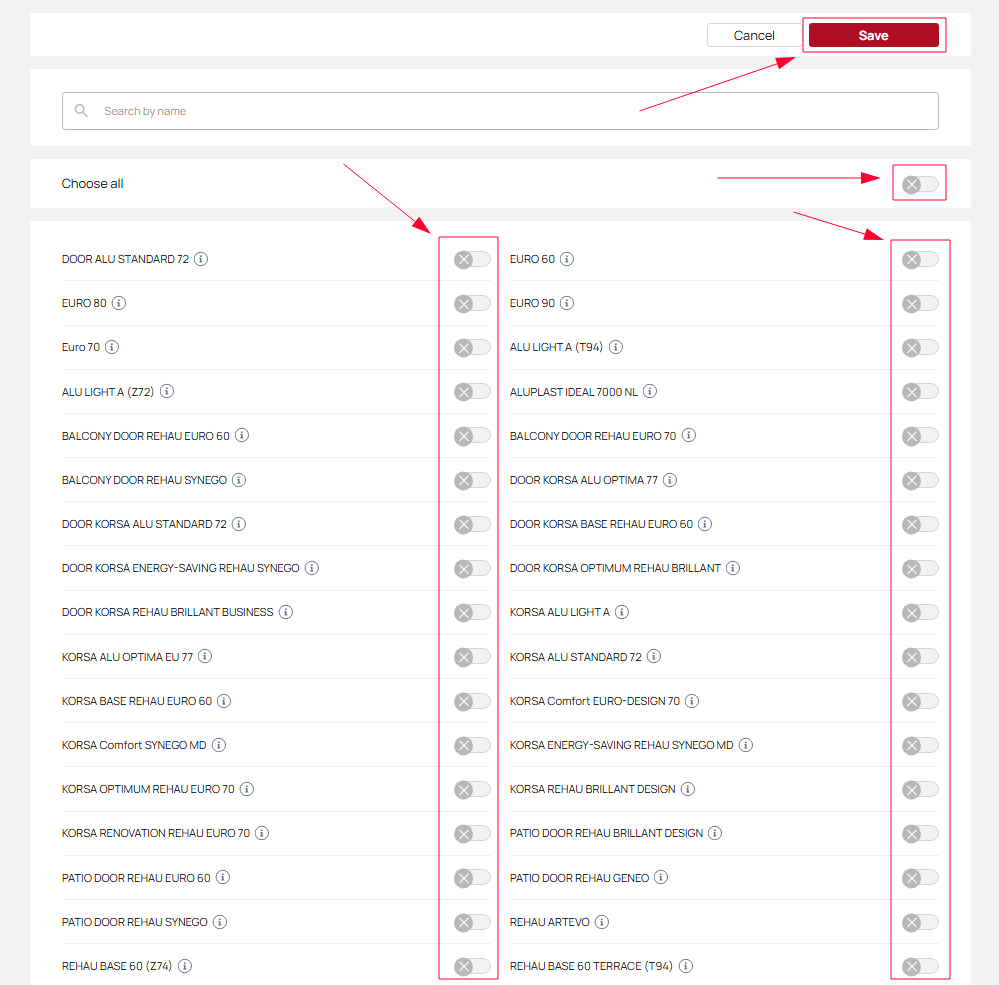
- To make the added additional assortment available in collections, you need to configure compatibility. To do this, go to the Compatibility with collections block and click the Edit button.
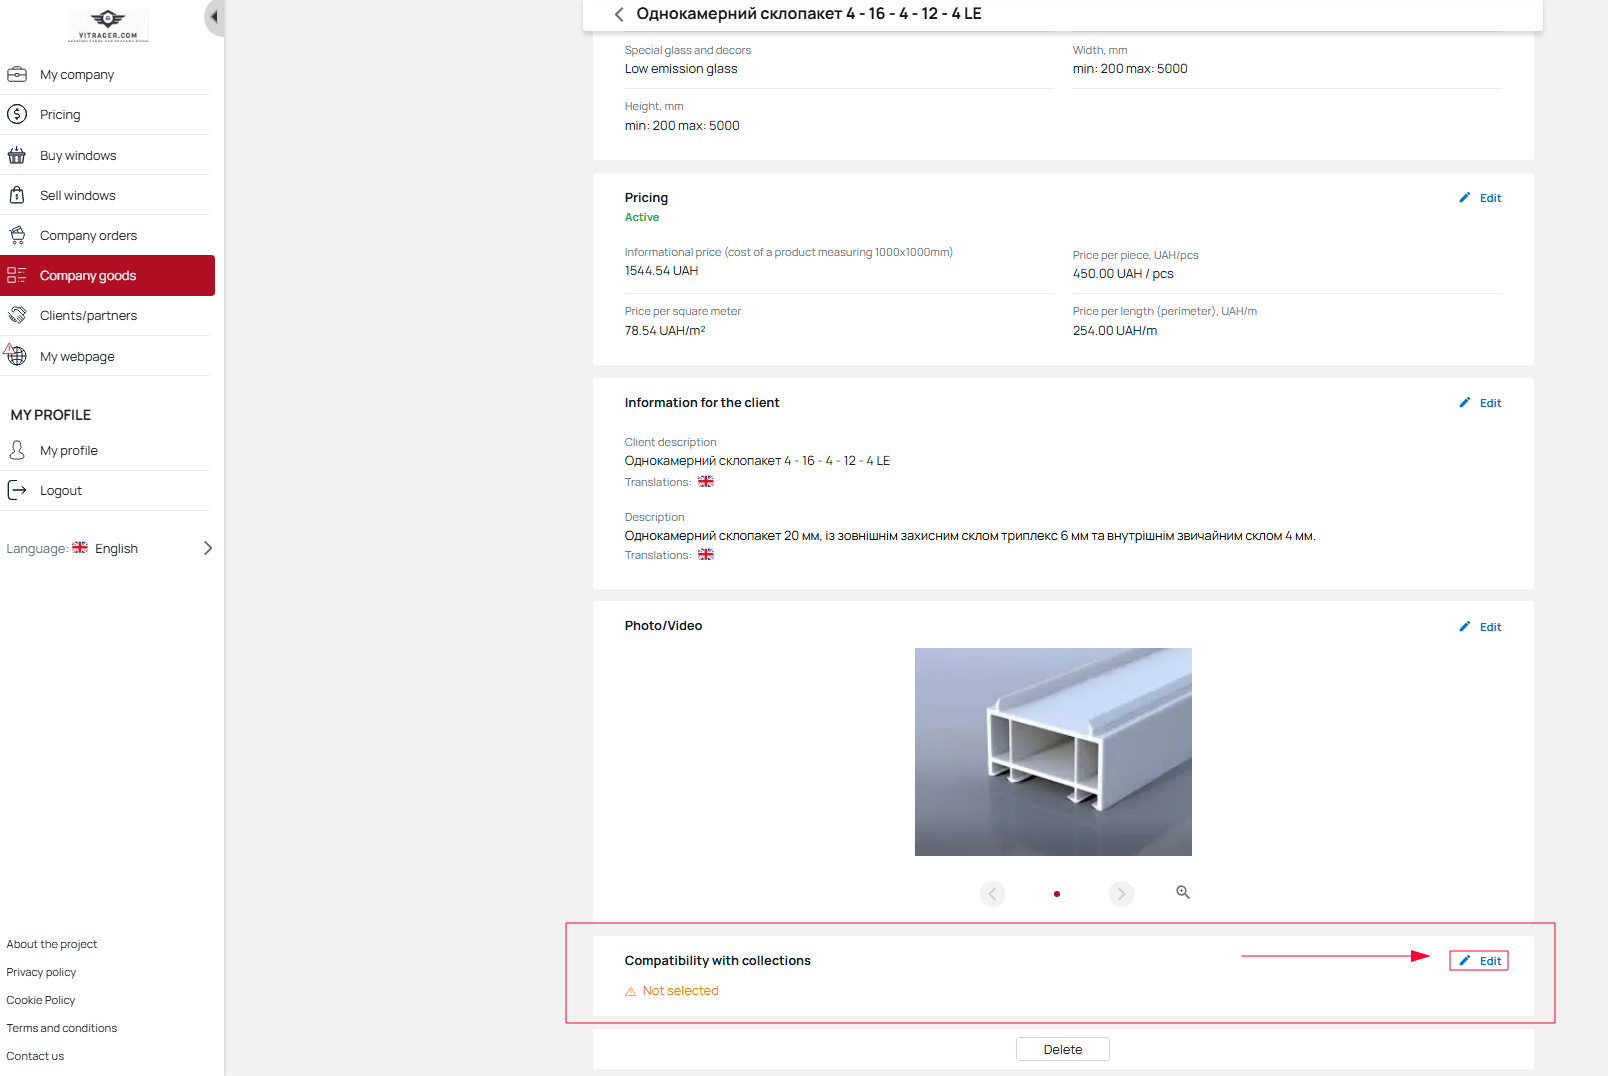
- On the compatibility page, use the switches to select the collections for which this assortment will be available. If you need to select all collections, click the Select All switch. After selecting the collections, click the Save button. For a quick search of the desired collections, there is a field for entering the collection name.
- If you need to delete this product, click the Delete button at the bottom of the page.
List of necessary items for the collections:
- For window collections:
- Double-glazed windows
- Handles
- Imosts
- Burglary protection
- For door collections:
- Double-glazed windows
- Handles
- Imosts
- Locks
- Thresholds
- Burglary protection
- Hinges
- Horizontal/vertical connectors
Calculation of construction costs
To calculate the cost of structures, we use your price list for basic templates and the interpolation method. The resulting price is almost identical to the calculated material costs.
To create a price grid, you take the minimum and maximum permissible dimensions for each template separately and calculate prices in this range with the selected step (the price grid step does not have to be uniform).
Ten points in height and ten in width are sufficient for an accurate calculation (the greater the number of calculation points, the more accurate the resulting price will be). If it is not possible to manufacture a structure when certain sizes intersect, this pair of sizes (height + width) is omitted.
In most designs, the user can independently divide any part of the block with an impost (add a jumper) and add an opening in the desired place, allowing them to achieve the desired window configuration.

When calculating, the program focuses on the existing design template that is closest to the resulting design (without opening).
The AI then analyzes all existing openings in the design and adds their cost, based on calculations using your templates. All calculations are performed according to the actual dimensions of the opening area.
The more templates (price grids) you upload, the more accurate the prices will be and the faster the calculation will be. The complete list of available templates has been compiled based on many years of experience and is the most optimal.
Prices are uploaded separately for each collection (profile system).
To upload, you need to know the ID of your collection and the ID of the templates for which you will be uploading prices. To find them, go to the “Prices” section in the corresponding collection (they are written on the template for each template). The template ID is the same for all collections of the corresponding product type.
The price grid that is loaded is the cost of such a design in the selected configuration.
Each product type has a list of options that the user can change when creating the desired design. The options selected by default must be included in the price that is loaded. They are defined in the “Basic collection parameters” section.
In terms of the system, all collection options are elements of the “additional assortment” or “company colors” — they must be created in advance to fill the collection.
When the user replaces one of the design elements with an alternative, the program subtracts the cost of the base element and adds the cost of the selected one (the list of available elements for each option must be configured in the “Collection colors” and “Collection compatibility” sections). The main options are double-glazed windows, handles, imposts, etc.
Full list of options:
For window collections and sliding systems:
- Default collection colors (profile, base, and seal colors)
- handle
- transom
- double-glazed window
- burglar-proof
For balcony doors:
- Default collection colors (profile, base, and seal colors)
- handle
- impost
- glass unit
- burglar-proofing
- threshold
- horizontal connector
- vertical connector
For entrance doors:
- Default colors of the collection (color of the profile, base, and seal)
- handle
- glass unit
- hinges
- lock
- threshold
- horizontal connector
- vertical connector
- impost
For interior doors:
- Default colors of the collection (color of the profile, base, and seal)
- handle
- glass unit
- hinges
- lock
- threshold
- імпост
Price upload
To learn more about the price upload feature and the description of the upload file format, visit these pages:


Prices for additional assortment
The additional assortment is divided into two options based on the cost calculation principle:
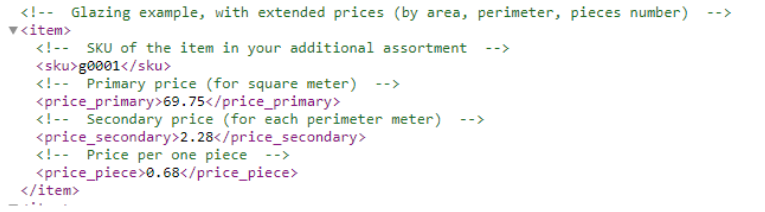
- Category: Double-glazed windows. The resulting price consists of three parts
- price per area (price_primary)
- price per perimeter (price_secondary)
- price per unit (price_piece)
- An example of such an item in the file (item number on the portal and three prices):
- All other categories currently have only one price per unit of measurement. An example of such an item in the file (item number on the portal and price):

Prices for the entire additional assortment can be downloaded in a single file. Prices change only for the assortment present in the file, i.e., the file may contain only those items for which there are changes. Example of the resulting file:
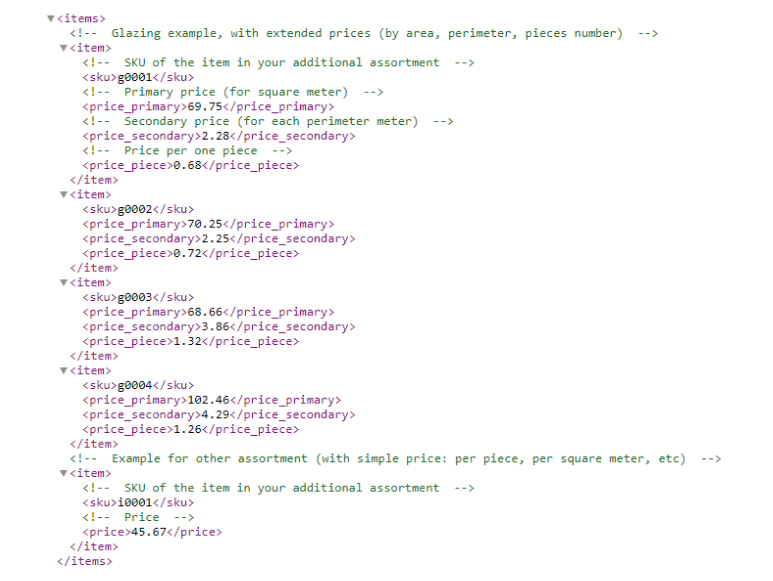
The system has a concept of a “derivative glass unit” — the main purpose of its creation is to simplify price administration. That is, there is a basic glass unit with its own prices per area, perimeter, and unit. There can be many derivatives of this basic unit, where prices per area and perimeter are calculated by a coefficient to the prices of the basic glass unit, and each has its own price per unit. Please note that if there are “derived” glass units in the list when loading prices, they will lose their connection to the base unit and become independent.
Color settings
Company colors are used when configuring company products. With their help, you can set the list of available colors. You can also configure pricing depending on the color.
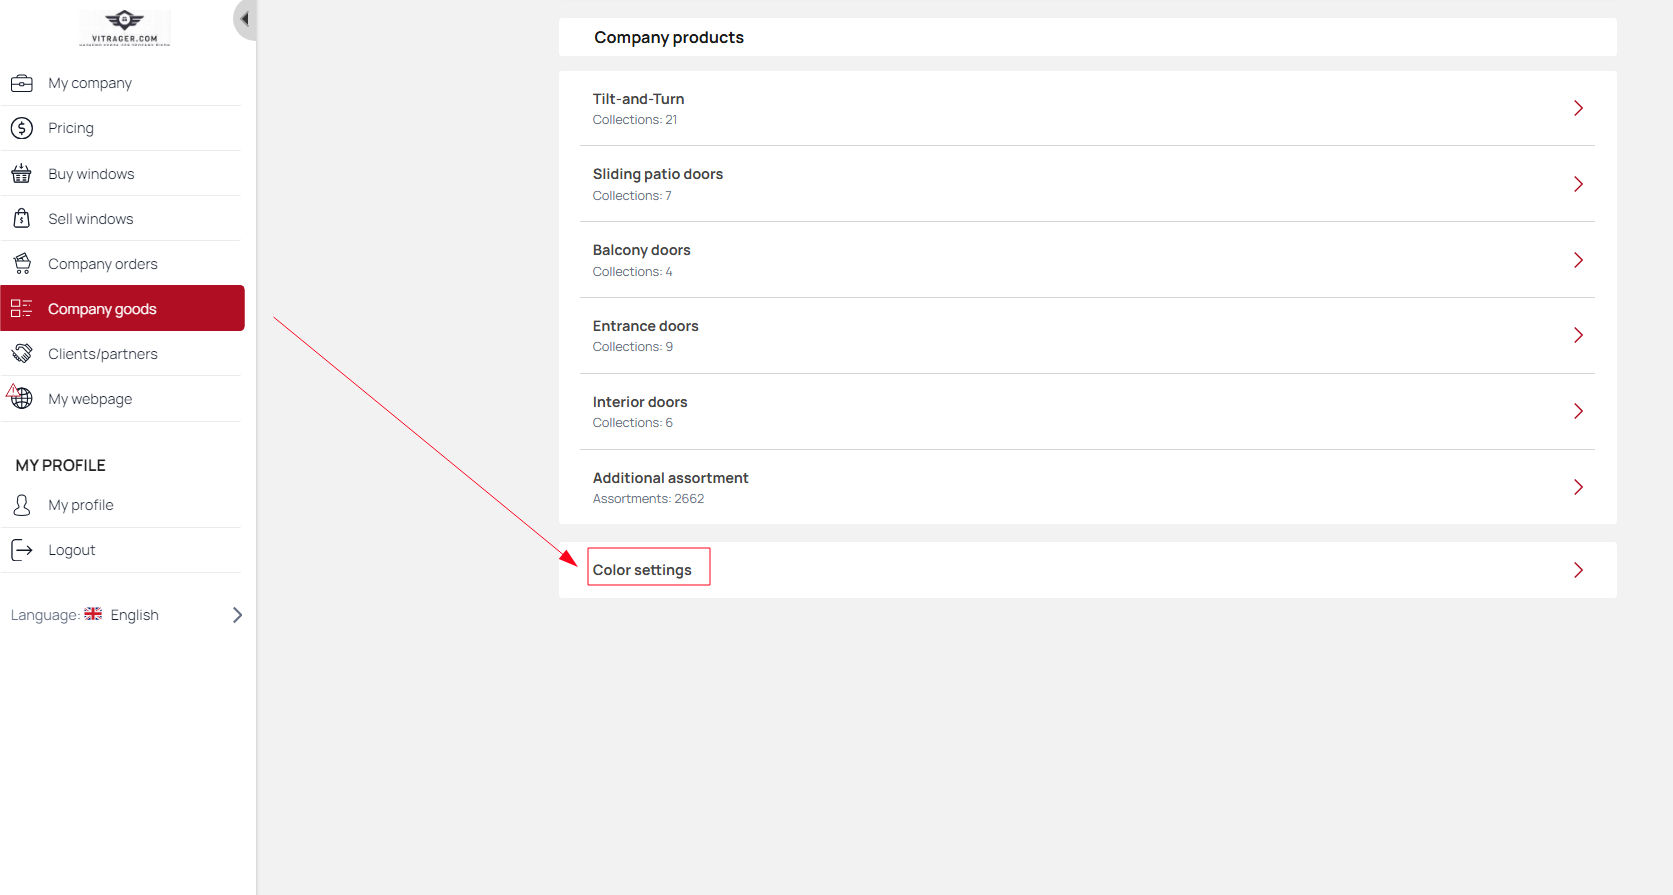
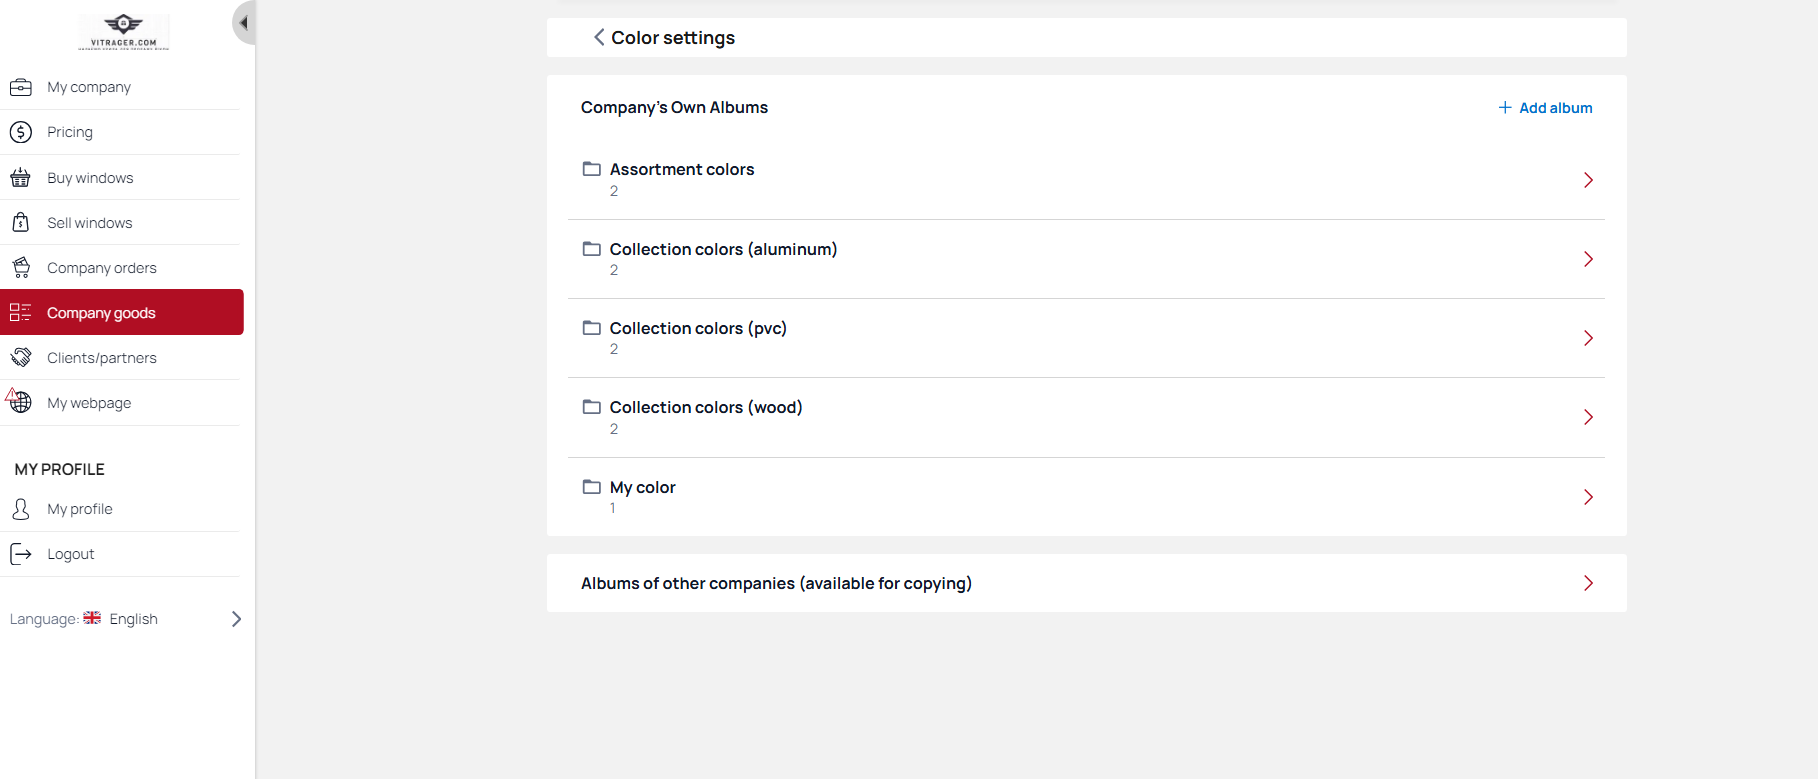
To configure colors, open the “Company Products” tab, then click on “Color Settings.” In this menu, you can see both your own albums and albums from other companies that have granted you access to their albums. If you are a manufacturer, you can create your own colors and grant access to other companies.
Copy album
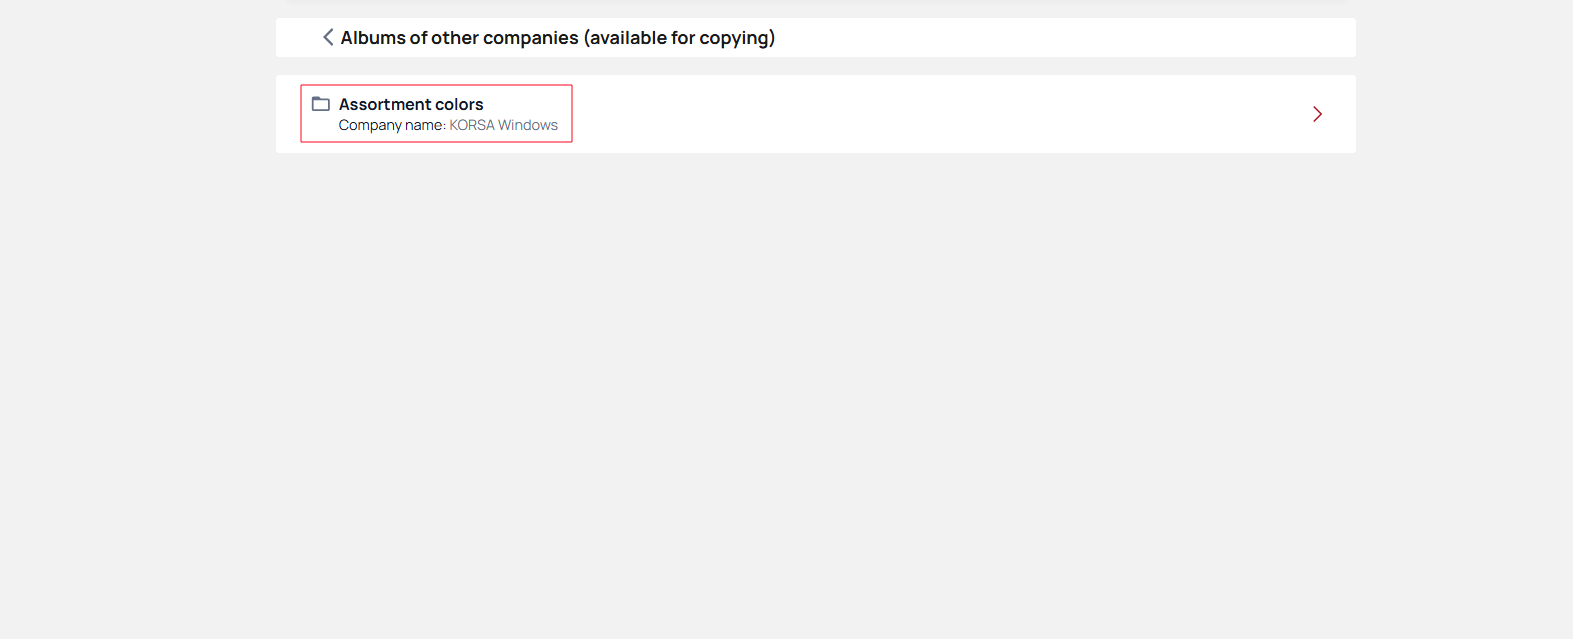
To copy an album with colors, go to the Albums page of other companies.
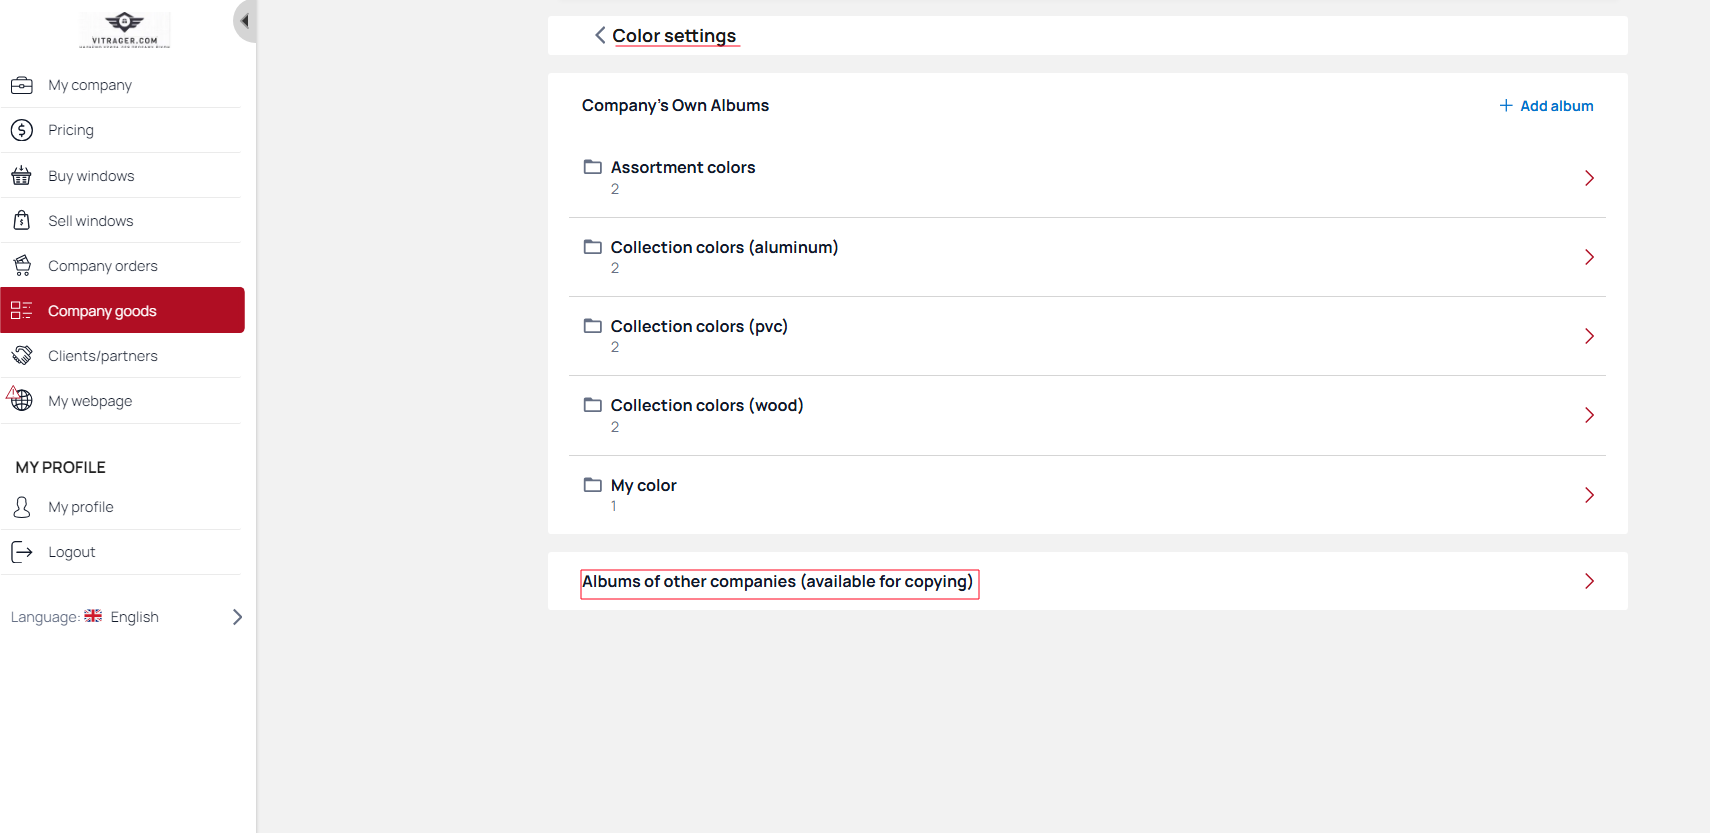
Select the desired album from the list and click on it.
You can view the colors on the album page. To display these colors, click the Copy Album button.
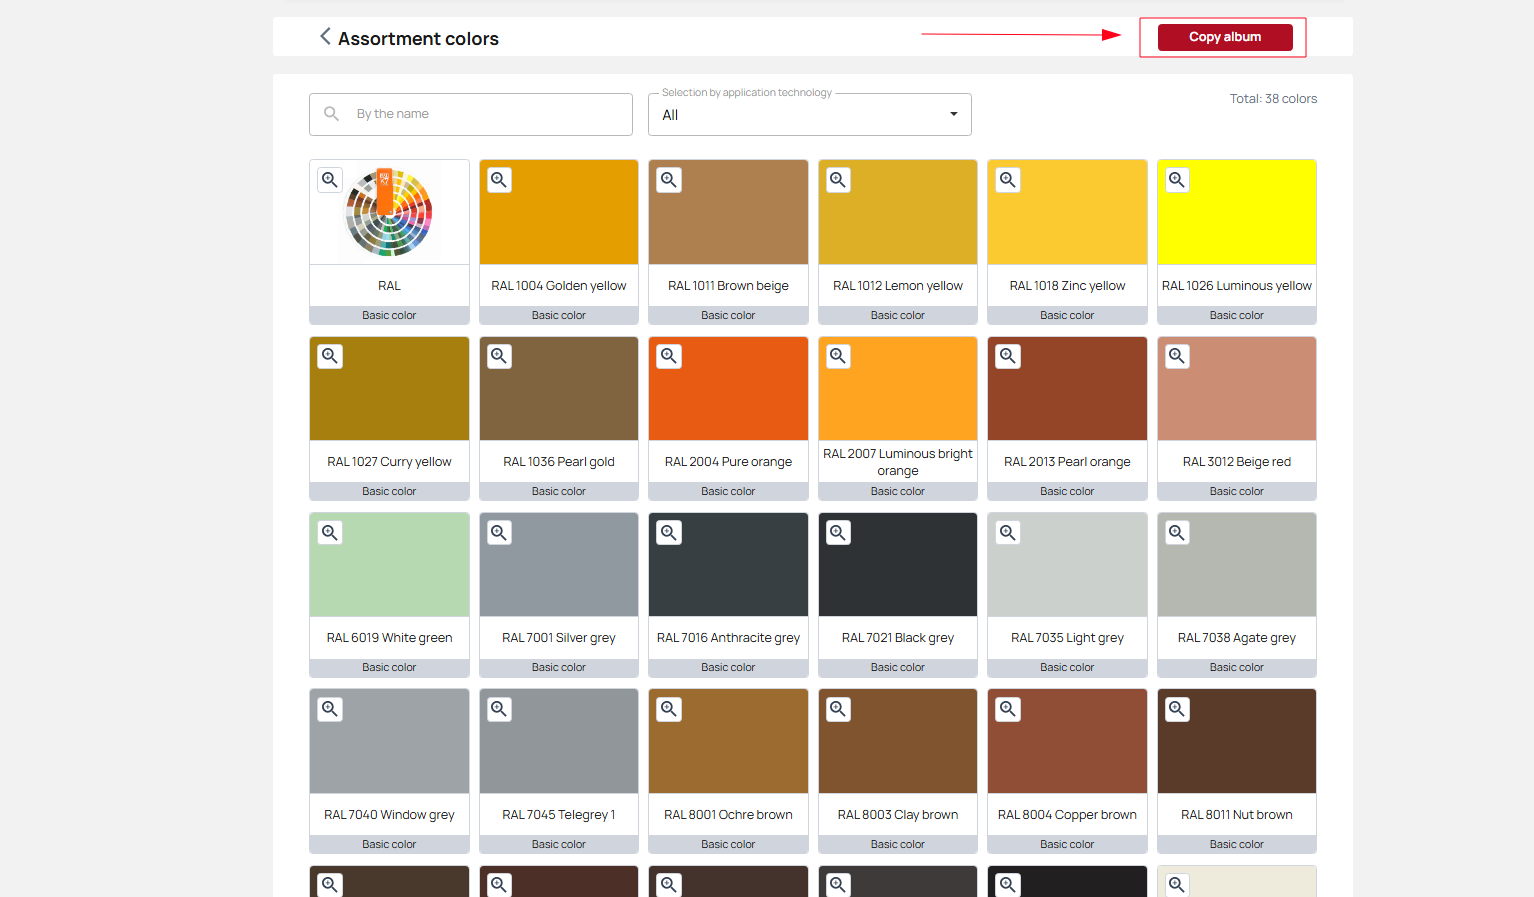
You can copy several colors (select the ones you need from the list) or all of them (by clicking Select All).
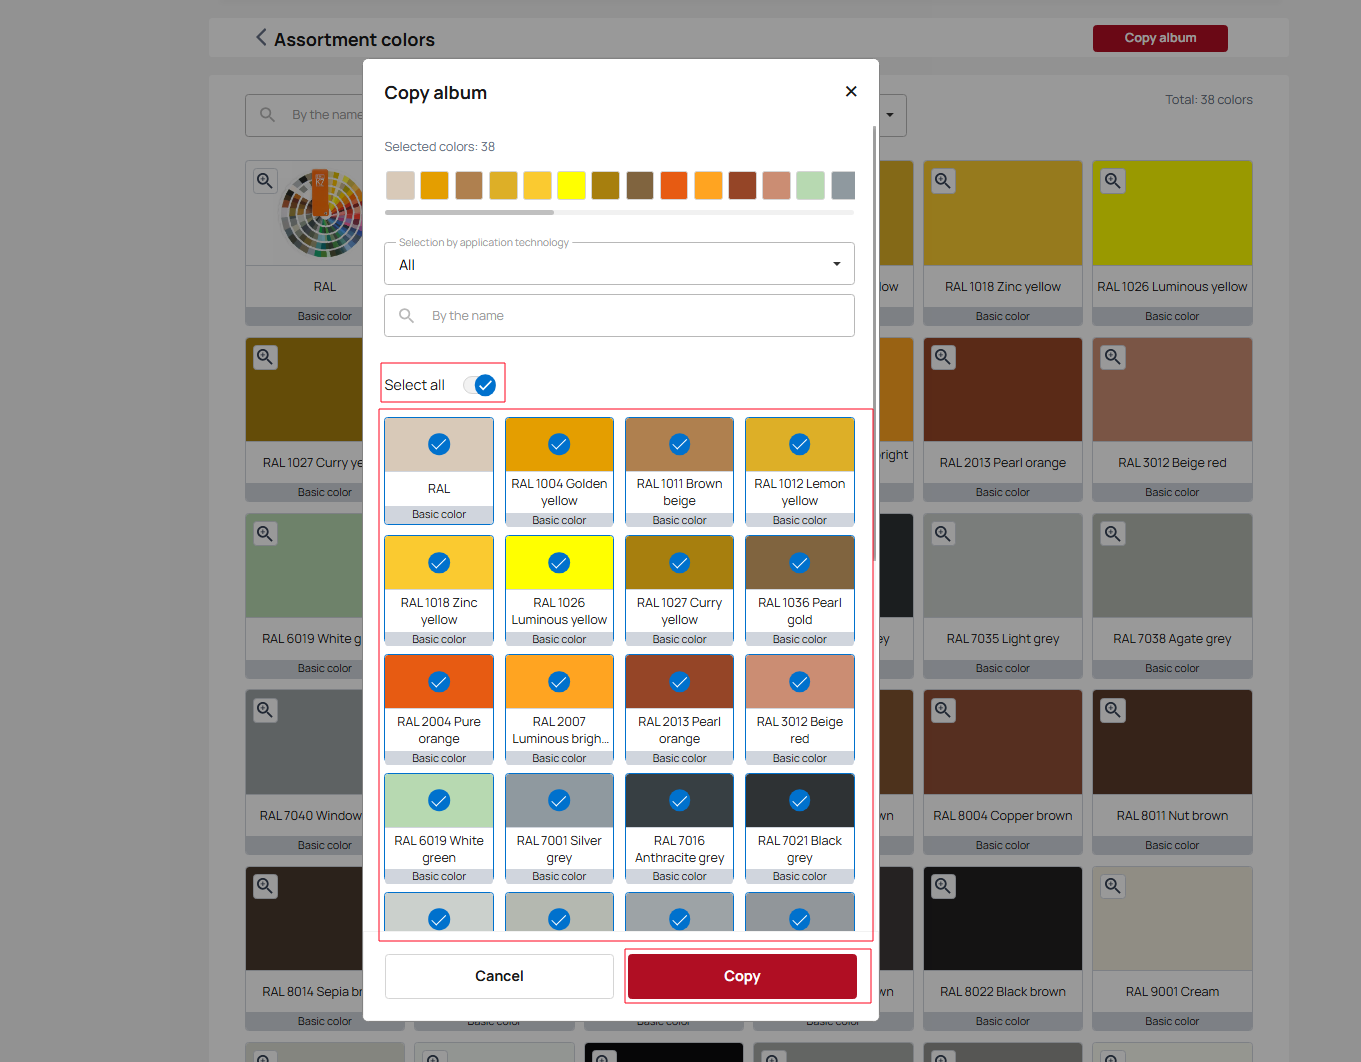
The album now appears in your album lists and is available for selection in collections.
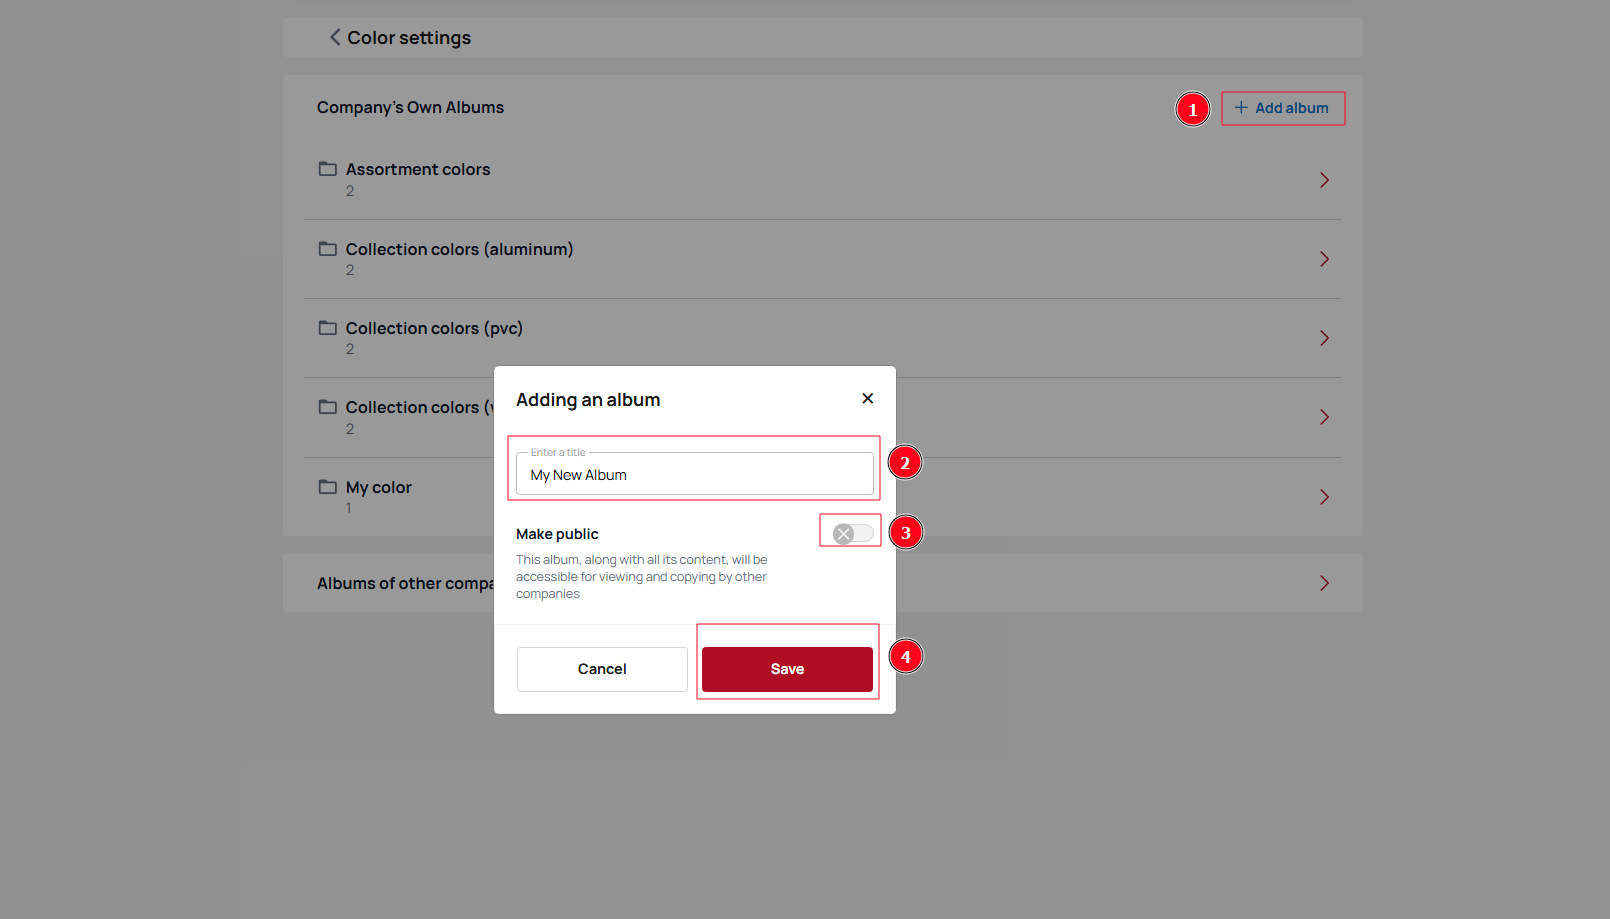
Add album
To create a new album to store your colors, follow these steps:
- Create an album: Click the “Add Album” button.
- Name the album: Enter the desired name for your new album.
- Set access: If you want other companies to be able to view and use the colors in this album, enable the “Access for other companies” option.
- Save changes: Click the “Save” button.
After creating an album, you can add, edit, and delete colors, change the album name, and search for colors by name or application technology. If necessary, you can delete the album using the corresponding button.
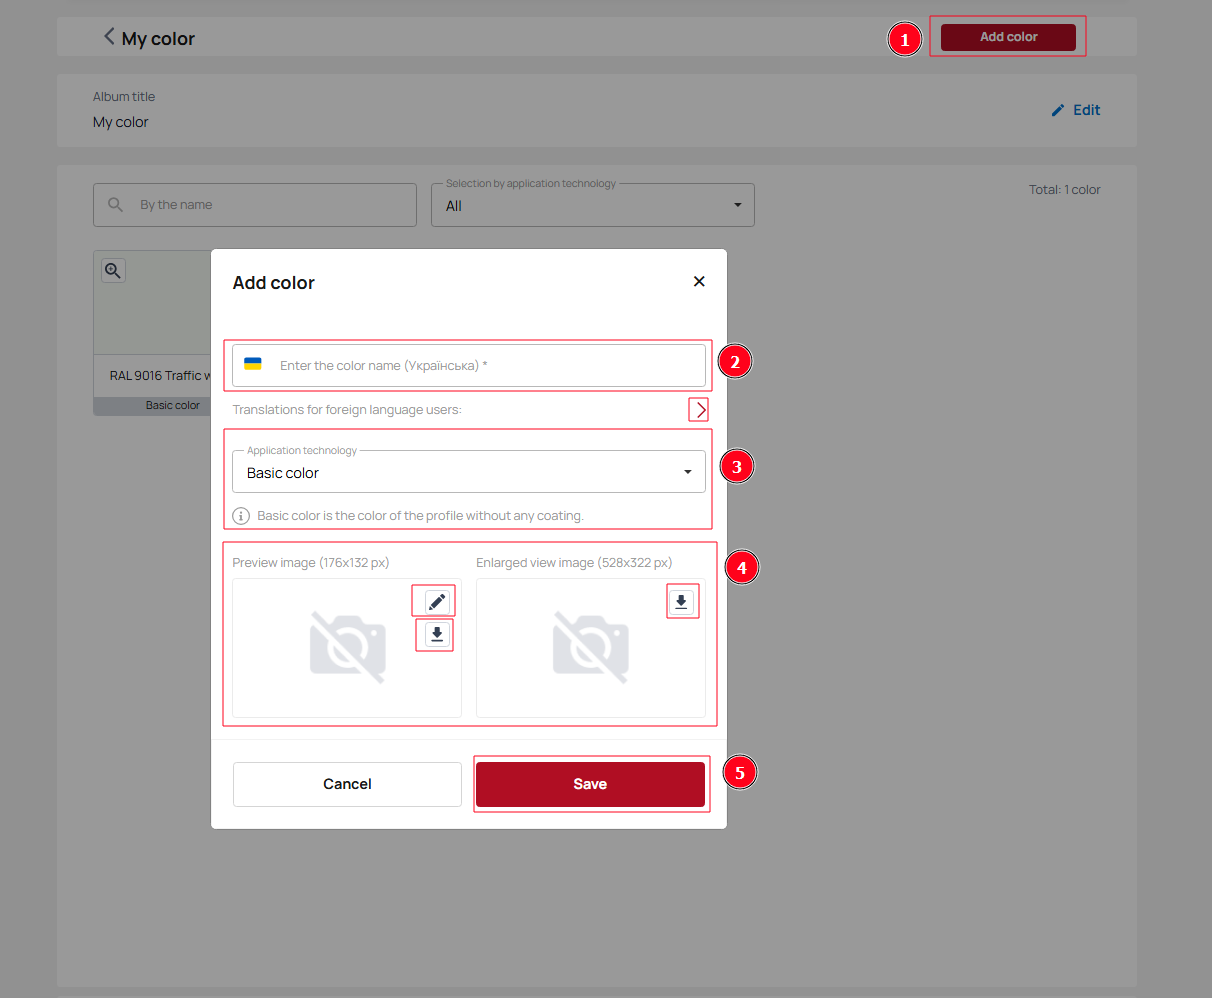
Adding colors
To add a new color to your palette, follow these steps:
- Create a new entry: Click the “Add color” button.
- Name the color: Enter the desired name for the new color. If your website has multiple language versions, add a translation of the name for each language.
- Select a technology: From the list of available application technologies, select the one that corresponds to your color.
- Add an image:
- Main image: Upload an image that visually represents the color. You can use your own image or select a color from the palette.
- Enlarged image: Add an enlarged image of the color for detailed viewing.
- Save changes: Click the “Save” button.